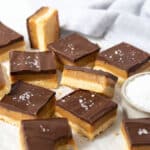
Caramel Slice
Salted caramel slice, made from scratch with simple pantry ingredients. These rich caramel bars feature a buttery shortbread base and gooey homemade caramel, all topped with a thick layer of luscious chocolate and a sprinkle of salt flakes. An Australian bakery favourite that is easy to make and impossible to resist!
Servings: 16
Calories: 310kcal
Ingredients
For the base
- 150 grams plain flour 1 cup, sifted (all-purpose flour)
- ½ cup desiccated coconut finely shredded
- 85 grams icing sugar ½ cup, sifted
- 125 grams butter melted
For the caramel filling
- 125 grams butter
- 1 x 395g can sweetened condensed milk 1 x 395 gram can (about 1 cup)
- 115 grams brown sugar ½ cup, firmly packed
- 2 tablespoons golden syrup
- salt flakes
For the chocolate layer
- 220 grams dark chocolate 45% cocoa, broken or chopped into small pieces
- 1 tablespoon vegetable oil
Instructions
For the base
- Preheat oven to 180°C/356F (fan-forced). Grease a 20 x 20cm (8 inch) square baking tin/cake tin with butter and line it with baking paper. Leave the sides longer to help remove the slice later.
- Place the flour, coconut, icing sugar and melted butter into a mixing bowl and stir until everything has combined. The mixture will be crumbly, but this is normal.
- Use the back of a spoon to firmly press the mixture into the prepared tin, to form an even layer.
- Bake for 12-15 minutes, until the base is lightly golden around the edges. Remove from the oven and set aside to cool while you make the caramel filling.
For the caramel filling
- Place the butter, sweetened condensed milk, brown sugar and golden syrup into a medium saucepan.
- Whisk the mixture continually over medium-low heat for 5-10 minutes until the caramel turns a light golden colour and thickens slightly.
- Once the caramel has thickened, pour it over the top of the shortbread base.
- Bake for a further 12-15 minutes, until the caramel turns golden brown on the edges. Remove from the oven and leave to cool for 20 minutes before adding the chocolate topping.
- Add a light sprinkle of salt flakes to the top of the caramel.
For the chocolate topping
- Place the dark chocolate and oil into a microwave-safe bowl and heat at medium (50% power) in 30 second intervals, stirring in between each interval, until melted and smooth.
- Spread the chocolate over the top of the caramel layer.
- Refrigerate for at least 2 hours, until the slice has set. Cut into pieces and serve or keep refrigerated until ready to serve. Serve with an additional sprinkle of salt flakes, if desired.
Notes
- Golden syrup is a thick, amber coloured syrup with a rich, toffee-like flavour. It is commonly used in baking in Australia and New Zealand and can be found in supermarkets or online. It is added to the caramel for richness. I don't recommend skipping this ingredient. If you can’t source it, leave it out or add another tablespoon of brown sugar or brown rice syrup (although the flavour won’t be quite the same).
- Sweetened condensed milk – the base of the caramel filling. It adds sweetness and richness and gives the caramel its gooey texture. Be sure to use sweetened condensed milk (rather than unsweetened) and make sure it is the regular, full-fat version. Low-fat or light condensed milk products won’t set as nicely and the filling will be runny and difficult to slice.
- Heat the caramel on medium-low heat. The caramel should thicken in 5-10 minutes and it can be tempting to increase the heat to speed up the process. But if the temperature is too high, the mixture can burn and cause pieces of burnt caramel to be visible throughout slice. The caramel can also catch and burn on the bottom of the pan, so continual whisking or stirring is important.
- Line the slice tray with baking paper and leave the sides overhanging to assist you in removing the slice at the end.
- You can use less chocolate on top if you prefer a thinner layer.
- Be sure to let each layer cool before adding the next, so you end up with 3 even layers.
- Sea salt flakes really enhance the chocolate flavour and balance the sweetness of the slice. I don’t recommend skipping it! Add a little sprinkle to the caramel layer before adding the chocolate for little bursts of salt to balance the sweet slice.
- Freezing; Caramel slice can be frozen for up to 3 months. But be sure to wrap it well (individual pieces are easiest) and store it in an airtight container. Thaw the slice completely in the fridge or at room temperature when you are ready to eat it.
- Storage; Store the slice in an airtight container in the fridge for up to 5 days. It can be eaten straight from the fridge, or brought back to room temperature before serving.
- While the slice can be cut into pieces of desired size, please note that the nutrition information is based on the slice being cut into 16 pieces, with one piece being one serve. The nutritional information is an estimate only and does not take into account any additional toppings or sides served with the slice.
- This recipe is made using Australian cups and spoon measurements. Due to cup sizes varying from country to country, I advise adjusting if necessary.
Nutrition
Calories: 310kcal | Carbohydrates: 28g | Protein: 3g | Fat: 21g | Saturated Fat: 13g | Polyunsaturated Fat: 1g | Monounsaturated Fat: 5g | Trans Fat: 1g | Cholesterol: 34mg | Sodium: 107mg | Potassium: 136mg | Fiber: 2g | Sugar: 18g | Vitamin A: 396IU | Vitamin C: 0.04mg | Calcium: 22mg | Iron: 2mg