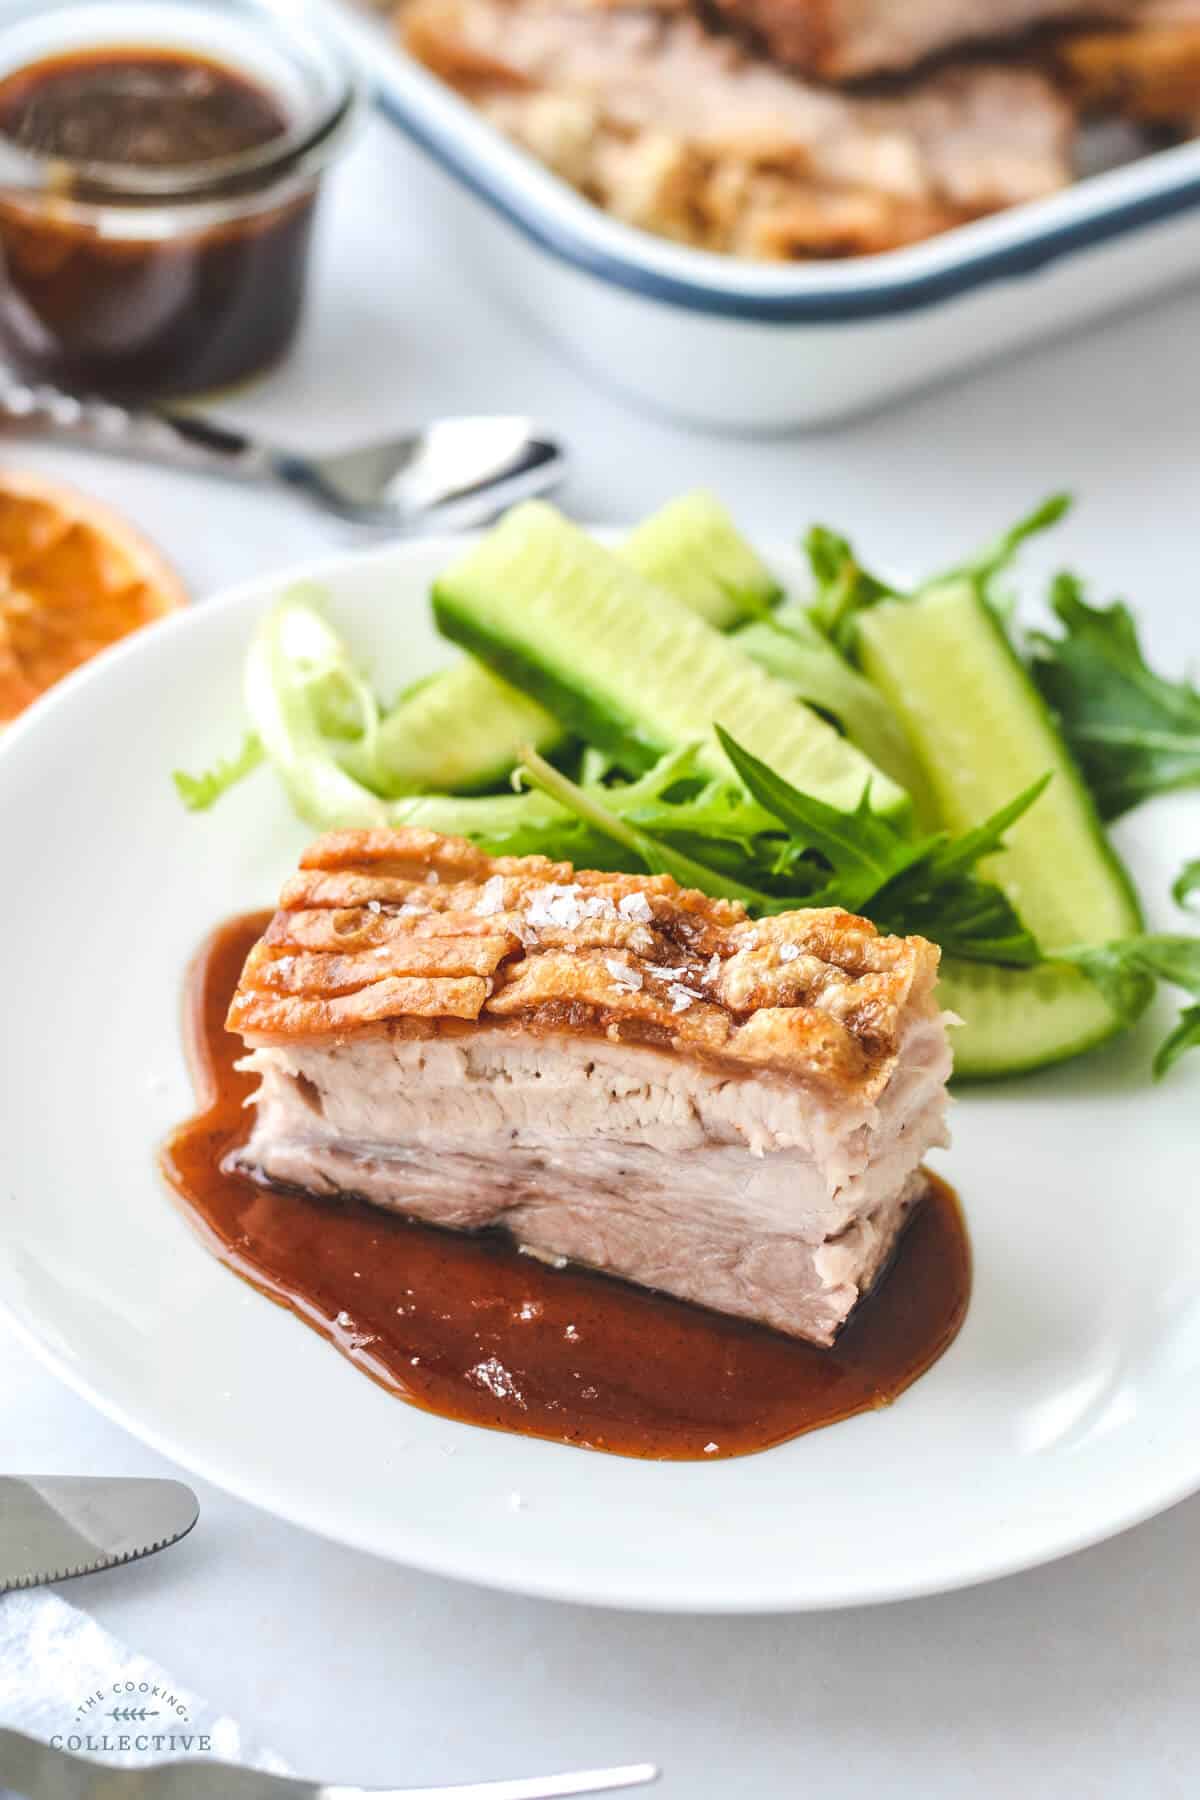
This slow cooked pork belly is simple, fool-proof and completely delicious! Twice-cooking the pork makes it succulent and fall-apart tender, with the perfect, crispy crackling. Served with a sticky, spiced citrus sauce and your choice of sides, it is guaranteed to impress. And it is much easier to make than you’d think!
Why you’ll love this recipe
- Slow cooking the pork belly renders the fat to make the meat incredibly succulent and melt-in-your-mouth tender
- Perfect, crunchy, salty and crispy pork crackling
- So delicious and full of aromatic spices
- A “wow factor” dinner with minimal effort
- Versatile. Carve it up for a Sunday roast, or pull it apart with two forks and serve it in tacos, burgers with an Asian inspired slaw, nachos or whatever you like!
Ingredients you will need
** This post contains tips and instructions to achieve the best possible results. The photo above is a great guide for when you are in the supermarket, but for full ingredient quantities and methods, please scroll down to the detailed recipe card below!
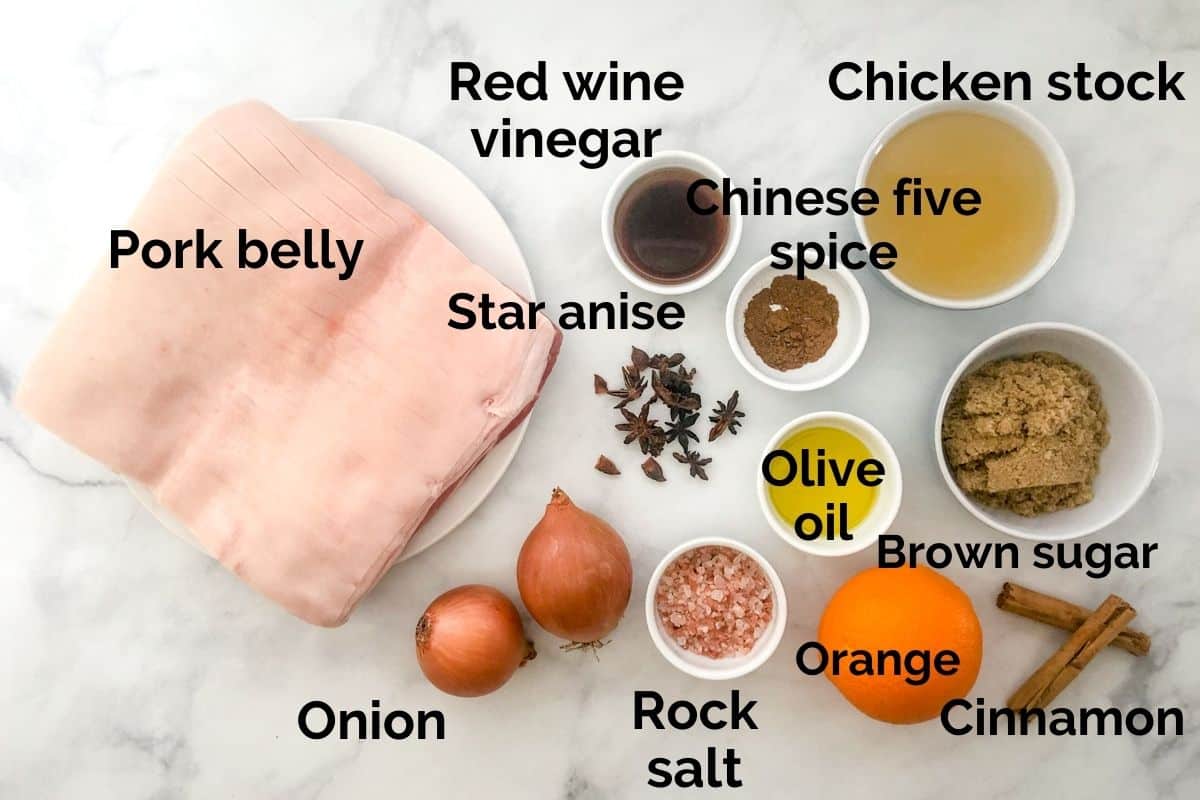
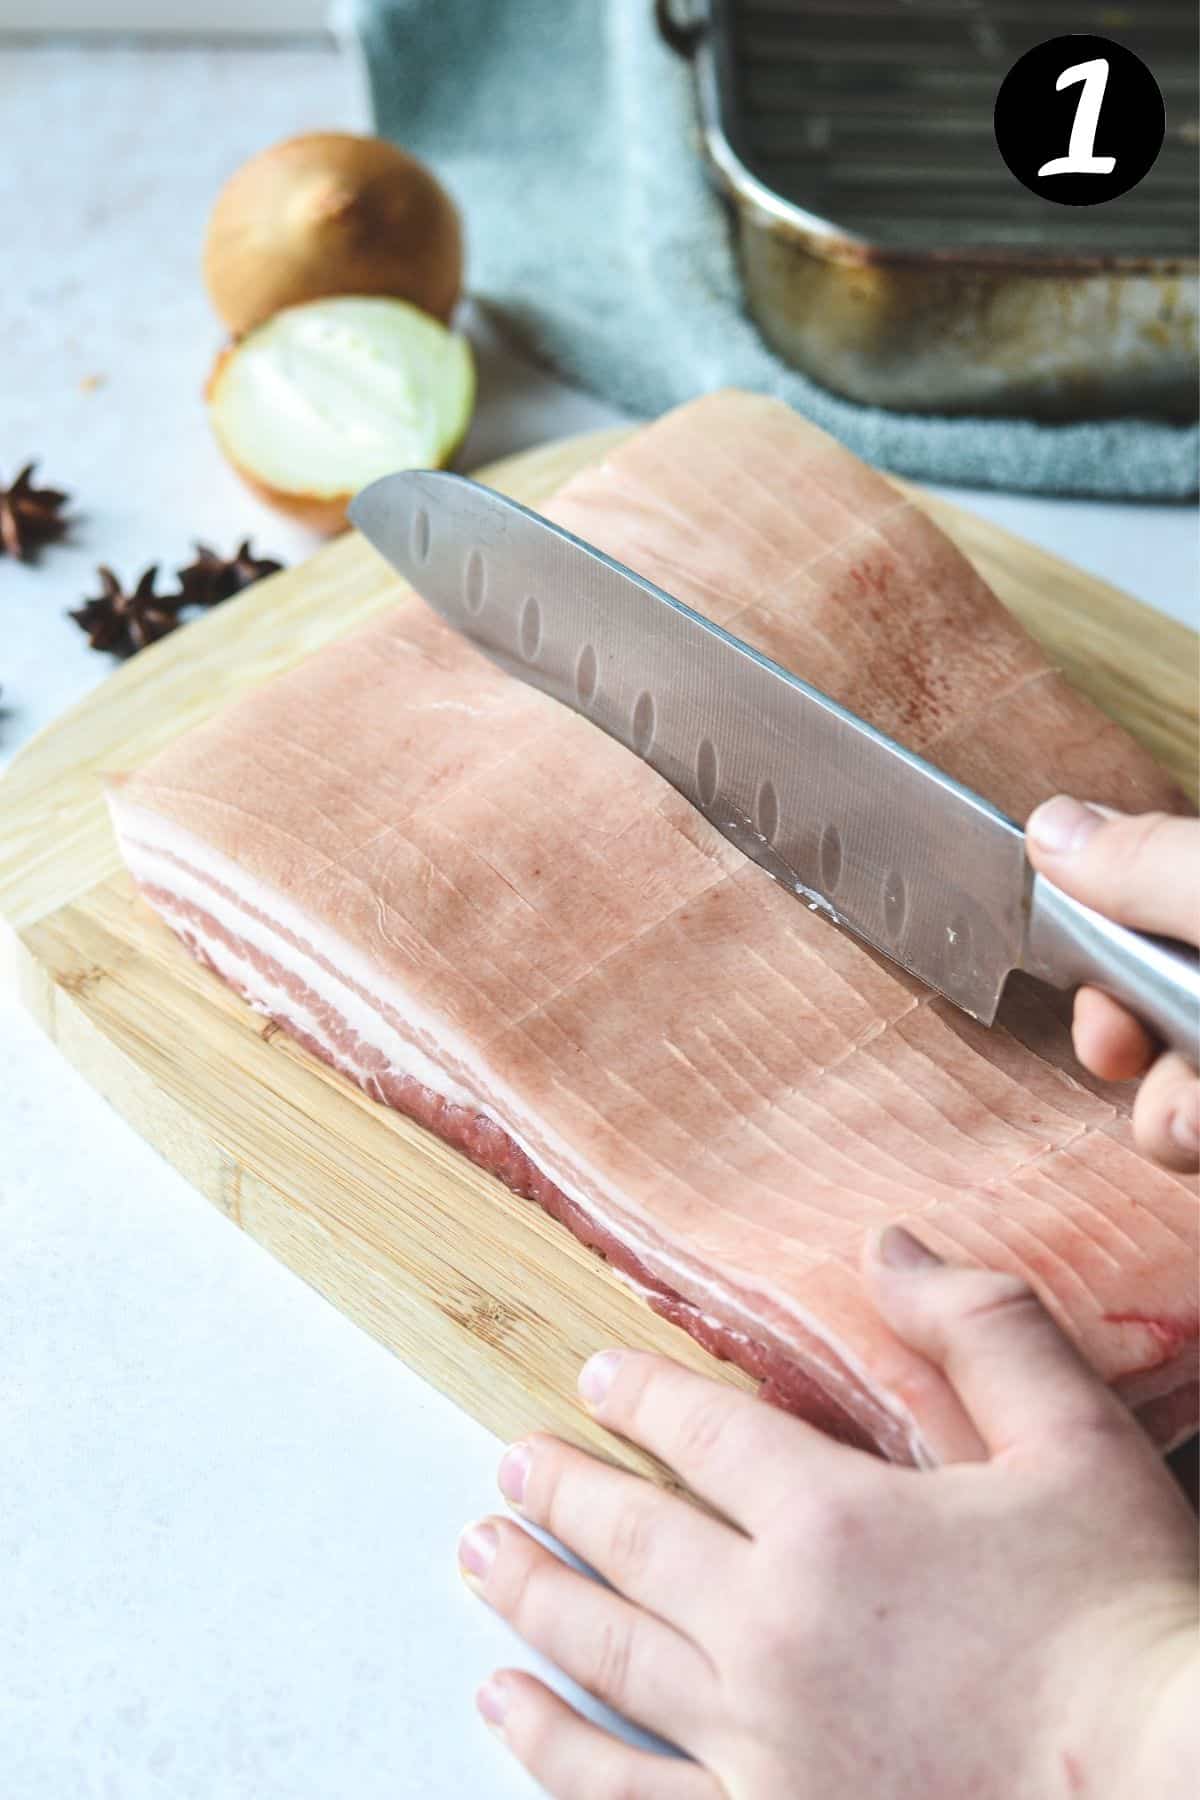
- Pork belly is an inexpensive, fatty cut of meat that comes from the underside of the pig, near the loin. It can be purchased from most supermarkets, or from your butcher. This recipe requires a whole piece of pork belly with the bones removed and skin thinly scored (small cuts in the top layers of the skin to help it become crispy). While the skin can be scored at home with a sharp knife, most butchers will happily do this step for you to save time.
- Orange is used in the pork belly sauce. Both the skin and juice are used, so fresh is best. Any type of orange can be used. Use a vegetable peeler to remove the thin strips of peel before juicing.
- Star anise is a star-shaped, aromatic spice with an aniseed flavour that infuses through the meat during the first cook and also flavours the pork belly sauce. It can be found in most supermarkets and Asian grocers. Use whole star anise, rather than ground.
- Chinese five spice is a ground spice mixture containing Chinese cinnamon, star anise, fennel seed, cloves and usually Sichuan pepper. It can be found in most supermarkets and Asian grocers.
- Rock salt is used to draw the moisture from the skin to make crispy crackling. Regular salt can be substituted, if this is what you have on hand.
Step by step guide
For best results, the pork belly should be left out in the fridge overnight before cooking, to dry out the skin. Just pop it into a container and leave it uncovered overnight, where possible. Before doing this, use a sharp knife to score the skin (or ask your butcher to do this). Be careful not to cut through to the fat or meat layers.
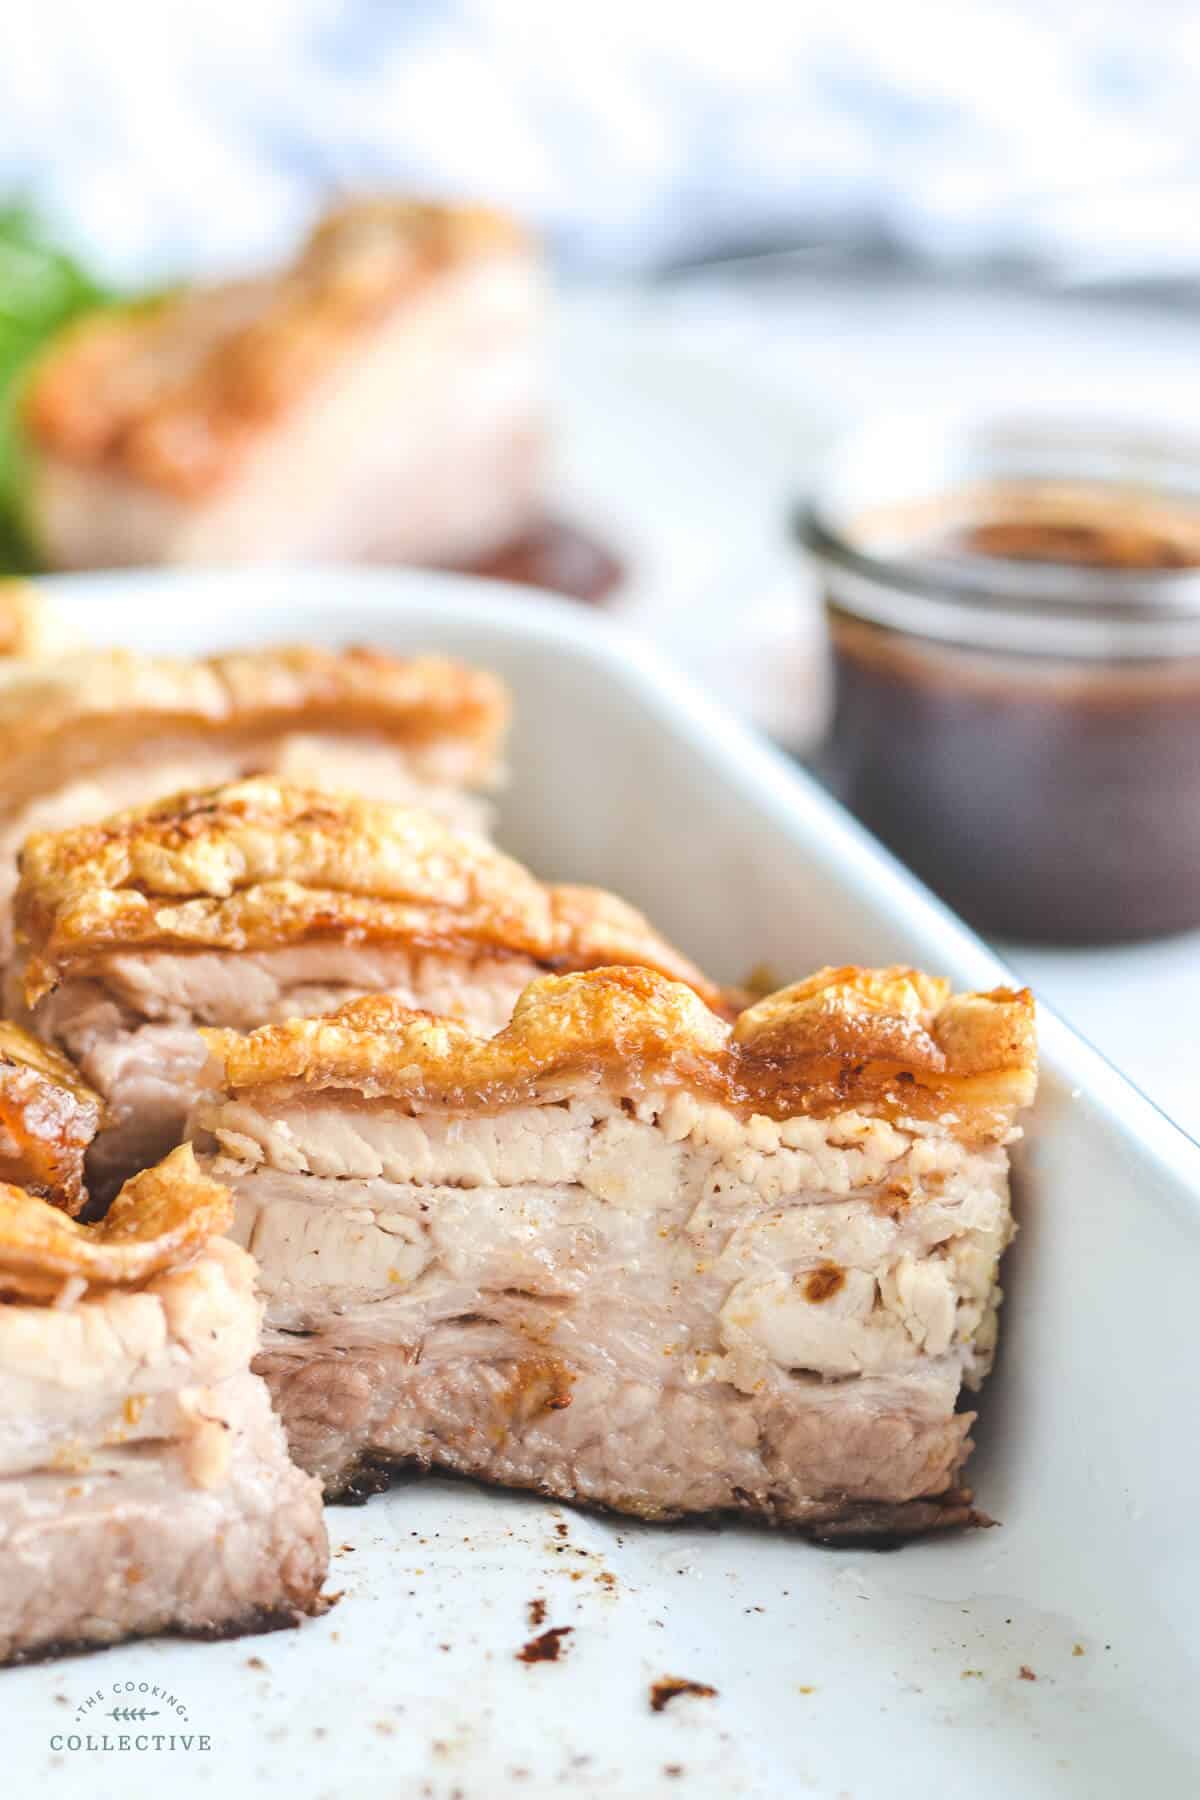
This pork belly is twice cooked, first over a water bath and then roasted in a slow oven to make it fall-apart tender.
First Cook;
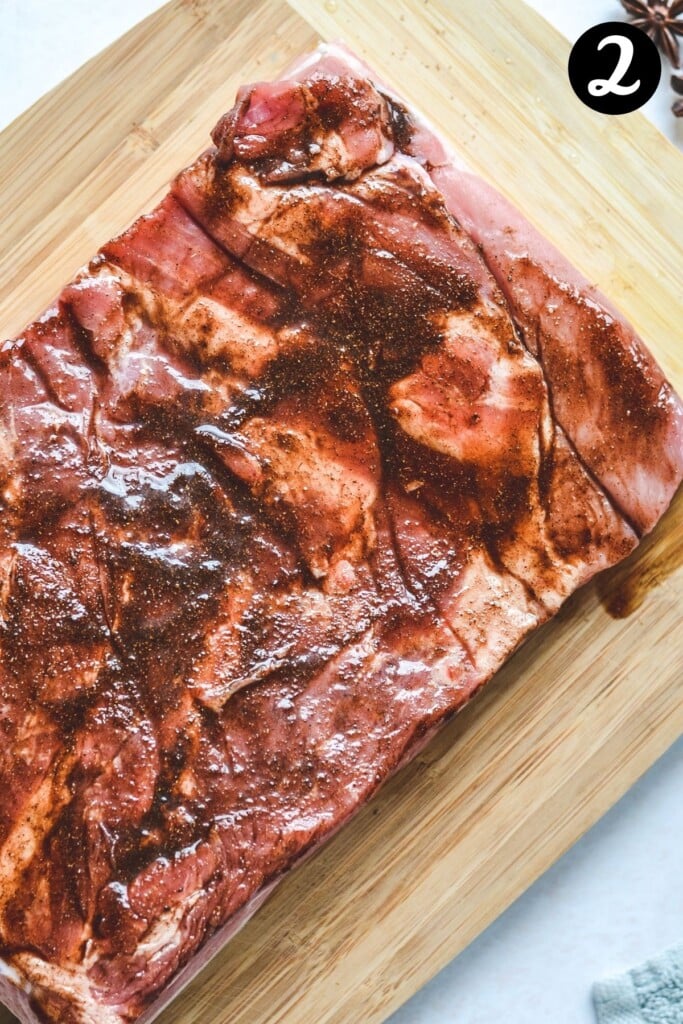
Rub the Chinese five spice and olive oil over the meat (not the skin) and use a paper towel to press and dry out the skin.
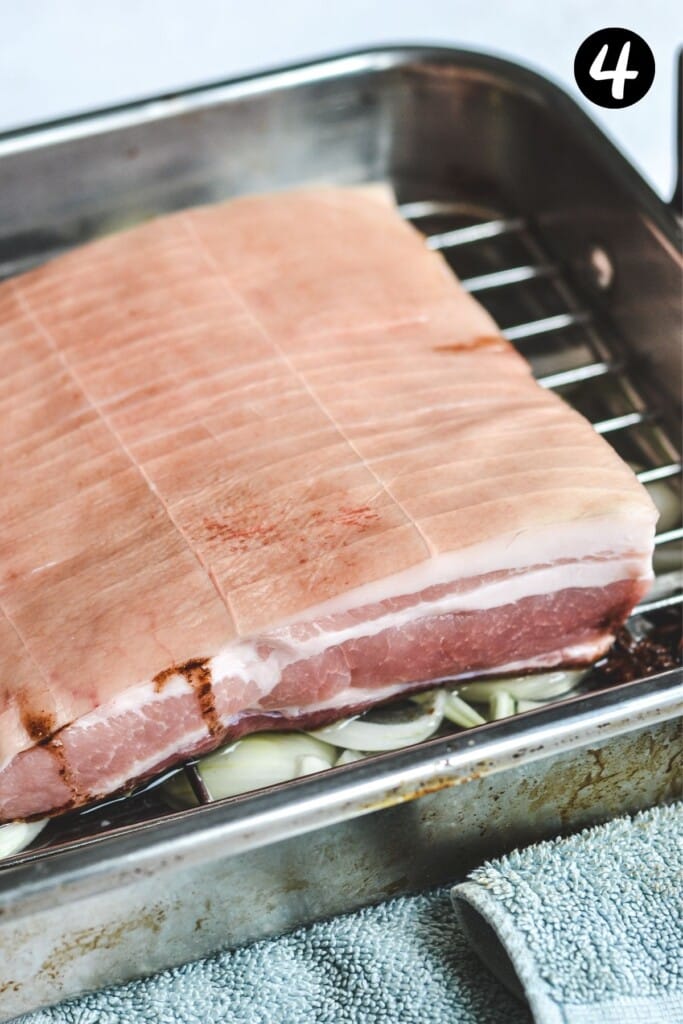
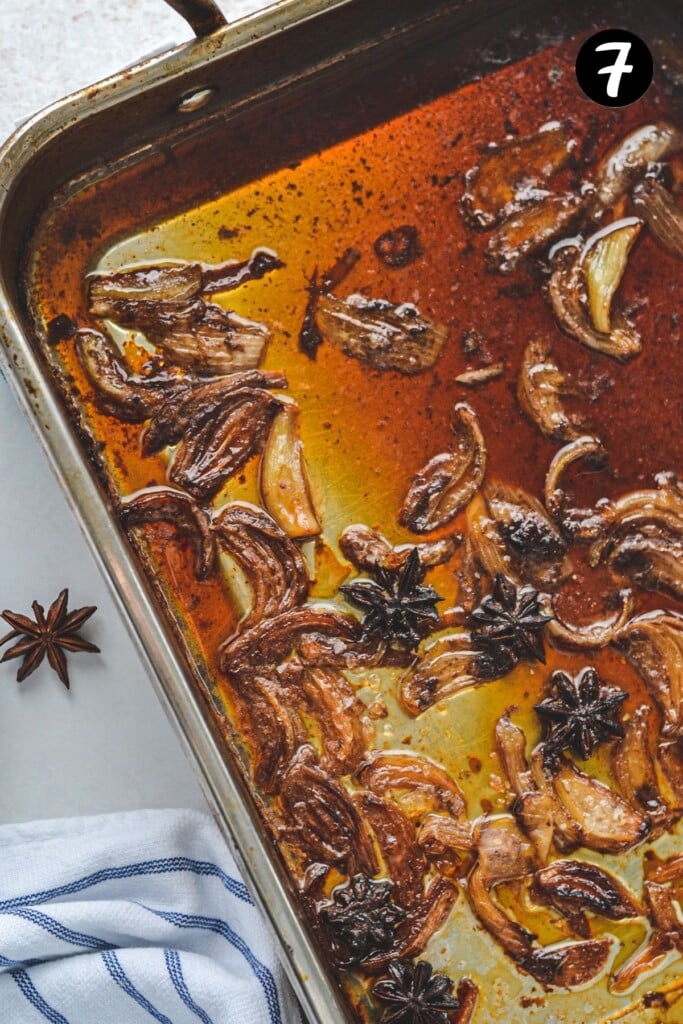
Place the pork on a rack that fits in a large roasting pan containing water, star anise and onions. The water bath keeps the meat tender and infuses it with the star anise. The water level should not touch the bottom of the pork belly.

Use aluminium foil to build up “walls” along the sides of the pork belly, about 1 inch above the top.
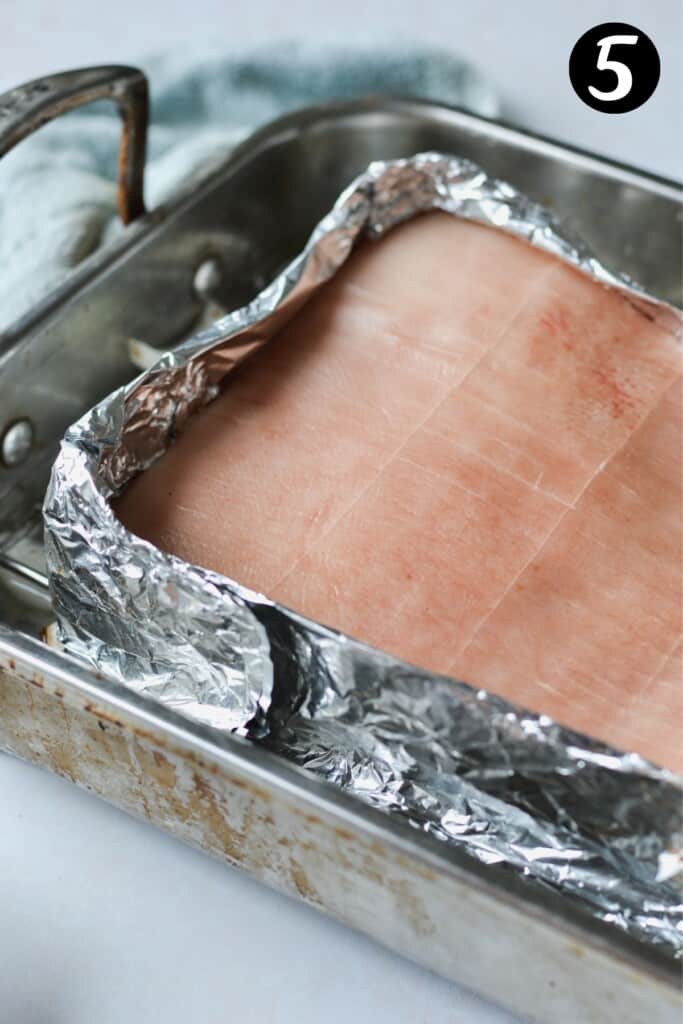
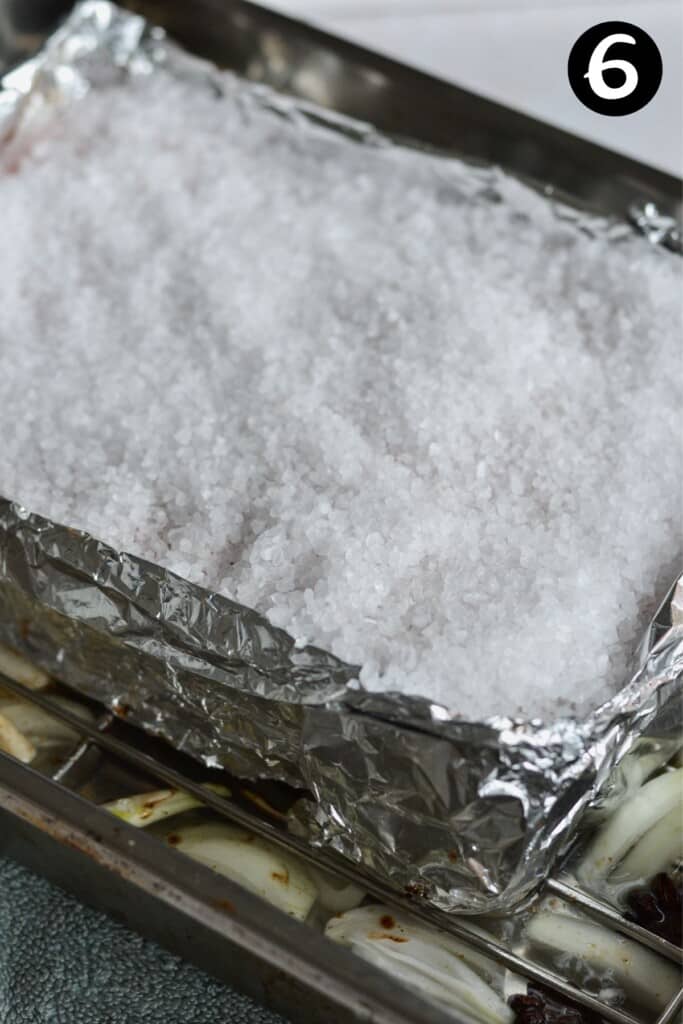
Cover the pork skin with rock salt (this will be removed after the first cook).
Slow cook as per the recipe instructions below. Once cooked, remove the salt from the pork skin and reserve the star anise pieces to make the sauce.
Second cook;
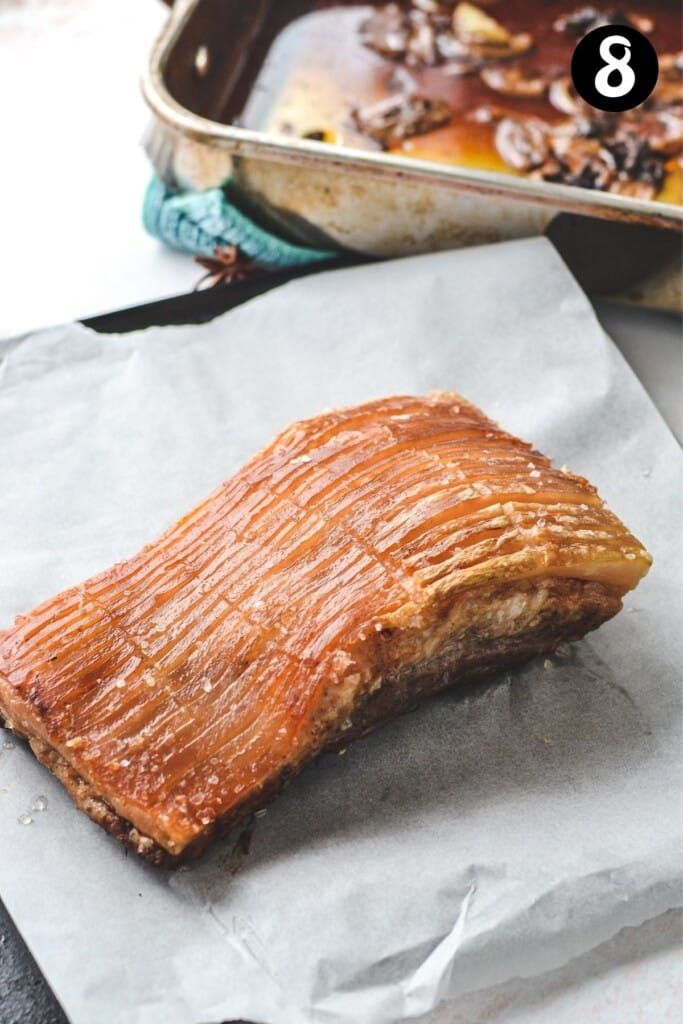
Place the pork belly onto an oven tray covered with baking paper and return it to the oven for the final cook. The second cook makes the meat even more tender, and this is also the time to finish the crackle.
In the last ten minutes of roasting, turn the heat up and place the pork belly under the grill/broiler to puff and crisp up the skin.
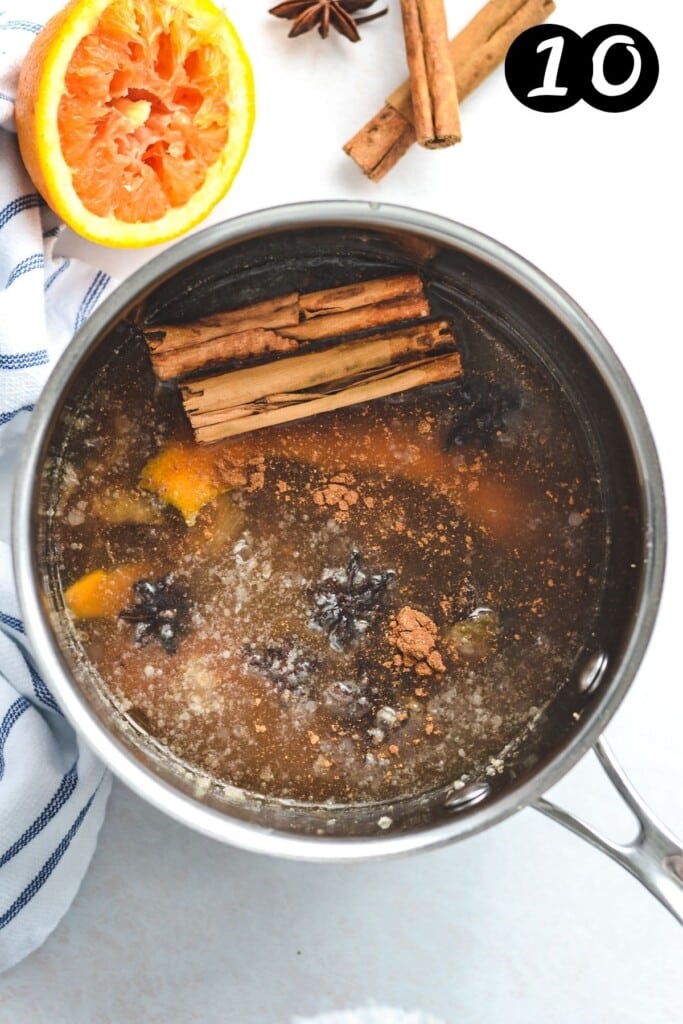
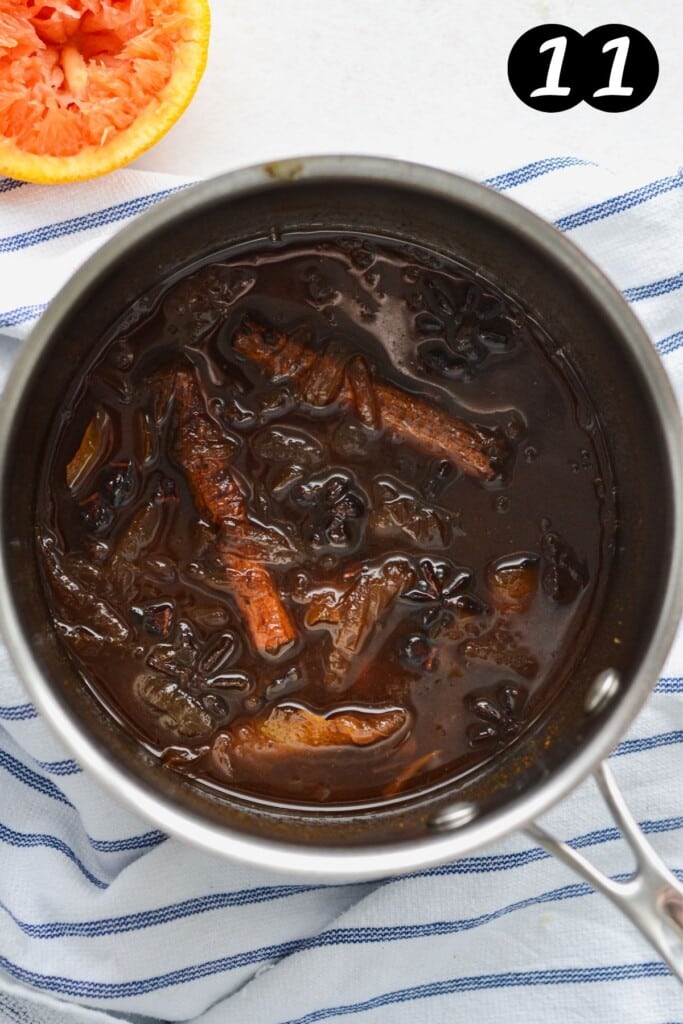
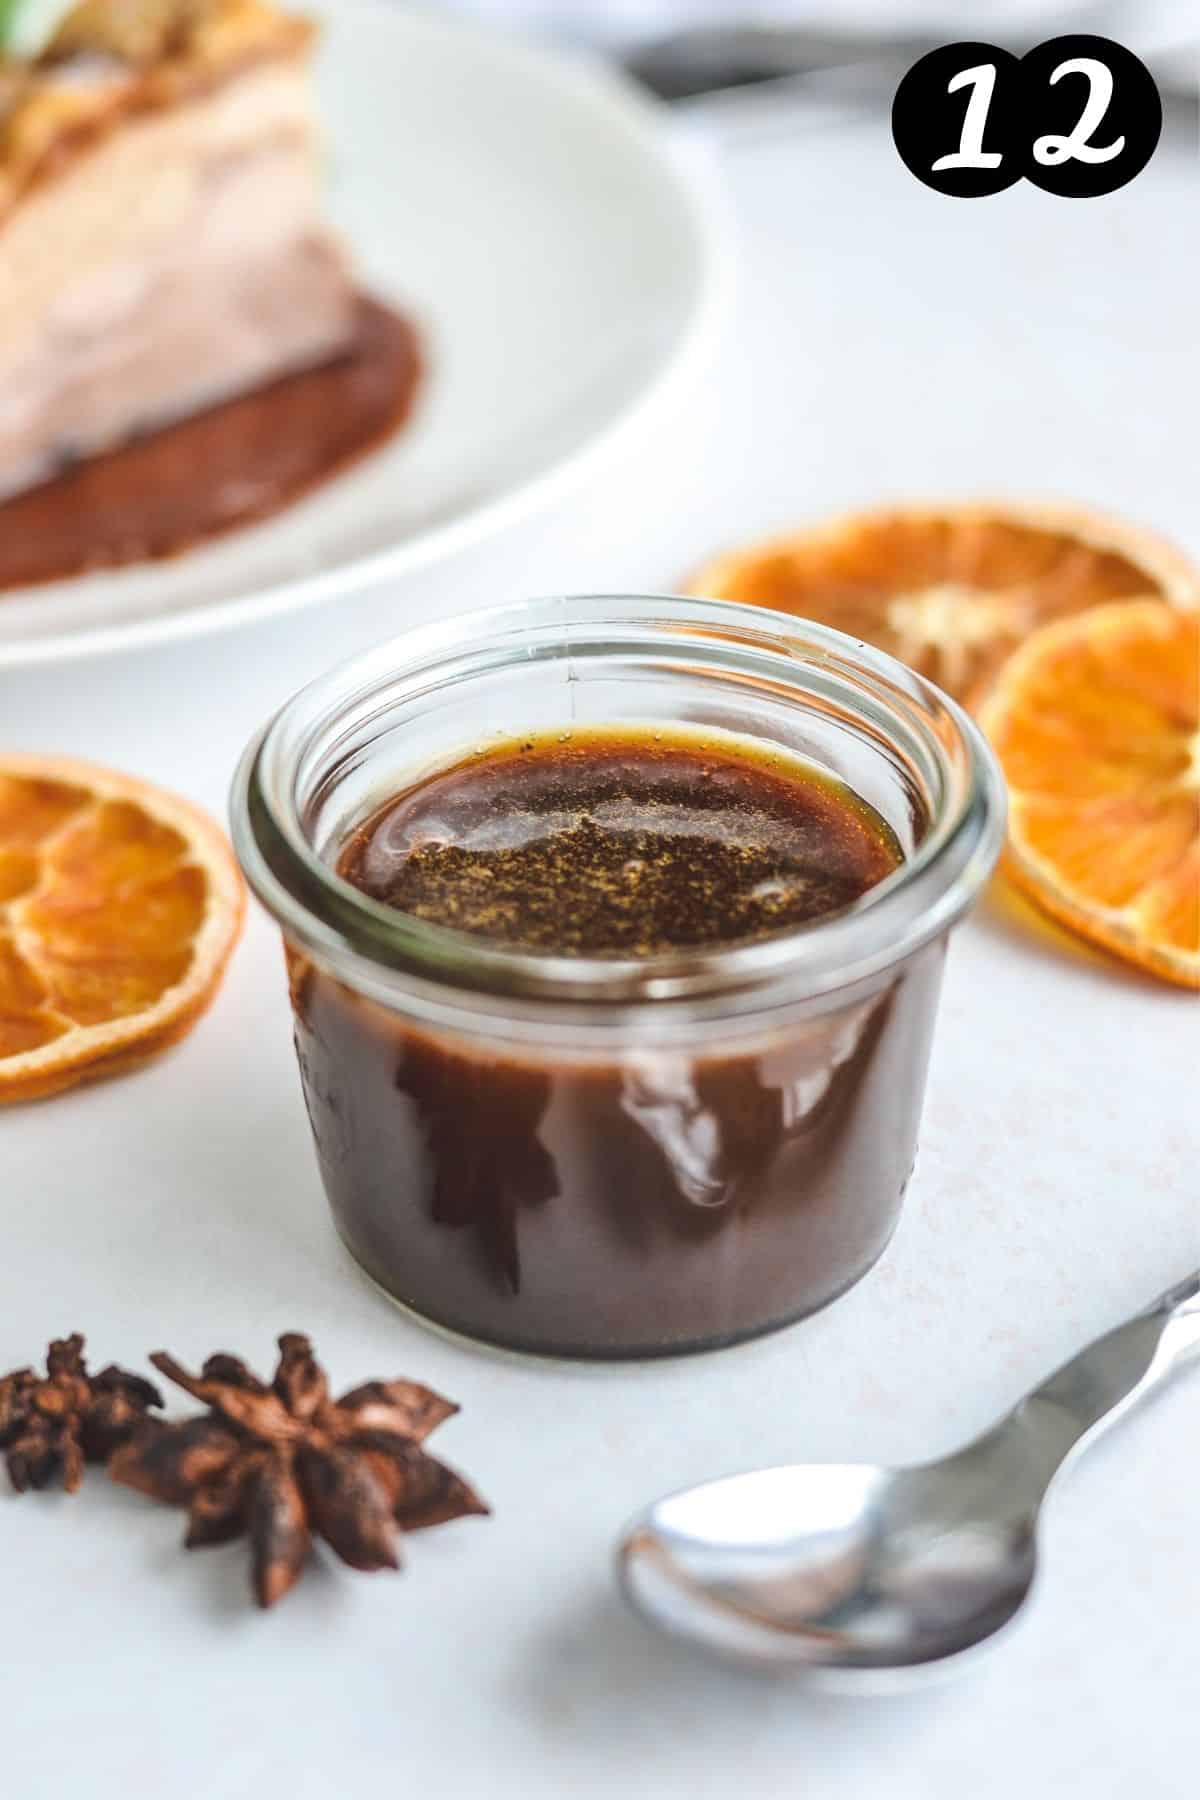
For the pork belly sauce;
Simmer all of the sauce ingredients together for around 10-15 minutes, until the sauce reduces and thickens slightly. Strain the sauce into a jug and use it to serve with the pork pieces.
Full ingredient list and instructions are found in the recipe card below.
Expert tips
- For best results, start the day before you want to serve your pork. Drying the pork skin in the fridge overnight makes super crispy skin!
- Finely scoring the pork skin, either in straight or crisscrossed lines makes all the difference, resulting in the signature puffy and crisp crackling you know and love. If you are not confident in scoring the skin yourself, ask your butcher to do it for you
- When scoring the skin, be careful not to cut through to the fat or meat layers. (Doing this will make the meat juices seep into the skin, making it wet and prevent crisping.)
- Keep an eye on the water level in the pan during the first cook. There should still be water at the end of the 2.5 hours. If it starts to reduce too much, carefully add a little more to prevent the onion and bottom of the pan from burning.
- During the grilling/broiling step to crisp up the crackling, ensure that the pork isn’t too close to the grill/heat element. If it’s too close, the top of the crackling will start to burn before it has crisped.
- The meat will shrink as it cooks and serves between 6-8 people, depending on your desired size. You can increase the weight to serve more people, or cook two bellies side by side if required.
- The skin needs to be completely dry before cooking, or it won’t crisp. Use a paper towel to remove any excess moisture from the skin before adding the salt.
You can serve this with any of your favourite sides! Pork belly is quite rich and filling, so I recommend pairing it with a fresh, bright salad like this Asian-inspired noodle salad or some pickled veggies. You can also pull the pork apart, cover it with the sticky sauce and add them to buns for pulled pork burgers. Roasted vegetables like carrot, asparagus or even cauliflower puree are great options too.
Pork belly can be prepared ahead of time, if needed. Cook the pork as per the recipe below, including the crispy skin. Allow the pork to cool and remove the crackling from the meat. Store the meat in an airtight container in the fridge for up to 3 days. To store the crackling, place it into a re-usable zip-lock bag or small container and keep it in the fridge. The meat can be re-heated by placing it into the microwave until warmed through, or covered in the oven at 180C/356F for 5-10 minutes. The crackle can be re-heated in the oven for 3-5 minutes, but it will become soft if left for too long.
Related recipes


Tried this recipe? Please leave a star ⭐⭐⭐⭐⭐ rating or leave a review below and let me know how you went!
Hungry for more? Subscribe to my newsletter and follow along on Facebook, Instagram and Pinterest for the latest recipes and news.
Slow Cooked Pork Belly
Ingredients
For the pork belly
- 1.2 kilograms pork belly (2.64 lb) boneless, with the skin thinly scored
- 8 star anise whole
- 2-3 brown onions peeled and sliced
- 3 tablespoons olive oil
- 1 teaspoon Chinese five spice, ground
- rock salt about 1-2 cups (it will be discarded after cooking)
- 2 cups water
For the orange sauce
- 2 strips orange peel Use one whole orange for the peel and juice
- ¼ cup fresh orange juice freshly squeezed (approx. juice from one whole orange)
- ½ cup brown sugar
- 4 tablespoons red wine vinegar
- 1 ⅓ cup chicken stock
- ¼ tablespoon Chinese five spice, ground
- 2 cinnamon sticks whole
- plus the star anise from the cooked pork belly
Instructions
For the pork belly
- If the pork skin is not already scored, use a sharp knife to carefully slice lines along the skin about 1cm apart, being careful not to cut too deep. Avoid piercing the fat or meat layers. Place the pork belly in a container (uncovered) and leave it in the fridge overnight for the skin to dry out. **This step is optional and can be skipped if you are short on time, but is highly recommended.
- Pre-heat your oven to 230°C/446 F. Prepare a deep roasting pan with a fitted wire rack that sits above the bottom of the pan.
- In the roasting pan, place the chopped onion, star anise and water in the bottom of the tray.
- Use a paper towel to dry the pork skin. Rub the olive oil and Chinese five spice all over the meat (but not the skin).
- Place the pork belly skin side up in the tray on the wire rack, sitting over the water bath. **The bottom of the pork belly should not touch the water.
- Mould some aluminium foil around the sides of the pork, about an inch higher than the skin. Cover the skin with rock salt so you can't see any skin (the foil should hold the salt in place).
- Cook the pork for 30 minutes at 230°C/446F, before turning the oven down to 150°C/300 F and continue to cook for a further two hours. **Keep an eye on the water level in the pan, as it will reduce over time. There should always be water in the bottom of the pan, to prevent burning. If the level gets too low, carefully add a little more water.
- Remove the pork from the oven and remove the salt from the skin. Cover the pork with foil and rest at room temperature for up to 2 hours. You can start the second cook immediately, if you are short on time. Reserve the star anise for the pork belly sauce.
For the second cook
- Place the pork belly onto a baking tray lined with baking paper and cook for one hour at 150°C/300 F.
- After one hour, turn the grill/broiler up to 230°C/446 F and adjust the height of the shelf so that the top of the pork belly is at least 25cm (10 ") from the top element, to prevent the skin from burning in patches. The skin will start to bubble, puff and become golden under the grill. Keep a close watch, as this will happen quickly (around 5 minutes). Don't place the skin too close to the heating element, or it will burn before it crisps.
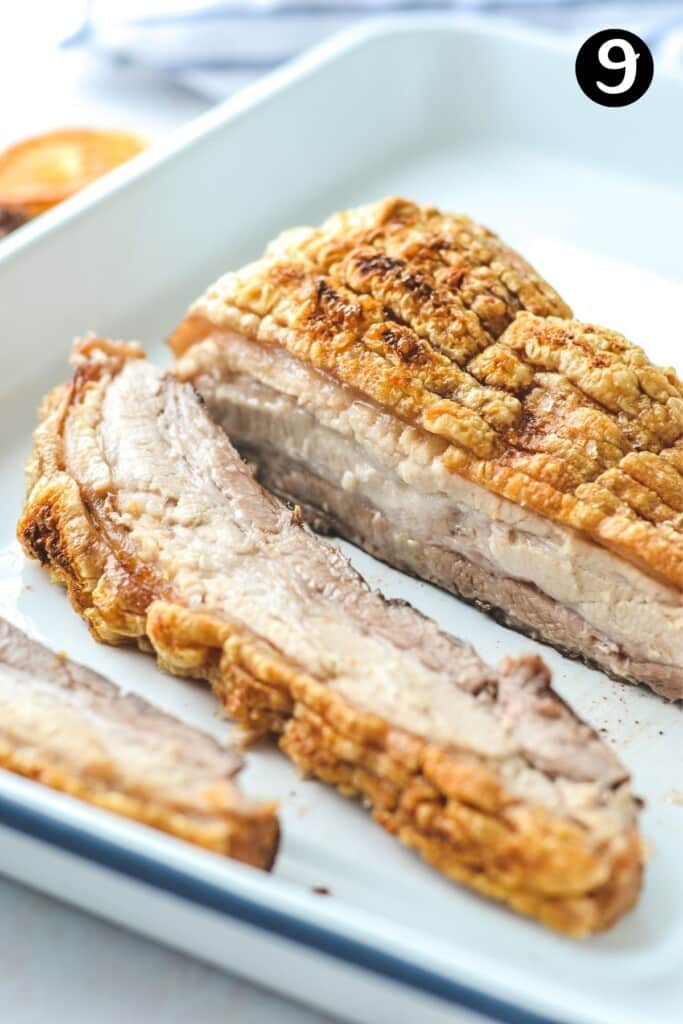
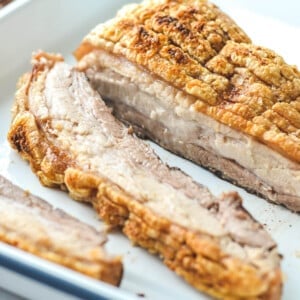
- Slice the pork into pieces and serve hot, with the sticky sauce and your choice of sides. Enjoy!
For the sauce
- Place all of the sauce ingredients, including the remaining star anise, into a small saucepan and bring to a low boil over medium-high heat.
- Reduce the heat to low and simmer the sauce, stirring occasionally, for around 10 minutes, or until the sauce thickens slightly and becomes glossy. Be careful not to reduce it too far. It will thicken further as it cools.
- Strain the sauce through a sieve, into a jug. Pour the sauce over the meat when ready to serve.
Notes
- For best results, start the day before you want to serve your pork. Drying the pork skin in the fridge overnight makes super crispy skin!
- Finely scoring the pork skin, either in straight or crisscrossed lines makes all the difference, resulting in the signature puffy and crisp crackling you know and love. If you are not confident in scoring the skin yourself, ask your butcher to do it for you
- When scoring the skin, be careful not to cut through to the fat or meat layers. (Doing this will make the meat juices seep into the skin, making it wet and prevent crisping.)
- Keep an eye on the water level in the pan during the first cook. There should still be water at the end of the 2.5 hours. If it starts to reduce too much, carefully add a little more to prevent the onion and bottom of the pan from burning.
- During the grilling/broiling step to crisp up the crackling, ensure that the pork isn’t too close to the grill/heat element. If it’s too close, the top of the crackling will start to burn before it has crisped.
- The meat will shrink as it cooks and serves between 6-8 people, depending on your desired size. You can increase the weight to serve more people, or cook two bellies side by side if required.
- The skin needs to be completely dry before cooking, or it won’t crisp. Use a paper towel to remove any excess moisture from the skin before adding the salt.
- To make this recipe ahead, cook the pork as per the recipe below, including the crispy skin. Allow the pork to cool and remove the crackling from the meat. Store the meat in an airtight container in the fridge for up to 3 days. To store the crackling, place it into a re-usable zip-lock bag or small container and keep it in the fridge. The meat can be re-heated by placing it into the microwave until warmed through, or covered in the oven at 180 C for 5-10 minutes. The crackle can be re-heated in the oven for 3-5 minutes, but it will become soft if left for too long.
- Please note that the nutrition information is based on the full amount of fat being counted in the pork. However, a large amount of fat will render out of the pork as it cooks. So real calories will be lower. Of course, it is still definitely not a low-fat meat! The nutritional information is an estimate only and does not take into account any additional sides served with it.
- This recipe is made using Australian cups and spoon measurements. Due to cup sizes varying from country to country, I advise adjusting if necessary.
- The orange sauce recipe has been adapted from this recipe from Best Recipes.
Nutrition
Update Notes: This recipe was originally published in January 2019, but was re-published with new information and photos in September 2021.


Jennifer says
First time ever cooking pork belly.
Nailed it.
Served with ginger and lemon grass steamed rice
And julienne of baby carrot, baby zucchini, water chestnut tossed in olive oil, ginger and sprinkled with fried noodles.
Andrea Geddes says
That’s so great to hear, Jennifer! I’m so glad that you nailed it and that you enjoyed the pork belly. Those sides sound AMAZING too – yum! 🙂