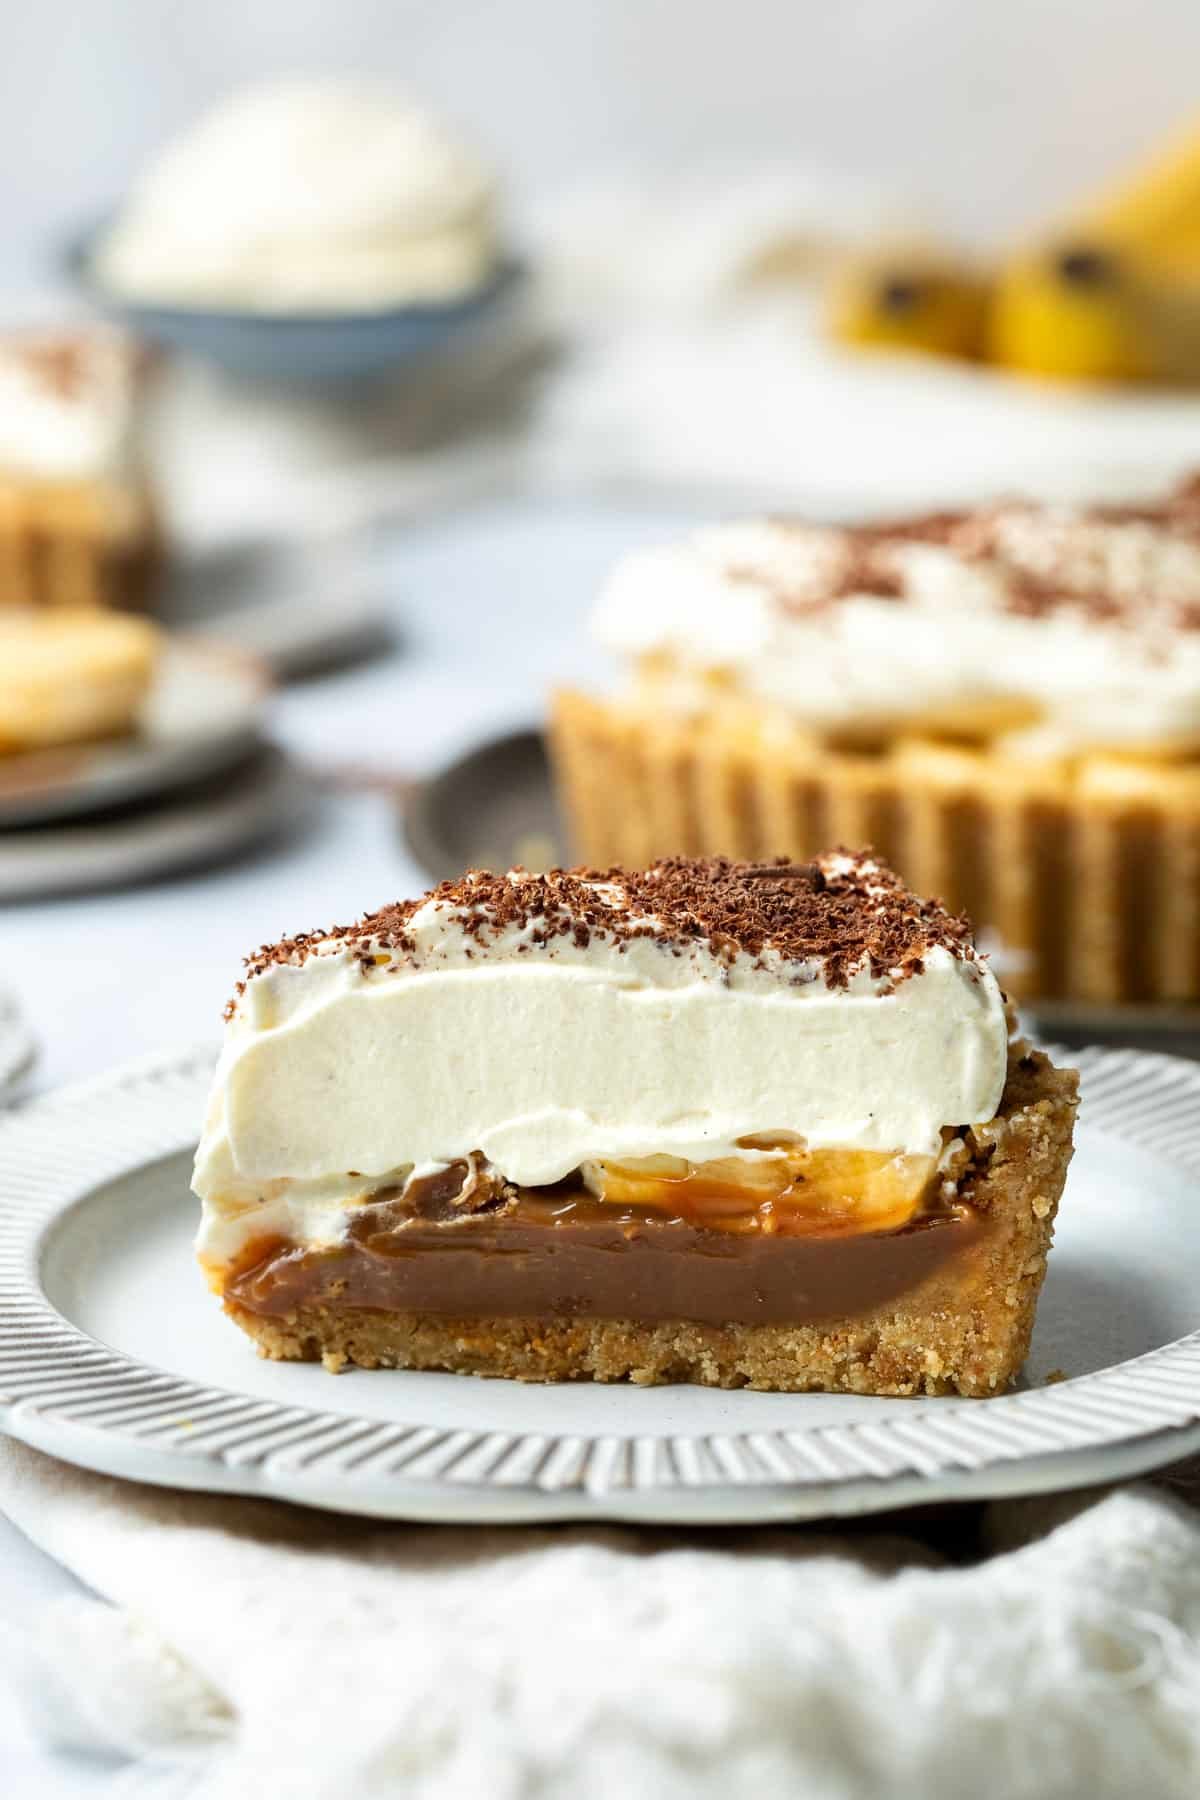
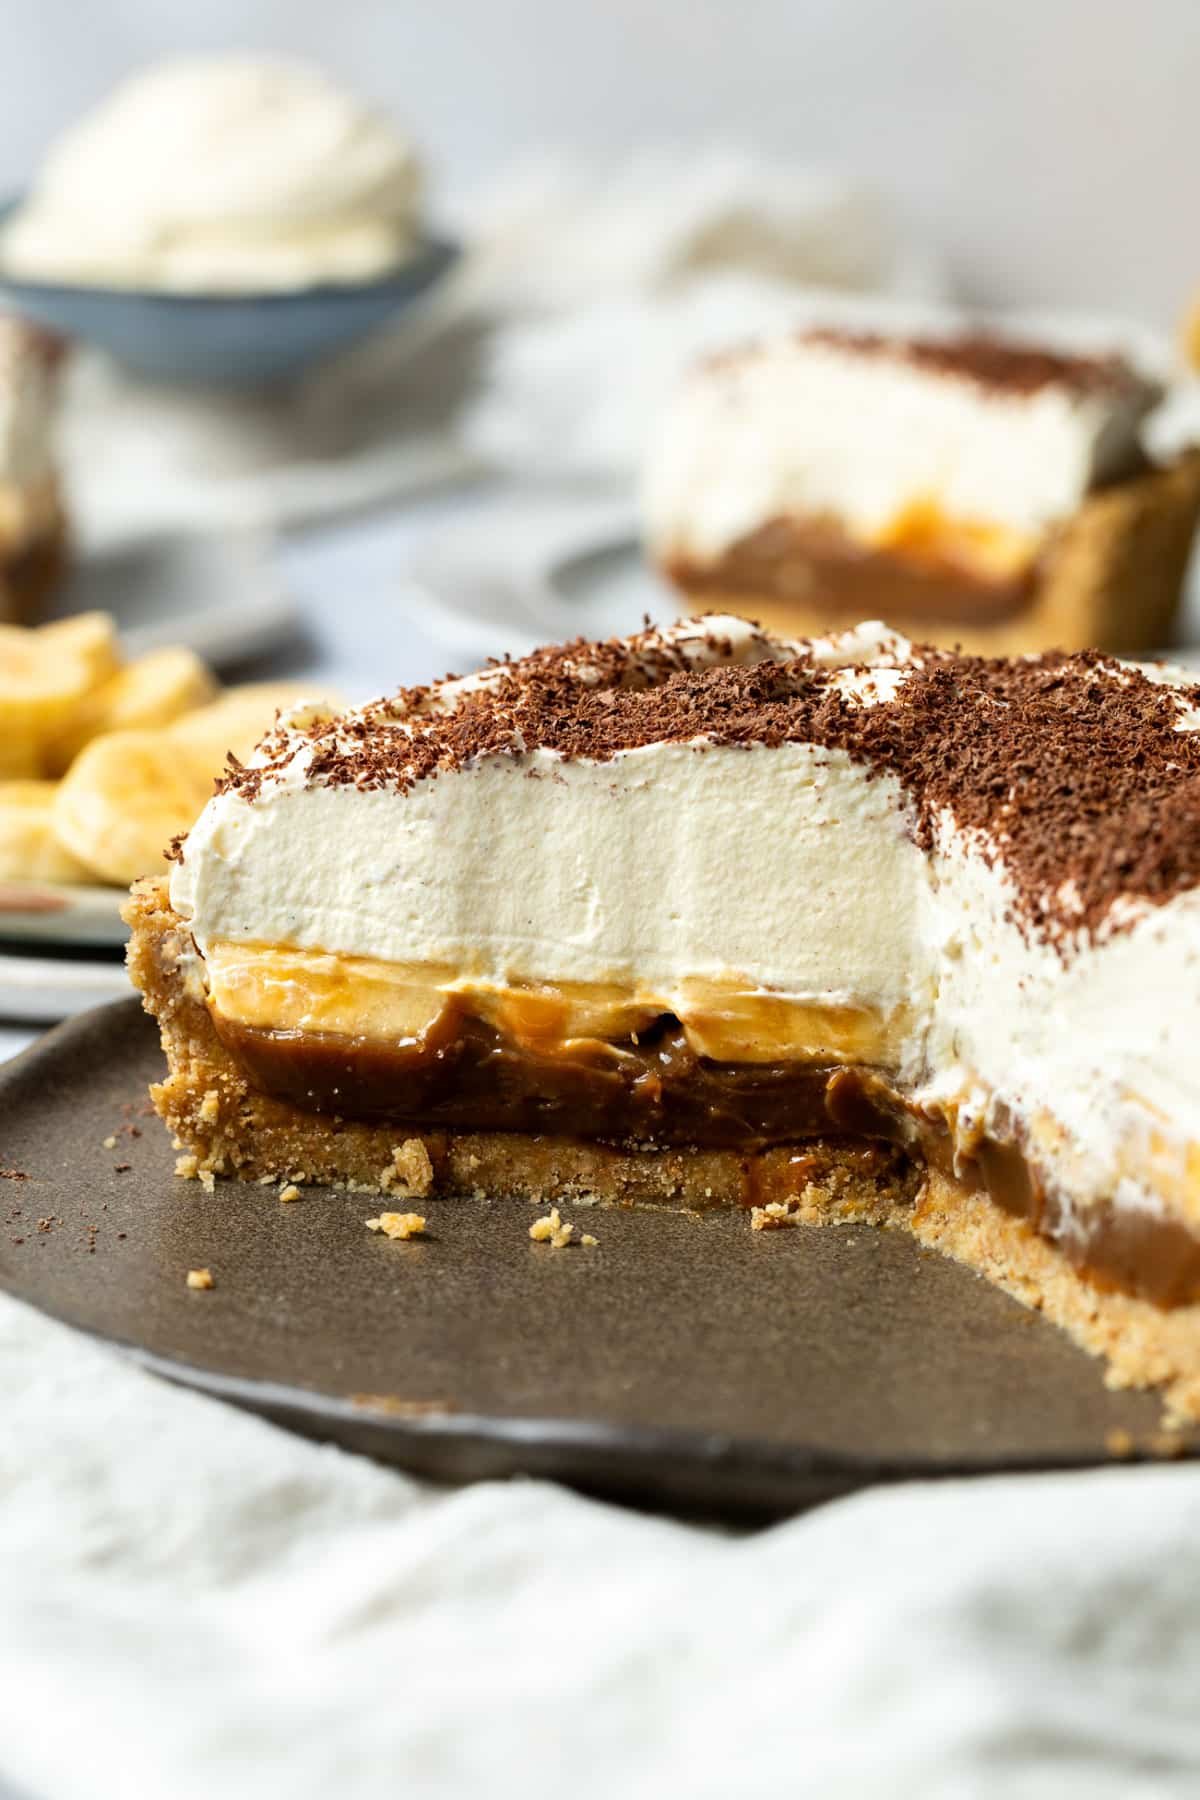
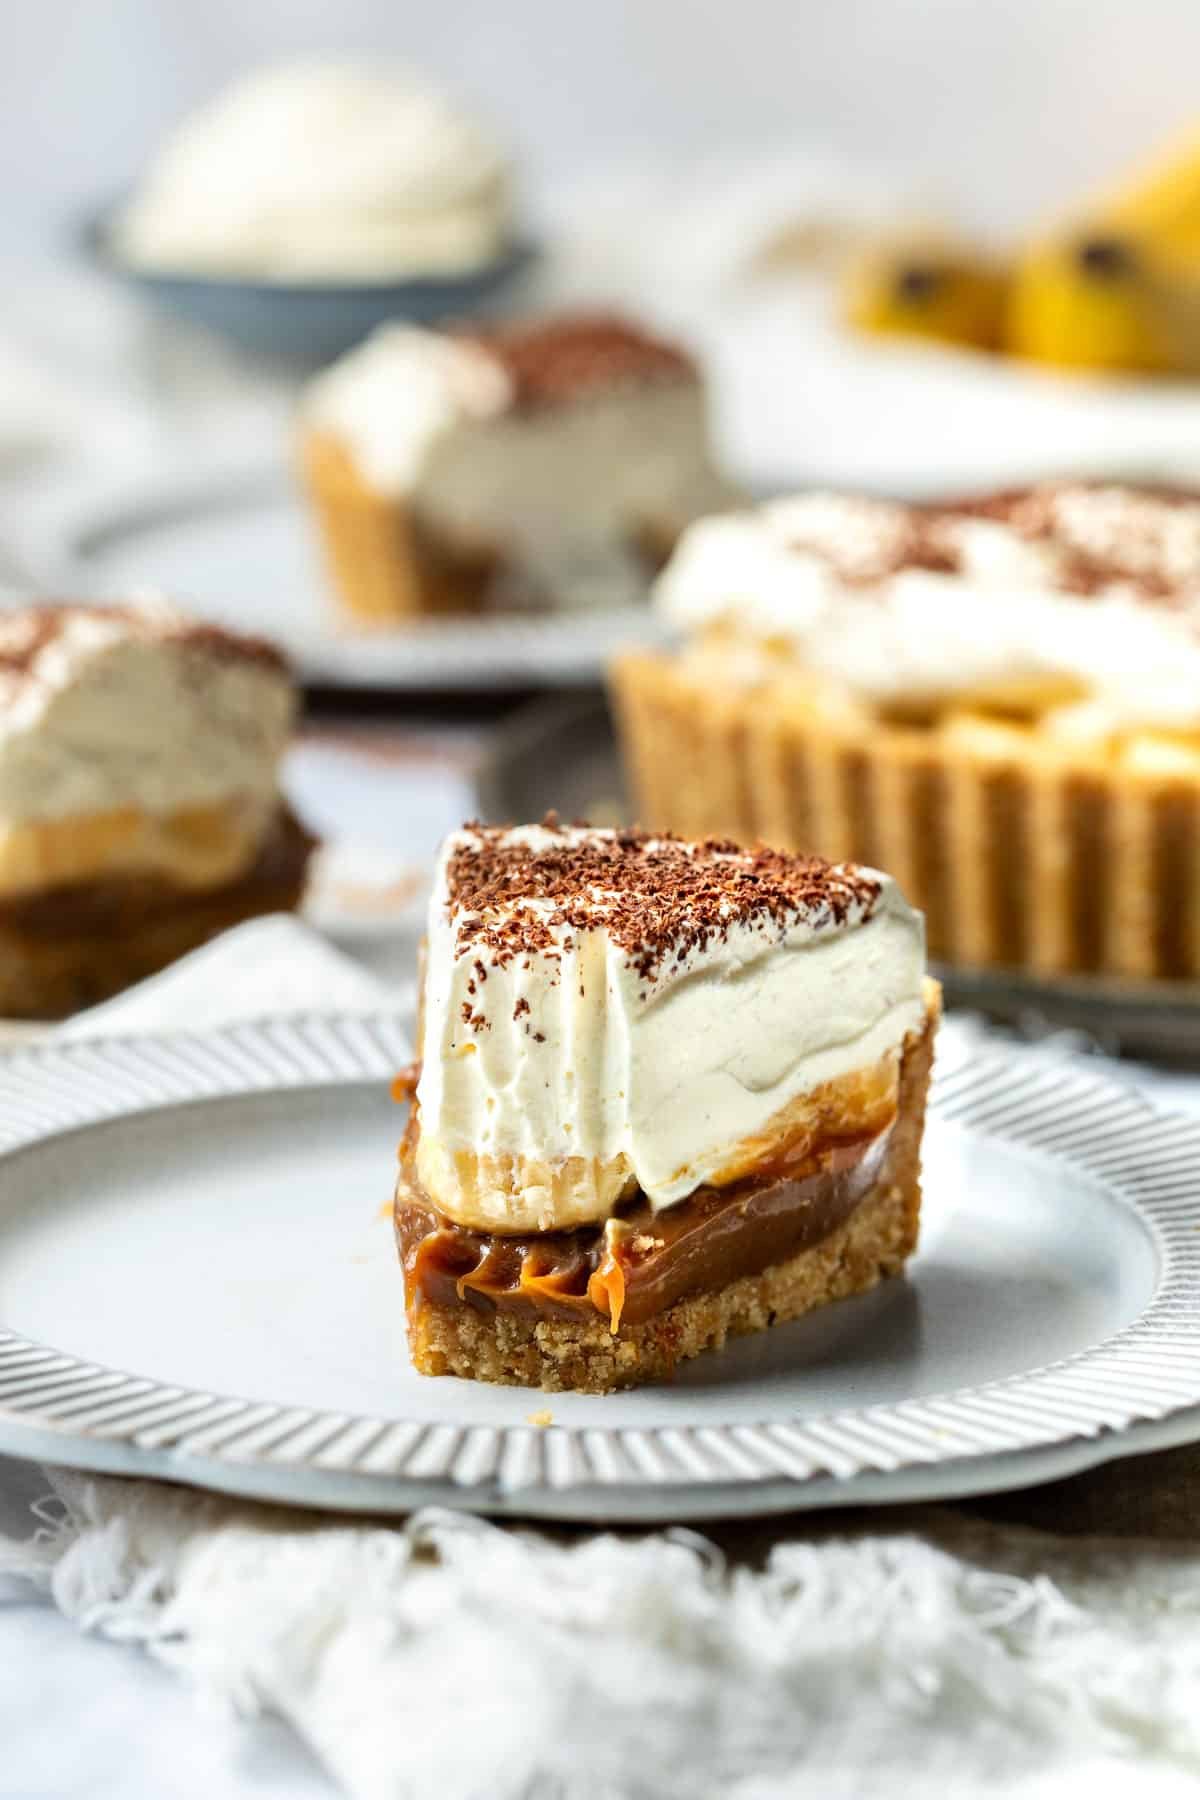
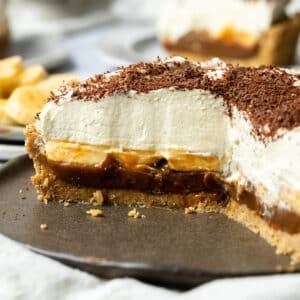
You will absolutely love this dreamy, no-bake banoffee pie. Made with a simple biscuit base and layers of thick caramel, fresh banana and whipped cream, it’s the ultimate dessert! You won’t even need to turn on the oven.
Jump to:
Why you’ll love this recipe
A popular English dessert, banoffee pie is the ultimate hybrid. Banana and toffee (hence the name, banana + toffee = banoffee) combine with a buttery biscuit base and luscious whipped cream to make the most delicious dessert. With minimal hands-on time, it’s perfect for entertaining and always a show-stopper!
Banoffee pie has become a popular and much-loved dessert in Australia and NZ. And thanks to its simplicity, it’s perfect for serving at Christmas, family gatherings or whenever you need an impressive dessert with minimal effort.
- Quick and easy – the easiest pie you’ll ever make! Just prepare the biscuit base and the caramel filling and then refrigerate until you’re ready to assemble and eat. That’s it!
- Two versions to choose from – make the easy caramel filling on the stovetop in less than 5 minutes, or take a shortcut and just use tinned caramel on its own for an even speedier dessert. (Instructions for both below.)
- No bake – no need to turn on your oven. Just mix, layer and set – the fridge does most of the work!
Need some more no-bake dessert ideas? Try my chocolate ripple cake with Peppermint Crisp, passion fruit slice, chewy Mars Bar slice or easy jelly slice.
Ingredients for banoffee pie
** This post contains tips and instructions to achieve the best possible results. This photo is a great guide for when you are in the supermarket, but for full ingredient quantities and methods, please scroll down to the detailed recipe card below!
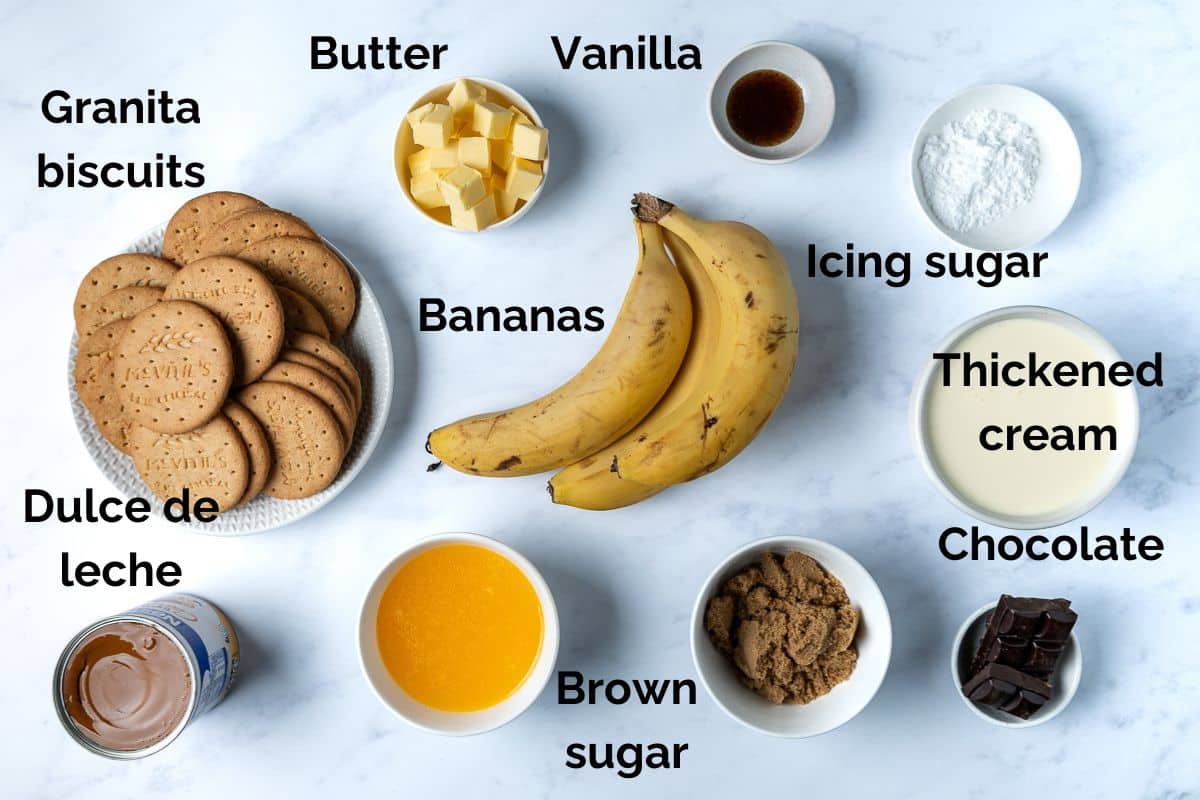
- Granita biscuits – plain, sweet tea biscuits are crushed and mixed with melted butter to form the biscuit base of the pie. In Australia and NZ, use Arnott’s Granita, Marie or Butternut Snap biscuits. In the US and the UK, Digestives or Graham Crackers can be used instead. Or use your favourite sweet biscuits! For a spiced twist, try Ginger Nut or Biscoff Speculoos cookies, which work perfectly with the sweet caramel filling.
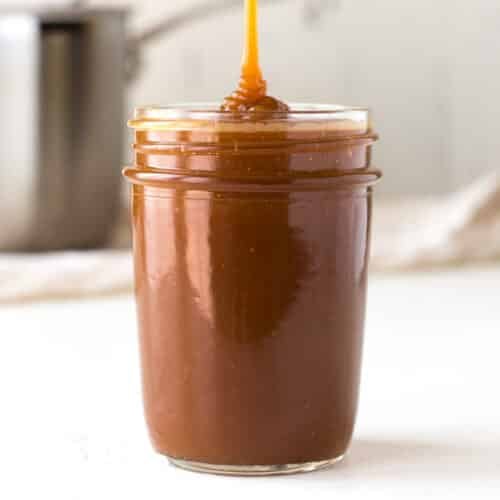
- Dulce de leche – a thick caramel confection made with milk and sugar, dulce de leche forms the caramel base of the pie. While you can make your own version, the canned version from the supermarket is easier and more convenient. In Australia, New Zealand and the UK, cans of dulce de leche can be found in most supermarkets in the baking aisle. Be sure to buy caramel and not condensed milk or the filling won’t set!
- Bananas – to prevent the banana layer from turning brown, wait to slice the bananas and assemble the pie when you are ready to serve it. A light brushing of lemon juice also helps prevent browning. For best results, use ripe bananas that are yellow, with just a few brown spots on the skin. Don’t use green, underripe bananas; they are not sweet enough and you won’t get a strong banana flavour. And overripe bananas are too mushy (save them for banana cake or muffins!).
- Butter – regular, unsalted butter is used to bind the biscuit base. For best results, I recommend using real butter rather than margarine or butter substitutes.
- Cream – use regular, full-fat thickened cream suitable for whipping. The cream is flavoured with vanilla and a little icing sugar, for sweetness and to help it set.
- Chocolate – dark chocolate curls can be used to decorate the top of the pie. Alternatively, use milk chocolate, caramelised white chocolate or a sprinkle of cocoa.
How to make banoffee pie
Full ingredient notes and quantities can be found in the detailed recipe card below. But here’s a brief overview of what you can expect;
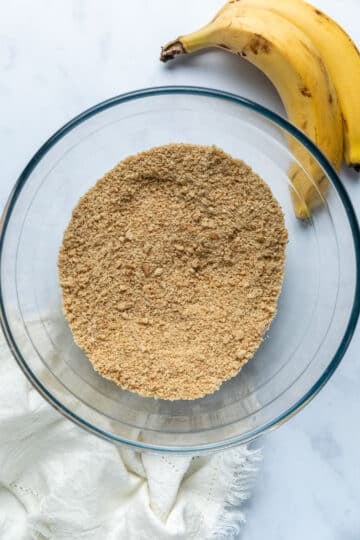
- Step 1: Crush the biscuits in a food processor (or grind with a rolling pin) until the mixture is coarse and sandy.

- Step 2: Mix the crumbs in a bowl with the melted butter, until combined.
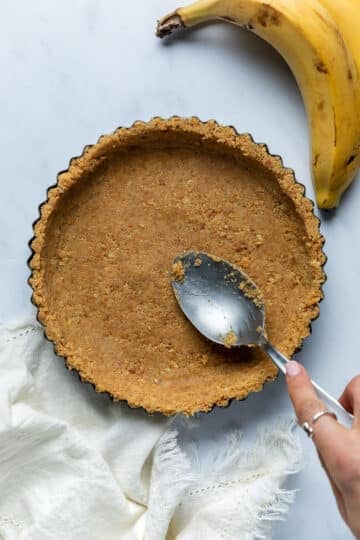
- Step 3: Using the back of a spoon, press the mixture firmly into a pie dish. Chill for 20-30 minutes to set while you prepare the filling.
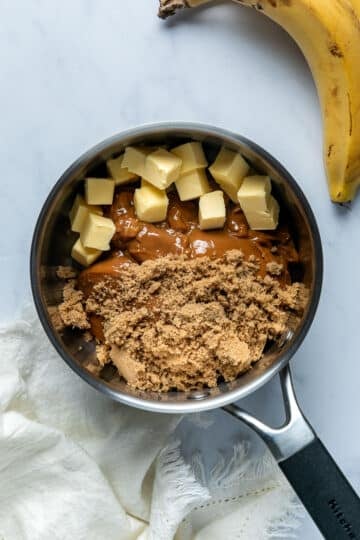
- Step 4: Make the filling: Place the tinned caramel (dulce de leche), brown sugar and butter together in a small saucepan.
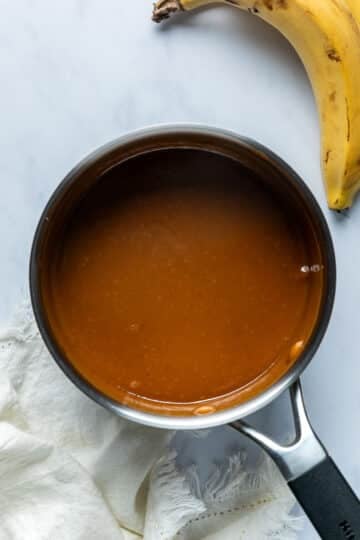
- Step 5: Whisk continually over low heat until melted and combined.
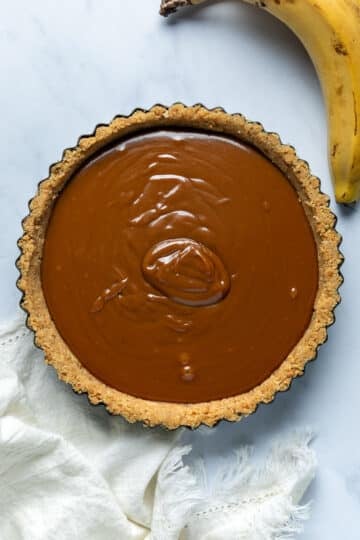
- Step 6: Allow the caramel to cool slightly and then pour it into the biscuit base and refrigerate until set (at least 2 hours), or until you are ready to serve.
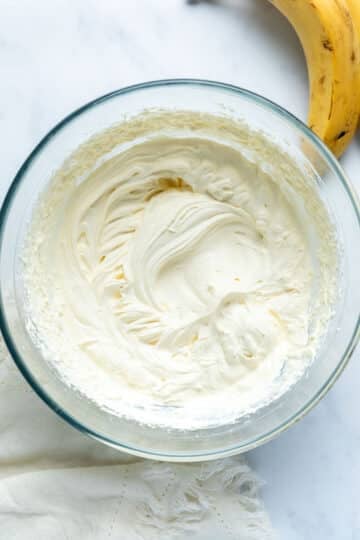
- Step 7: Whip the cream, vanilla and icing sugar to stiff peaks.
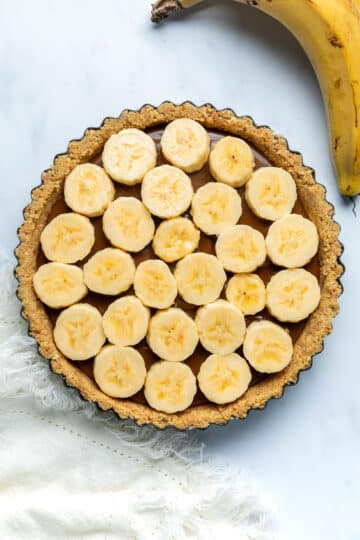
- Step 8: Assemble: When you are ready to serve, arrange thick slices of fresh banana over the top of the set caramel.
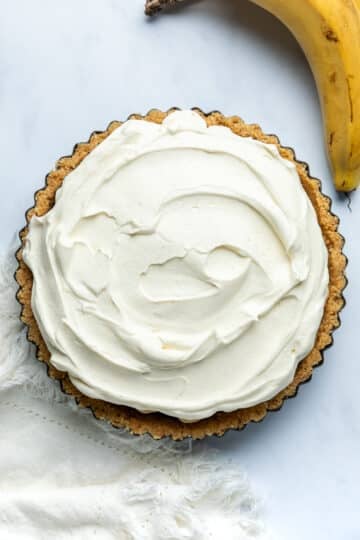
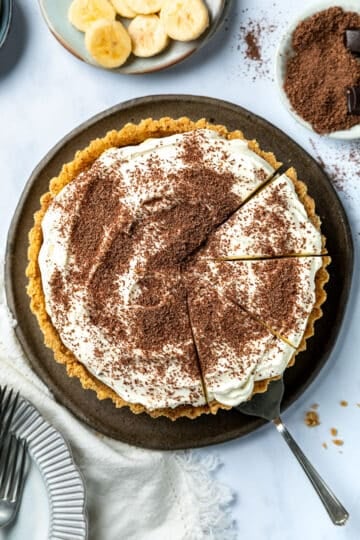
- Step 9: Top with the whipped cream and sprinkle with shavings of dark chocolate.
- Slice and serve.
Note: When cooking the caramel filling, it is important to whisk continually over low heat, or the caramel can catch and burn on the bottom of the pan.
Expert tips
- Brush the banana slices with a little lemon juice, to prevent browning.
- To make banoffee pie ahead of time, prepare the biscuit base and caramel filling and store tightly covered for up to 2 days. The pie can be fully assembled a day in advance, but keep in mind the bananas may brown slightly.
- The biscuit base can also be made ahead and frozen (unfilled) for up to 3 months. Simply add the caramel filling and refrigerate when you are ready to use it.
- Add salt to the biscuit base and/or the caramel filling, to taste. A little salt is lovely to balance the sweet caramel.
- Keep the pie chilled until you are ready to serve. The biscuit base and the caramel filling will soften when at room temperature; so the pie is best eaten cold, straight from the fridge.
- Wait to assemble the pie until you are ready to serve it. This way, all of the layers remain fresh and the banana slices won’t turn brown.
If you are short on time, canned dulce de leche can be spooned directly into the biscuit base instead of making the stovetop caramel filling. This version is a little messier, but is a great option when you are short on time. Simply add 1-2 cans of the thick caramel to the biscuit base when you are ready to assemble the pie. Don’t stir the canned dulce de leche before adding it to the pie, or it will become runny.
FAQs
Banoffee pie is best eaten fresh, on the day or day after it is made. It can be stored in the fridge for 2-3 days, but the bananas will start to brown and soften the longer it sits.
I don’t recommend freezing banoffee pie. Bananas tend to go mushy once thawed and the pie will become watery. However, the base can be made ahead and frozen for up to 3 months. If you want to make banoffee pie ahead of time, I recommend making the base 2-3 days ahead and keeping it in the fridge, or freezing the base (unfilled) and assembling the other elements on the day you want to serve it.
Related recipes

Tried this recipe? Please leave a star ⭐⭐⭐⭐⭐ rating or leave a review below and let you know how you went!
Hungry for more? Subscribe to my newsletter and follow along on Facebook, Instagram and Pinterest for the latest recipes and news.
Banoffee Pie
Ingredients
For the biscuit base
- 250 grams Arnott's Granita biscuits or use Marie or butternut snap biscuits, Digestives or Graham Crackers or your favourite sweet biscuits.
- 160 grams butter melted (approx. ⅔ cup)
For the caramel filling
- 1 x 395 gram can dulce de leche Nestle Top n Fill or another brand of canned caramel. Be sure to use dulce de leche and not condensed milk.
- 75 grams butter cubed
- 75 grams light brown sugar
For the whipped cream
- 500 ml cream thickened
- 1 tablespoon icing sugar
- 1 teaspoon vanilla bean paste or extract
To assemble
- 2-3 bananas fresh. Use ripe bananas that are yellow with a few brown spots, rather than underripe green or mushy overripe bananas.
- 50 grams dark chocolate grated or shaved into curls
Instructions
For the base
- Add the biscuits to a food processor and blend to fine crumbs (or add them to a zip-lock bag and crush with a rolling pin).
- Place the crushed biscuits into a mixing bowl and add the melted butter. Stir until well combined and sticking together.
- Pour the biscuit mixture into a 22cm (8.6 inch) tart tin and use a metal spoon to the mixture firmly into the tin, along the base and up the sides.
- Place the pie base into the refrigerator for at least 20-30 minutes to set while you prepare the caramel filling.
For the caramel filling
- * This step takes only 5 minutes and makes a thicker-set caramel filling. If you are short on time or prefer not to make your own filling, see the notes below and swap the caramel filling steps for 1-2 cans of dulce de leche.
- Place the canned dulce de leche, brown sugar and butter in a small saucepan and whisk over low heat until melted and combined.
- Bring the mixture to a simmer over low heat. While whisking continually, simmer for 2-3 minutes, until smooth. *Be sure to whisk the mixture continually over low heat, or the caramel will catch and burn on the bottom of the pot.
- Allow the caramel to cool slightly and then pour it into the biscuit base. Smooth the top and refrigerate for 2-3 hours, or until set.
For the whipped cream
- When you are ready to assemble the pie, place the cream, icing sugar and vanilla into a bowl. Use electric beaters to whip the cream to stiff peaks. Be careful not to overbeat.
To assemble
- Thickly slice the bananas and arrange them over the top of the set caramel filling.
- Pipe or spoon the whipped cream over the banana layer. Garnish the top of the cream with the grated chocolate. Slice and serve immediately or keep in the fridge until you are ready to serve. Enjoy!
Video
Notes
- Dulce de leche – a thick caramel confection made with milk and sugar, dulce de leche forms the caramel base of the pie. While you can make your own version, for this recipe the canned version from the supermarket is easier and more convenient. In Australia and New Zealand, cans of dulce de leche can be found in most supermarkets in the baking aisle. Be sure to buy caramel and not condensed milk!
- If you don’t have time to make caramel filling on the stovetop, canned dulce de leche can be spooned directly into the biscuit base instead. This version is a little runnier, but is a great option when you are short on time. Simply add 1-2 cans of the thick caramel to the biscuit base when you are ready to assemble the pie and then top with the sliced bananas and cream. Don’t stir the canned dulce de leche before adding it to the pie, or it will become runny. I recommend refrigerating for 30 minutes before assembly so the caramel becomes nice and cold.
- Brush the banana slices with a little lemon juice, to prevent browning.
- To make ahead, prepare the biscuit base and caramel filling and store tightly covered for up to 2 days. The fully assembled pie can be prepared a day in advance, but keep in mind the bananas may brown slightly.
- The biscuit base can also be made ahead and frozen (unfilled) for up to 3 months.
- Add a little salt to the biscuit base and/or the caramel filling, to taste. A pinch of salt is lovely to balance the sweet caramel.
- Keep the pie chilled until you are ready to serve. The biscuit base and the caramel filling will soften when at room temperature; so the pie is best eaten cold, straight from the fridge.
- Wait to assemble the pie until you are ready to serve it. This way, all of the layers remain fresh and the banana slices won’t turn brown.
- Please note that the nutrition information is based on the pie being sliced into 10 pieces, with one piece being one serve. The nutritional information is an estimate only and does not take into account any additional toppings or sides served with the pie.
- This recipe is made using Australian metric cups and spoon measurements. Any reference to cups or spoons in this recipe is in Australian metric. Due to cup sizes varying from country to country, I advise adjusting if necessary.
Nutrition
Update Notes: This recipe was originally published in December 2018, but was re-published with new information, helpful tips and photos in December 2024.


Marcellina says
Wow this look fantastic! I actually have never made banoffee pie but I’d love a slice now! I’ve made caramel by boiling the sealed tin but this looks safer 😉
TheCookingCollective says
Thank you Marcellina! I have made caramel by boiling cans too. The end result is delicious, but you are right- it may not be the safest option and is quite time consuming. The dulce de leche in the can tastes exactly the same. Enjoy!
Robyn says
I haven’t eaten banoffee pie for years, but after seeing this beautiful pie – and reading how easy it actually is – I am going to have to try!
TheCookingCollective says
Thanks Robyn! I don’t eat it often enough. It really is so easy!
Sylvie says
Oh my goodness, this dessert is such a dream! I love how easy it is to make and it would definitely be a hit with the whole family… yum yum yum!!
TheCookingCollective says
Thank you Sylvie! It really is. So easy and so delicious!