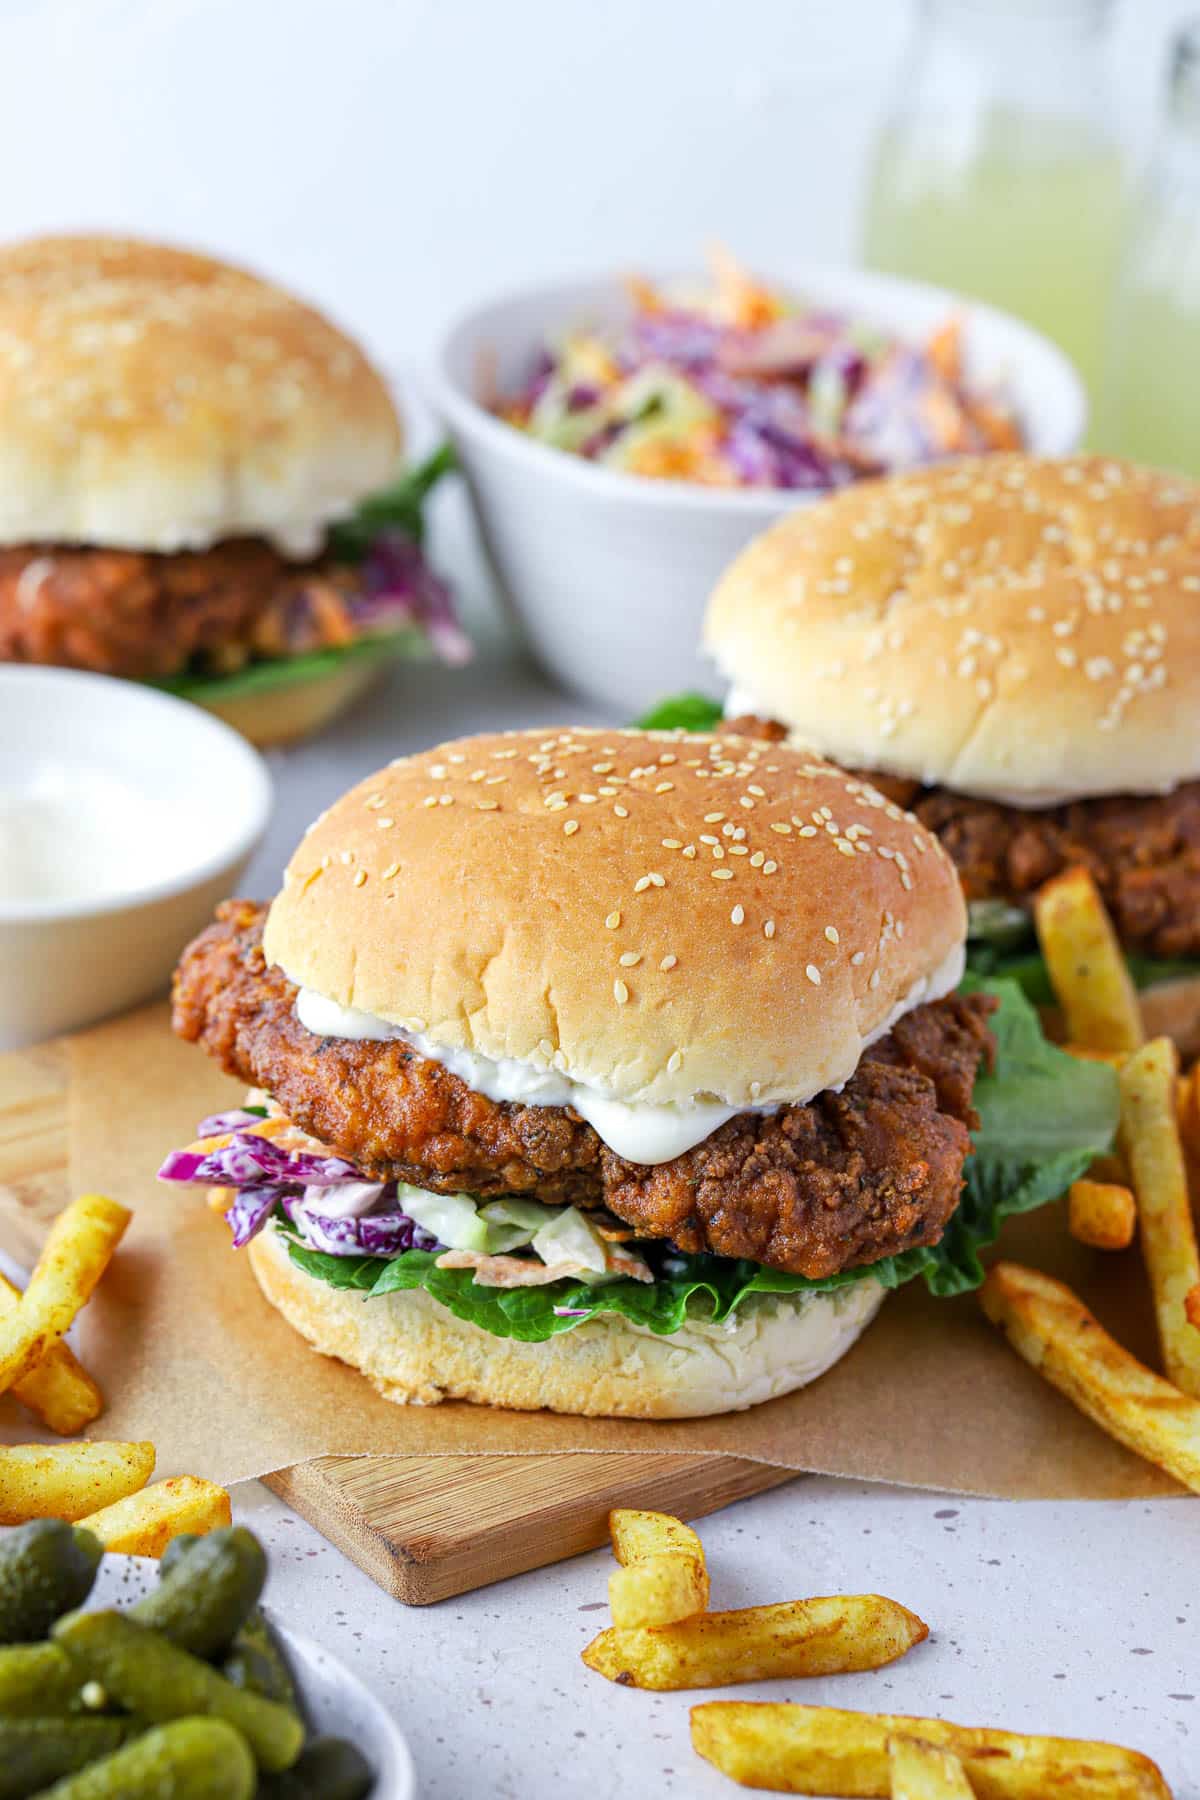
So delicious and seriously loaded with flavour, these crispy chicken burgers are the ultimate dinner for fried chicken lovers! Ultra-crispy chicken fillets are sandwiched between soft burger buns with crunchy lettuce, mayo and tangy homemade coleslaw. Way better than takeaway and so easy to make!
Why you’ll love this recipe
- They are just SO GOOD! – Crispy, crunchy and perfectly seasoned fried chicken burgers with loads of BIG flavours.
- Versatile – make them as simple or as gourmet as you like. While I opt for a simple filling of fresh lettuce and tangy coleslaw, you can easily adapt them with your favourite salads and sides. The star of the show is that crispy chicken!
- So tender and juicy – marinating the chicken in buttermilk overnight ensures the chicken comes out perfectly juicy, tender and flavourful after pan frying.
- They are really simple – everything is so easy to prepare. The chicken is prepared ahead and marinated in the fridge overnight. Any salads can be chopped and stored in the fridge. And the chicken coating can be made ahead of time and stored in the pantry so that everything is ready to cook, assemble and eat when you are hungry!
Ingredients you will need
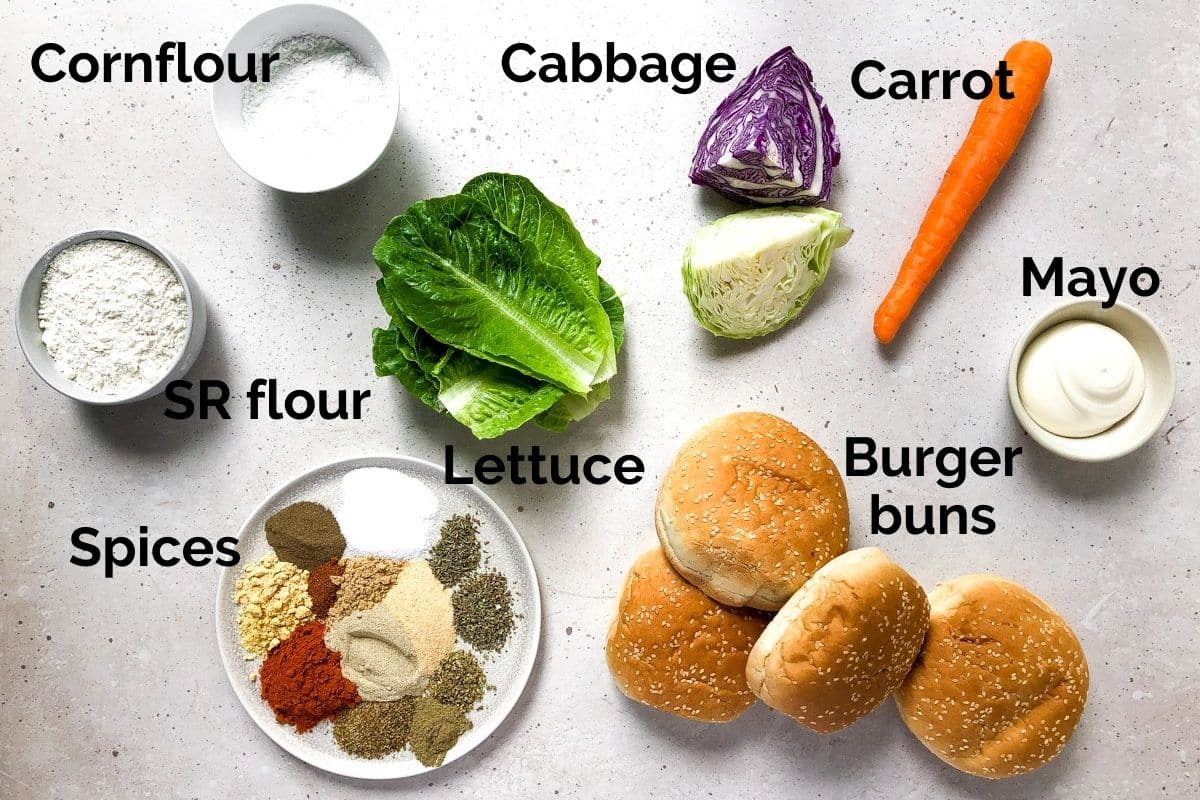
** This post contains tips and instructions to achieve the best possible results. The photo above is a great guide for when you are in the supermarket, but for full ingredient quantities and methods, please scroll down to the detailed recipe card below!
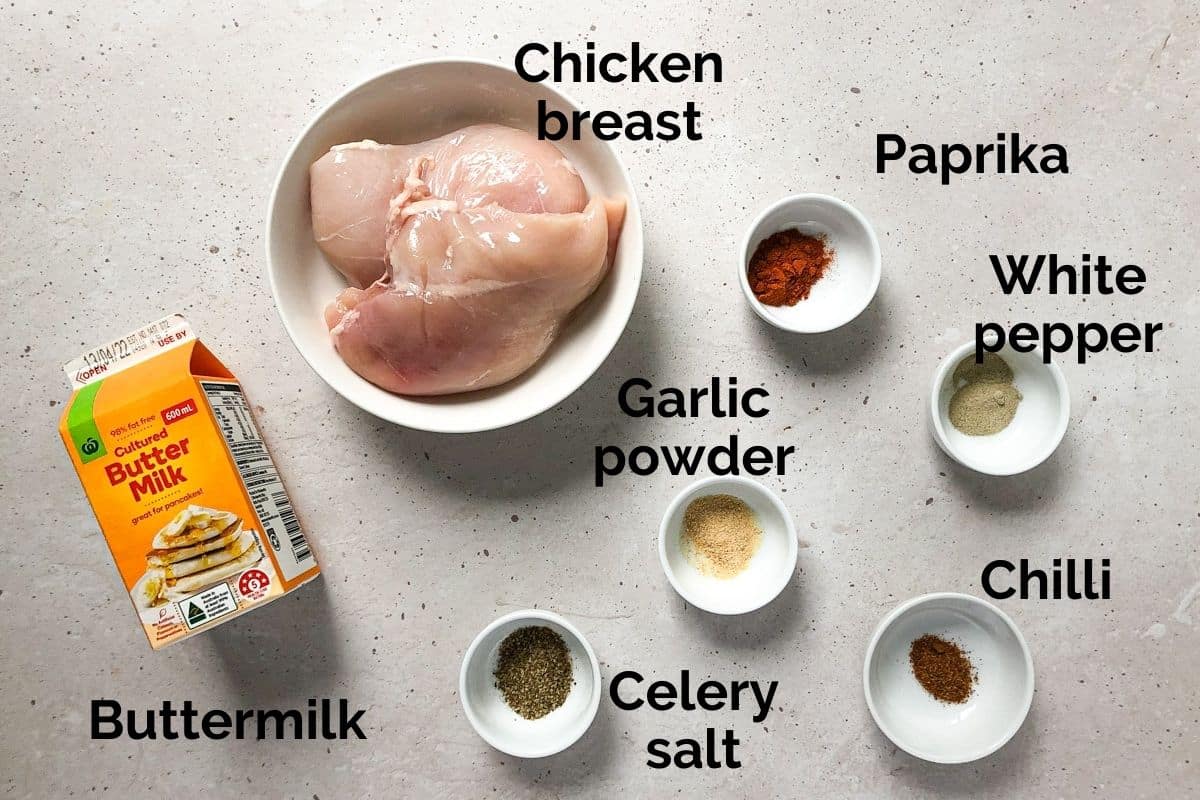
- Chicken breast – I recommend boneless, skinless breast fillets for their larger size, which is perfect for burgers. The chicken breasts are sliced in half, pounded and marinated in a buttermilk mixture to tenderise before cooking. I recommend using fresh chicken rather than frozen/thawed.
- Buttermilk – is the not-so-secret key ingredient that is essential for juicy, tender and flavoursome fried chicken. It plays multiple roles in this recipe; it tenderises and infuses the spices into the chicken before cooking. And it also helps the flour coating mixture cling to the chicken. Store-bought or homemade buttermilk is fine.
- Flour – forms the base of the chicken coating. I recommend using self-raising flour, as the baking powder in it will add to the crunch of the coating when fried. But both plain flour and self-raising flour will work.
- Cornflour – lightens the flour coating and adds crispiness.
- Pantry spices- there is a large list of dried pantry spices like garlic powder, paprika and celery salt in this recipe, but I promise that it’s worth it! Every one plays a part in creating the ultimate chicken fillet burgers.
- Vegetable oil – with its high smoke point and mild flavour, vegetable oil is perfect for frying. Alternatively, use canola or sunflower oil. Olive oil or coconut oil are not suitable for pan frying chicken.
- Burger buns – choose your favourite. While I love brioche buns or plain white sesame seed burger buns, any kind will work.
- Toppings – your choice! Add some shredded iceberg lettuce, homemade coleslaw and mayo or add mix it up with some sliced tomatoes, pickles, burger cheese or any of your favourites.
Step by step instructions
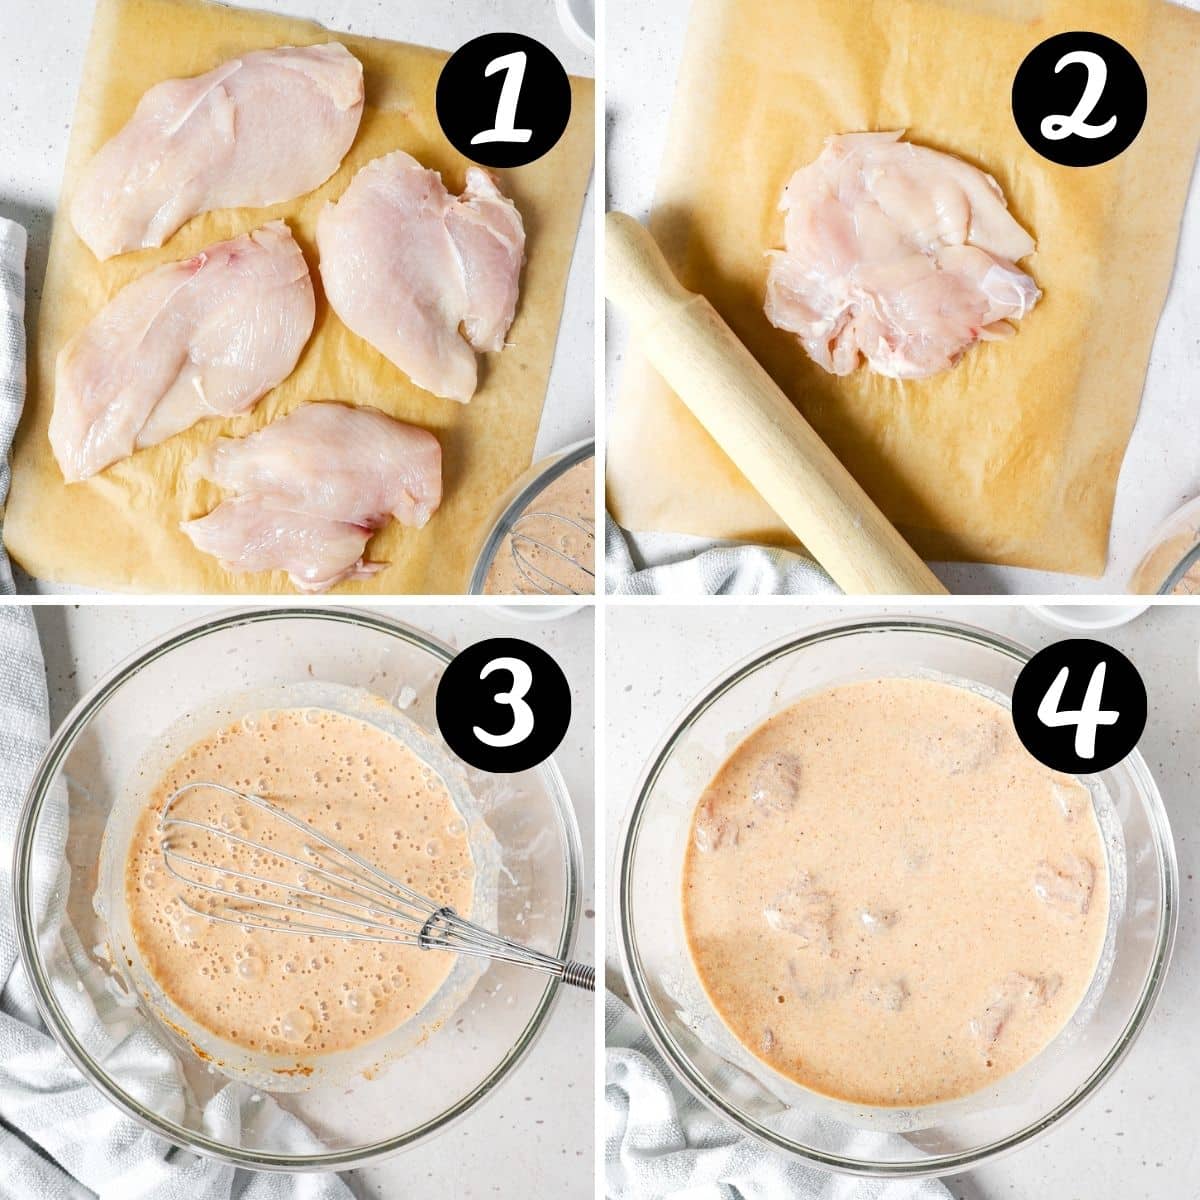
Step 1 – Pound the chicken;
Pounding the chicken ensures even thickness, which means the fillets will cook evenly. It will also help to tenderise the chicken, along with the buttermilk.
Slice each of the breast fillets in half, to make four round(ish), burger-sized fillets. Place them on a board and cover with baking paper before using a rolling pin to pound them to about 1cm thickness. *Ensure that the chicken is evenly flattened so that they don’t take too long to cook. Otherwise, the coating will overcook before the chicken is ready.
Step 2 – Coat in buttermilk and spices;
Mix the spices and buttermilk together and add the chicken. Ensure the chicken is completely coated in the buttermilk, then cover and refrigerate. Marinate for as long as possible. Overnight is best, or at least 4 hours, but they should sit in the buttermilk for at least an hour if you are short on time. **Prepping the night before is optimal, because the chicken will be super tender and it will make dinner prep the following night much faster.
Step 3 – Make the chicken coating;
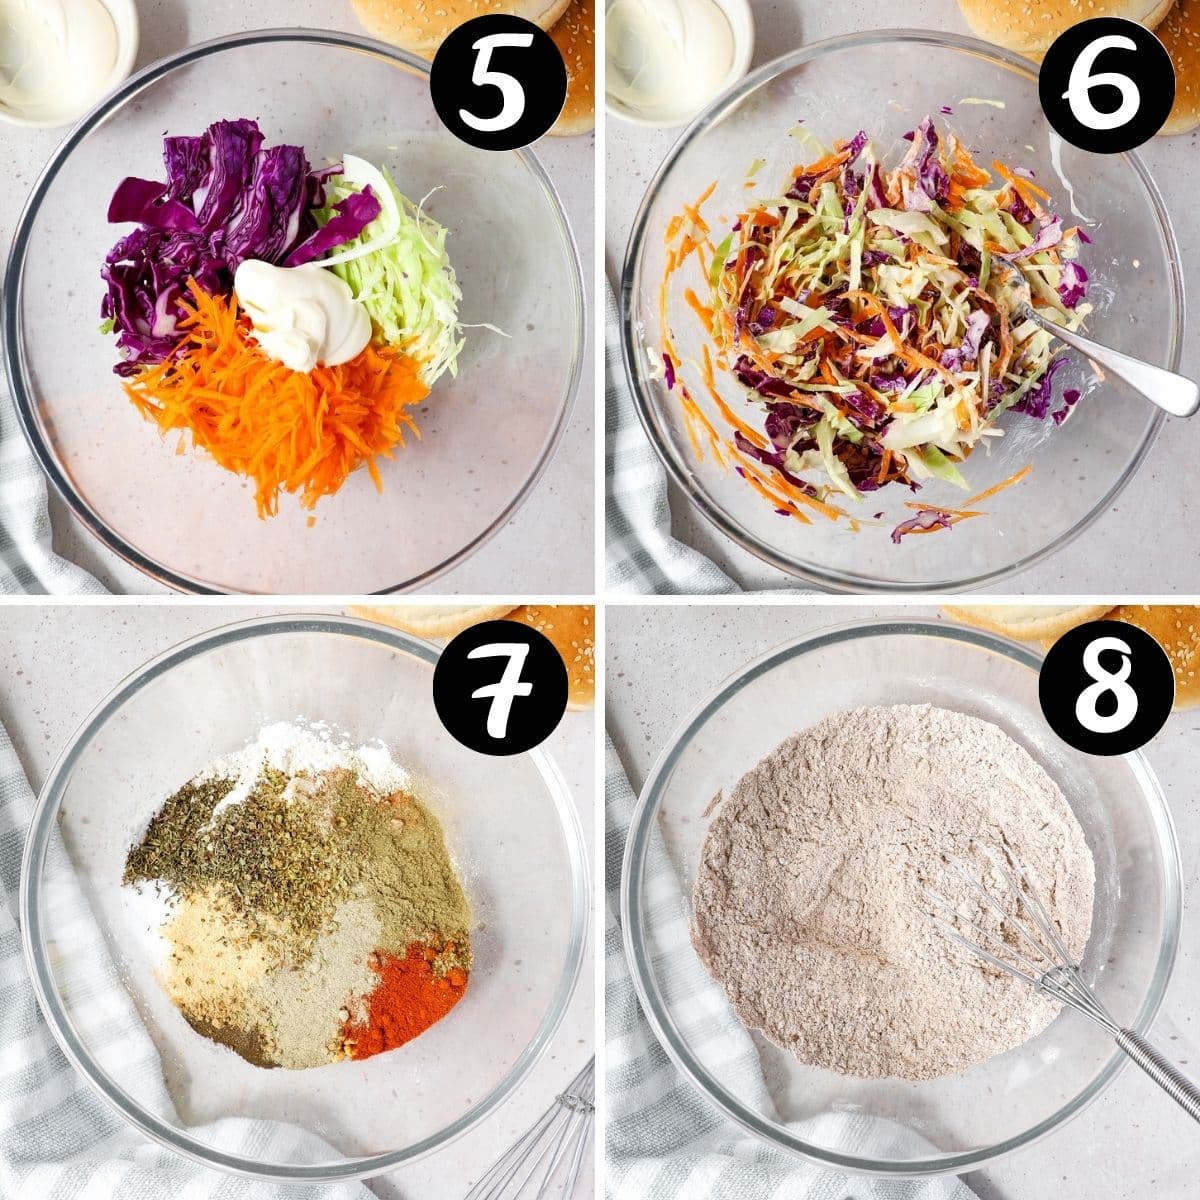
Mix the flour, cornflour and spices in a large bowl and stir until completely combined. *The coating can be made ahead and stored in an airtight container in your pantry until ready for use.
Step 4 – Coat the chicken;
Remove the chicken pieces from the buttermilk and coat in the flour and spice mixture. *Be sure to drain off as much buttermilk from the chicken as possible, or you’ll end up with a gummy coating that doesn’t crisp as nicely. Too much buttermilk on the chicken will also mean the coating may slide off.
Make sure the chicken is completely coated in the flour mixture.
To make the coleslaw;
Finely shred the coleslaw and carrot and combine in a bowl with a generous amount of coleslaw dressing or mayo. Stir to combine and refrigerate until ready to use.
Step 5 – Pan-fry the chicken;
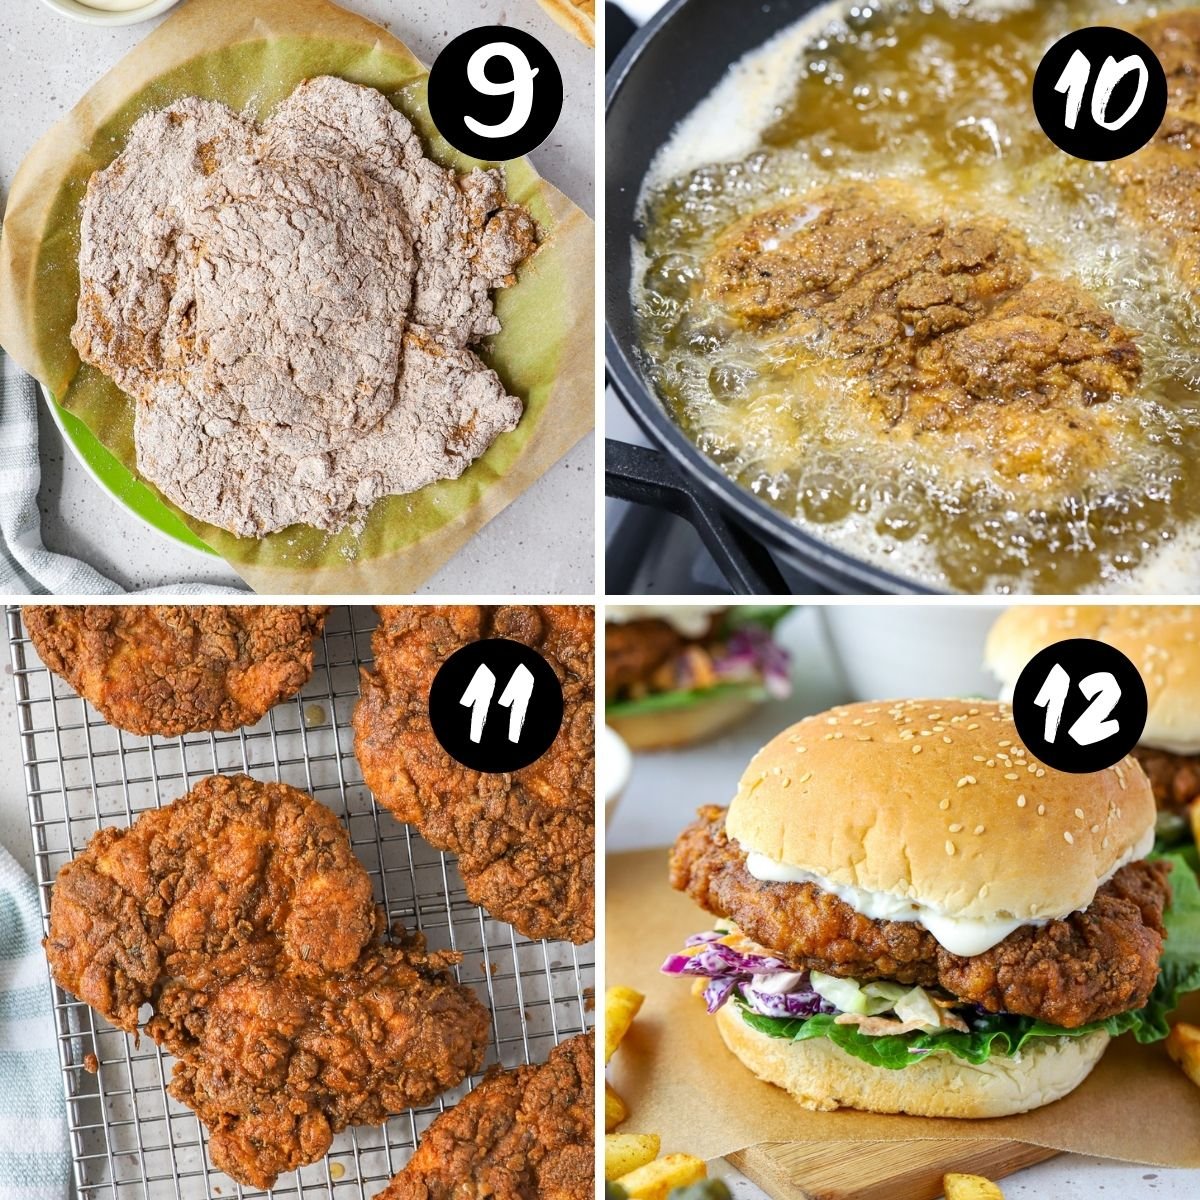
Pan-fry the chicken in oil at about 175-180 °C/356 F. How long to pan fry chicken will depend entirely on the thickness of the chicken fillets and the temperature of the oil.
For chicken 1cm in thickness, aim for about 3-4 minutes on one side and then flip and fry for an additional 2-3 minutes.
For chicken to be safe to eat, it should be completely white and cooked through in the middle, with an internal temperature of 75°C/167 F.
Place the chicken on a wire rack to cool slightly.
Step 6 – Assemble the burgers;
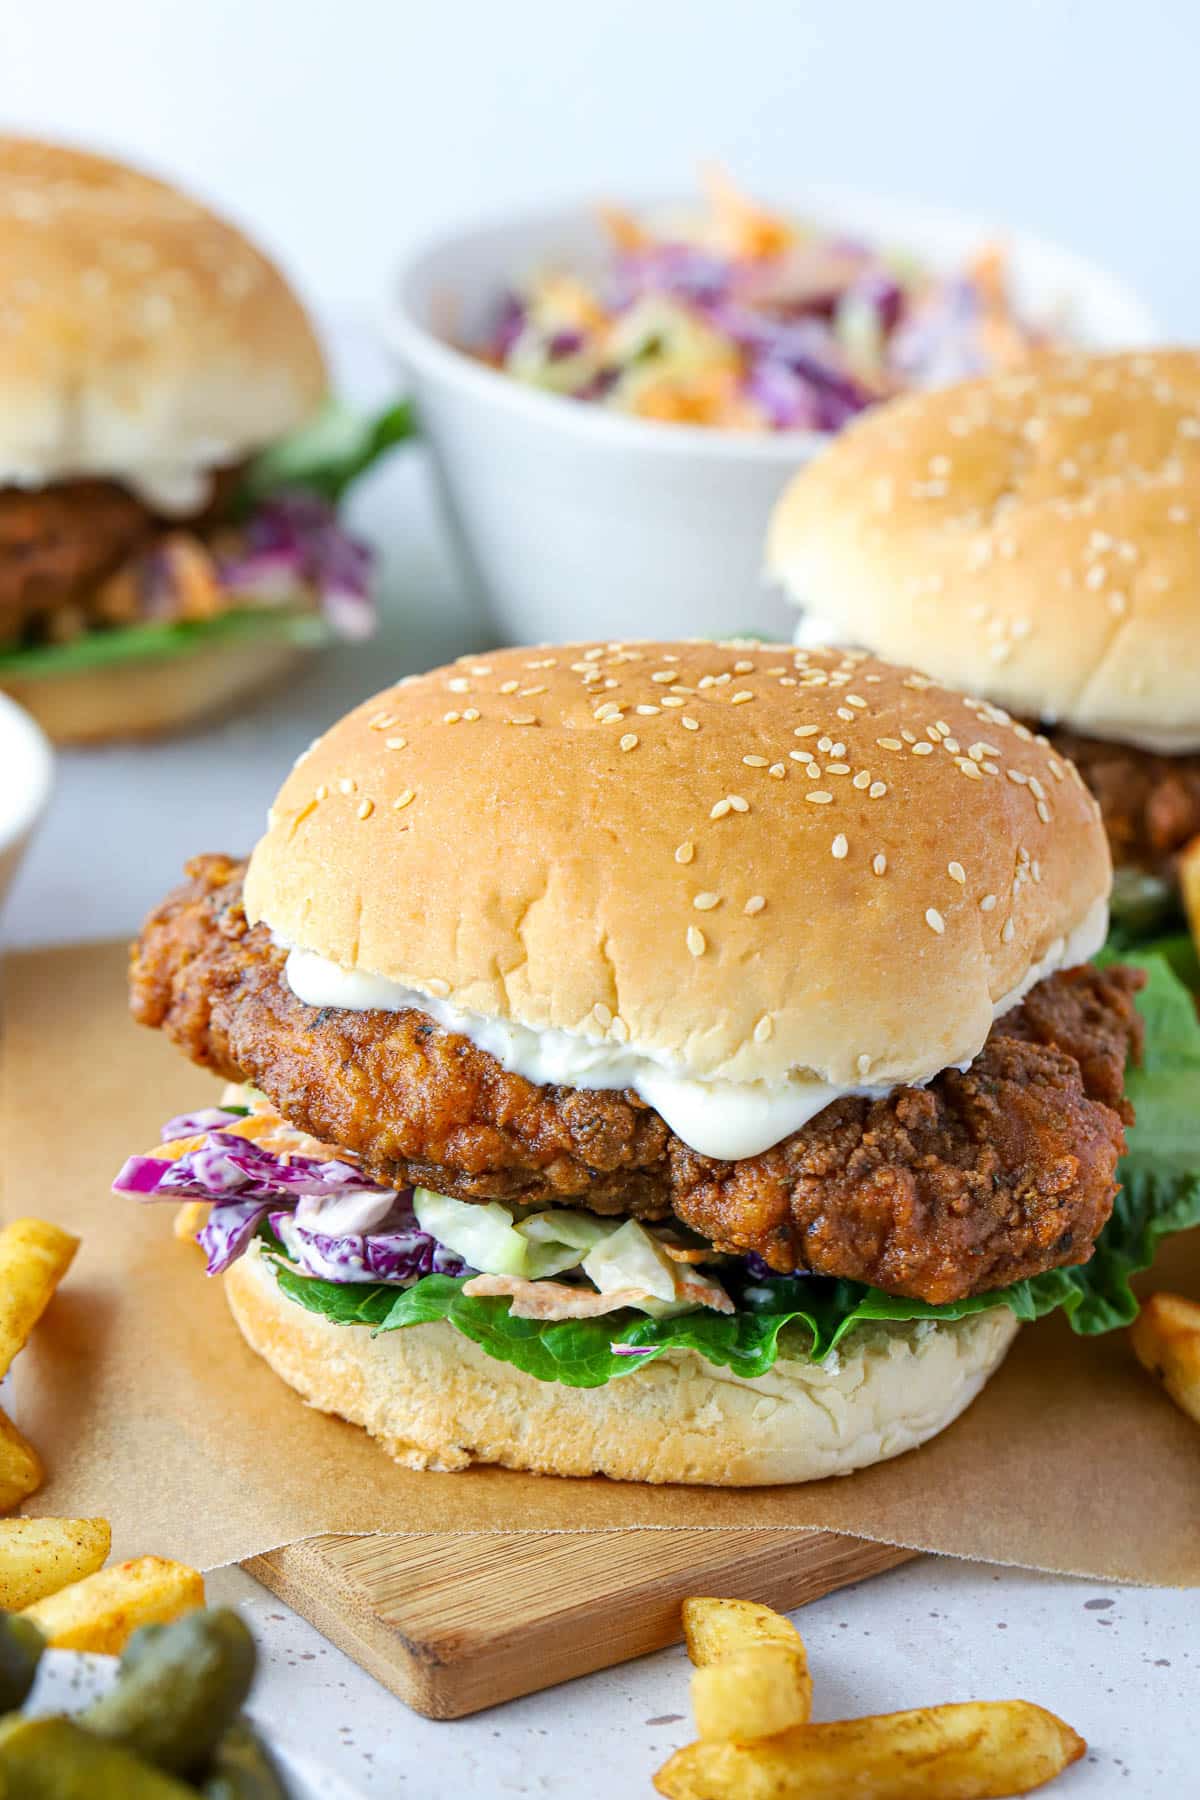
Add the lettuce and coleslaw to the bottom of the burger bun and top with the chicken and some mayo, or any of your desired toppings. Add the top of the bun and enjoy with some crispy fries.
Tips for success
- Let the chicken sit at room temperature for 20-30 minutes before cooking. Adding cold chicken to hot oil will cause it to shrink slightly and become chewy.
- Be sure to drain any excess buttermilk from the chicken before adding the flour coating. Hold each piece over the bowl and let the buttermilk drip off as much as possible. Too much buttermilk will cause the flour coating to become “gummy” and not become crispy in some areas. It may also cause the coating to fall off the chicken in patches.
- Make a double batch of the chicken coating and keep half for next time! It makes prep so much easier.
- I recommend soaking the chicken in the buttermilk overnight, for best results. At least 4 hours is recommended, but at least one hour if you are short on time.
- Don’t over-handle the chicken while cooking. It will cause the coating to fall off in patches. Use tongs and only flip once before removing from the hot oil.
- Let the chicken sit on a wire rack for a few minutes to drain. Some fried food is ok to drain on paper towel, but in this case, it makes the bottom of the chicken a little soggy. We want crispy, crunchy chicken fillets here, so setting them on a wire rack is the best option. Place a tray underneath the wire rack to catch any stray drips.
- Prep ahead – you can chop the salads (including the coleslaw ingredients) and keep them in the fridge in an airtight container for 1-2 days until ready to assemble. I recommend leaving the coleslaw dressing off until you are ready to serve. The chicken coating mixture can be made ahead and stored in an airtight container in the pantry until you are ready to use it. And the chicken can of course be soaked in the buttermilk mixture the night before, making the cooking process so much easier!
FAQs
Try serving chicken burgers with potato fries or wedges, sweet potato fries, potato salad, mashed potato and gravy or even some grilled corn with paprika salt. Load them up with whichever crunchy salads and sauces you love. Pickles, burger cheese or bacon make great additions.
When fried in oil at 180 C, chicken fillets 1cm in thickness will take about 3-4 minutes on one side and then a further 2-3 minutes when flipped. When the chicken is firm and the juices run clear, the chicken is cooked. If you cut the chicken at its thickest part and it is still slightly pink, it needs more time. The internal temperature of the thickest part of the chicken should reach 75C/167F before consuming.
Related recipes
Tried this recipe? Please leave a star ⭐⭐⭐⭐⭐ rating or leave a review below and let you know how you went!
Hungry for more? Subscribe to my newsletter and follow along on Facebook, Instagram and Pinterest for the latest recipes and news.
Crispy Chicken Burgers with Buttermilk
Ingredients
- 600 grams chicken breast 2 large fillets, sliced in half lengthways
For the buttermilk marinade
- 1 cup buttermilk
- 1 teaspoon salt
- ½ teaspoon ground black pepper ground
- 1 teaspoon paprika sweet paprika
- ½ teaspoon chilli powder or sriracha sauce. Optional.
For the chicken coating (make ahead and store in the pantry, ready to go!)
- ¾ cups self raising flour
- ⅓ cup cornflour cornstarch
- 1-1 ½ teaspoons salt
- ½ teaspoon dried thyme
- ½ teaspoon dried basil leaves
- ½ teaspoon dried oregano
- ⅛ teaspoon ground sage
- 1 teaspoon celery salt
- 1 ½ teaspoons ground black pepper
- ½ teaspoon ground white pepper
- 1 teaspoon mustard powder
- 1 ½ teaspoons sweet paprika sweet Hungarian paprika (not hot or smoked).
- 1 ½ teaspoons garlic powder
- ½ teaspoon ground ginger
- ½ teaspoon chilli powder optional
- 1 ½ teaspoons onion powder
For the coleslaw
- ¼ purple cabbage shredded
- 1 carrot grated
- ⅓ cup coleslaw dressing
Plus
- vegetable oil or canola oil, for frying
- 4 white burger buns or brioche rolls
- mayonnaise or smoky BBQ sauce or chilli mayo
- iceberg lettuce shredded
Instructions
For the marinade
- Slice the chicken breast lengthways (burger sized) and pat dry with a paper towel.
- Place the chicken on a chopping board and cover with baking paper. Use a mallet or rolling pin to pound the chicken to about 1cm thickness. *The height should be even to ensure even cooking.
- Mix the buttermilk and buttermilk spices together and add the chicken. Ensure the chicken is completely coated in the buttermilk mixture, then cover and refrigerate overnight, or for at least 4 hours.
For the coleslaw
- When you are almost ready to cook the burgers, mix the cabbage, carrot and coleslaw dressing together in a bowl and stir to combine. Cover and refrigerate until ready to assemble.
For the chicken
- Once the chicken has soaked overnight, remove it from the fridge and set aside.
- Mix the chicken coating ingredients together in a bowl and whisk until completely combined. *This step can be done ahead of time and the coating stored in the pantry, ready for use.
- Pick up one piece of chicken at a time and hold it above the bowl so the excess buttermilk drips off.
- One at a time, place each piece of chicken into the coating mixture and coat until thickly covered. Set aside on a plate while you coat the other pieces.
- When ready to cook, add enough oil to the pan to shallow fry the chicken. Heat the oil in the pan until it reaches 180°C/356 F. If you don't have a thermometer, test the oil by dropping a small piece of chicken coating into the pan. If it bubbles, the oil is ready.
- Place the chicken into the hot oil and cook for 3-4 minutes on one side. Use tongs to flip and cook for a further 2-3 minutes, or until the coating is golden and crispy and the chicken is completely cooked through with an internal temperature of 75°C. *Make sure the oil doesn't get too hot, or the coating will burn. (The temperature will drop to around 150-160°C when the chicken is added. Try to keep it at this temperature as the chicken cooks.)
- Place the chicken on a wire rack to rest and drain for 1-2 minutes.
To assemble the burgers
- Place a the lettuce and coleslaw on the bottom burger buns. Place the crispy chicken fillets over the top and add some mayo.
- Top with any additional fillings and the remaining top of the burger bun. Serve with fries or your favourite sides.
Notes
- Chicken breast – I recommend boneless, skinless breast fillets for their larger size, which is perfect for burgers. The chicken breasts are sliced in half, pounded and marinated to tenderise before cooking. I recommend using fresh chicken rather than frozen/thawed.
- Buttermilk – is the not-so-secret key ingredient that is essential for juicy, tender and flavoursome fried chicken. It plays multiple roles in this recipe; it tenderises and infuses the spices into the chicken before cooking. And it also helps the flour coating mixture will cling to the chicken. Store-bought or homemade buttermilk is fine.
- Let the chicken sit at room temperature for 20-30 minutes before cooking. Adding cold chicken to hot oil will make it shrink slightly and become chewy.
- Be sure to drain any excess buttermilk from the chicken before adding the flour coating. Hold each piece over the bowl and let the buttermilk drip off as much as possible. Too much will cause the flour coating to become “gummy” and not become crispy in some areas. It may also fall off the chicken in patches.
- Make a double batch of the chicken coating and keep half for next time! It makes prep so much easier.
- I recommend soaking the chicken in the buttermilk overnight, for best results. At least 4 hours is recommended, but at least one hour if you are short on time.
- Let the chicken sit on a wire rack for a few minutes to drain. Some fried food is ok to sit on paper towel, but in this case, it makes the bottom of the chicken a little soggy. We want crispy, crunchy chicken fillets here, so setting them on a wire rack above a tray to catch stray drips is the best option.
- Prep ahead – you can chop the salads (including the coleslaw ingredients) and keep them in the fridge in an airtight container for 1-2 days until ready to assemble. I recommend leaving the coleslaw dressing off until you are ready to serve. The chicken coating mixture can be made and stored in an airtight container in the pantry until you are ready to use it. And the chicken can of course be coated in the buttermilk mixture the night before, making the cooking process so much easier!
- How to tell when the chicken is done; When fried in oil at 180 C, chicken fillets 1cm in thickness will take about 3-4 minutes on one side and then a further 2-3 minutes when flipped. When the chicken is firm and the juices run clear, the chicken is cooked. If you cut the chicken at its thickest part and it is still slightly pink, it needs more time. The internal temperature of the thickest part of the chicken should reach 75C/167F before consuming.
- Please note that the nutrition information is based on the ingredients being made into 4 burgers, with one burger being one serve. The nutritional information is an estimate only and does not take into account any additional toppings or sides served with the burgers. It is also difficult to calculate the amount of oil and buttermilk absorbed by the chicken in the marinating and cooking process. I have allowed for ¼ cup of oil to be retained, but if you need a more accurate reading you can measure the amount of oil before and after cooking (obviously be careful with hot oil!).
- This recipe is made using Australian cups and spoon measurements. Due to cup sizes varying from country to country, I advise adjusting if necessary.
Nutrition
Are you following us on Facebook, Instagram and Pinterest?
Update Notes: This recipe was originally published in April 2020, but was re-published with new information, helpful tips and photos in April 2022.


Rob says
I have cooked these 3 times so far for family dinner night and they are an absolute favourite.
Andrea Geddes says
Hi Rob! I’m so happy to hear that you enjoy them! They’re a favourite in our house too. Thank you so much for taking the time to leave a comment and let me know how you went. Andrea 🙂
Ken says
Awesome. Made some small personal choice changes, however everyone loved them
Andrea Geddes says
Hi Ken! I’m so happy that you enjoyed the burgers. Thanks for taking the time to comment and let me know! Andrea 🙂
Sha says
Hi, I’m just in the middle of making this and am excited to try. Just wanted to check the measurements though for the coating? It has a quarter of a tablespoon for a lot of the spices which I converted to teaspoons but wanted to confirm those were the right measurements and it’s not supposed to be a quarter of a teaspoon for example? I’ve already mixed it together but have until tonight to still make another coating batch. Thanks heaps! 🙂
Andrea Geddes says
Hi Sha! I’m so excited for you to try it! Yes, you have read the measurements correctly- a quarter of a tablespoon is correct. A teaspoon is a third of a tablespoon, but if this is what you used that will still be ok!
The coating mixture used to be double what it was, but I found a lot of coating mixture was leftover. So when I updated the recipe, the mixture was halved (making some of the spices a quarter of a tablespoon). I hope that helps and I hope you love the burgers!
Andrea 🙂
Sha says
Oh thank you so much for your reply! Now I understand why the measurements were a bit unique. I think I put in 3/4 of a teaspoon so close enough. Will let you know how they turn out. Can’t wait
Shara says
Just wanted to let you know that the burgers turned out amazing! Definitely a recipe to keep. I also subbed half the sweet paprika measurement for half smoked paprika because I love the smoky taste that gives. I also used GF flour and it worked perfectly. Thanks
Andrea Geddes says
That’s so great to hear! I’m so happy that you enjoyed them, and I appreciate you letting me know that GF flour works too; that will be really helpful for other readers. Thanks again! Andrea 🙂
Kylie says
Best burgers I have made! Super quick and easy, especially after the first time having the flour seasoning ready to go in the pantry!
Andrea Geddes says
Hi Kylie! Thank you so much for taking the time to comment – I’m SO happy to hear that you enjoyed them! Keeping a batch of the seasoning on hand makes them such an easy dinner. Thanks for your support! Andrea x
Gavin says
I literally just tried to jump into my computer screen! These look phenomenal – these are DEFO hitting the dinner list
Andrea Geddes says
Haha! Thanks Gavin! They are pretty tasty! I hope you enjoy them!
Jaimie says
You had me at ‘crispy chicken’. And ‘burger’. Hell, this whole thing is just perfect. Looks amazing!
Andrea Geddes says
Thanks Jaimie! I can’t pass up a good burger. Especially one with crispy chicken!
Adrianne says
WOW and yum!! I saw the pic of these and I had to come and check them out, they look SO GOOD!!! I wish I was having one for dinner or a weekend lunch. The coleslaw looks like the perfect pairing as well, delicious, can’t wait to try it!!
TheCookingCollective says
Thank you Adrianne! I hope you enjoy them!
Sylvie says
Got some chicken breasts in the freezer, and now I know exactly what I’m gonna make with them! I adore anything fried chicken, so put inside a burger… it’s heavenly!
TheCookingCollective says
That’s a great way to use up those chicken breasts Sylvie! Enjoy.
Alex says
Wow, how delicious – a good chicken burger is the way to my heart. I love this recipe!
TheCookingCollective says
Thanks Alex! I am so glad to hear that!
Sally says
Oh my gosh this is my perfect meal! I love make at home takeaway for a friday night and chicken burgers are my weakness. These look so crispy and perfect I can’t wait to try them!
TheCookingCollective says
Me too Sally! I make burgers as often as I can!