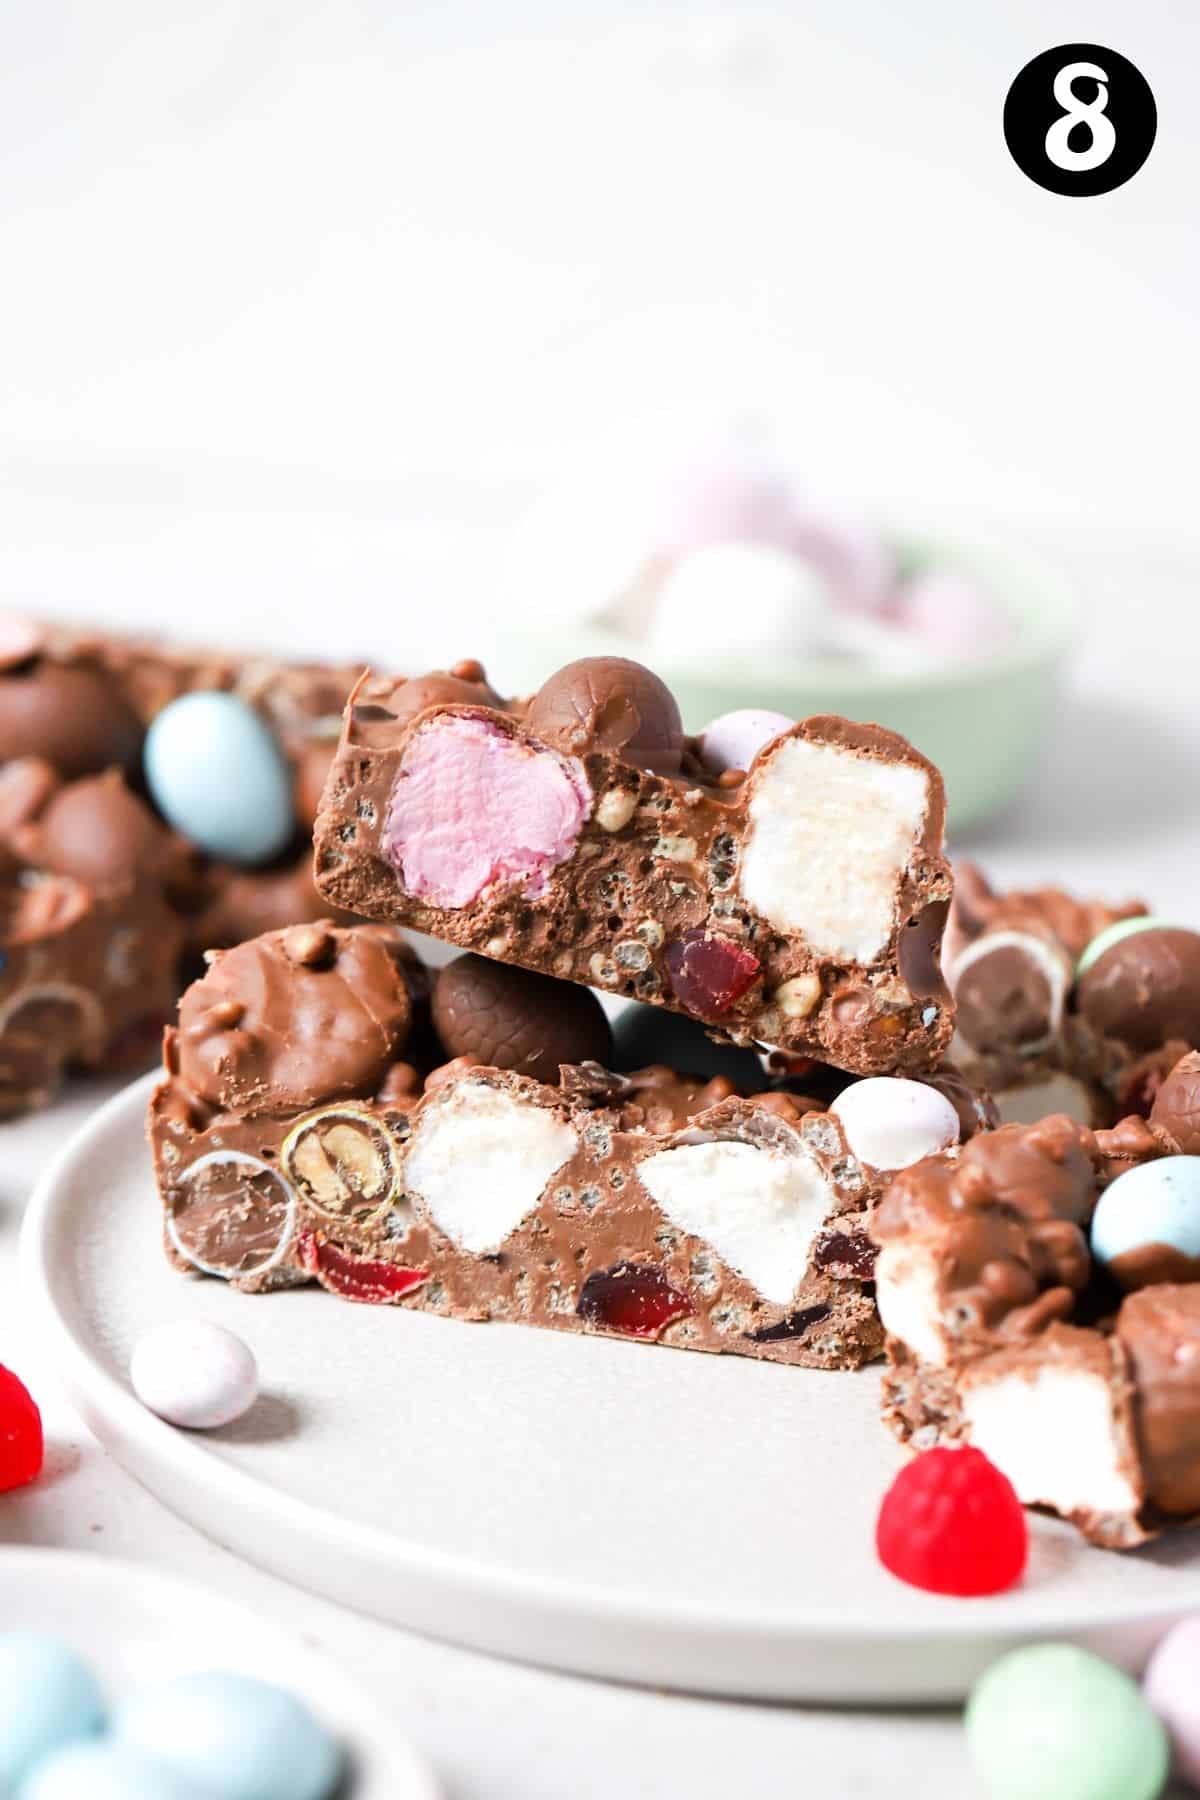
You will love this easy Easter rocky road, made from scratch. Every bite is filled to the brim with mini eggs, marshmallows, crunchy Rice Bubbles, lollies and chunky peanuts – all coated in luscious, creamy milk chocolate. I’ll show you how to make rocky road in less than 5 minutes, with just a handful of simple ingredients that you can adapt to your liking!

Why you’ll love this recipe
- Quick and easy – All you have to do is melt the chocolate and stir everything together. The hardest part is waiting for it to set!
- Customisable – add your own individual flair with any of your favourite sweet and salty fillings.
- Enjoyable all year round – it doesn’t have to be Easter or Christmas to enjoy this irresistible rocky road slice. It can be eaten year-round! Perfect for bake sales, holiday gifting or a sweet afternoon treat to enjoy with a cuppa.
- A great use for leftover Easter eggs – (is there such a thing?!)
- Make ahead – you can make it ahead of time and store it in the fridge for up to 2 weeks.
- Great for gifting!
- So delicious – sweet and soft, chewy and crunchy textures and loads of flavour. I promise this will be your go-to recipe!
- Made in the microwave – no need to turn on your oven and no candy thermometers required.
Ingredients you will need
** This post contains tips and instructions to achieve the best possible results. The photo above is a great guide for when you are in the supermarket, but for full ingredient quantities and methods, please scroll down to the detailed recipe card below!
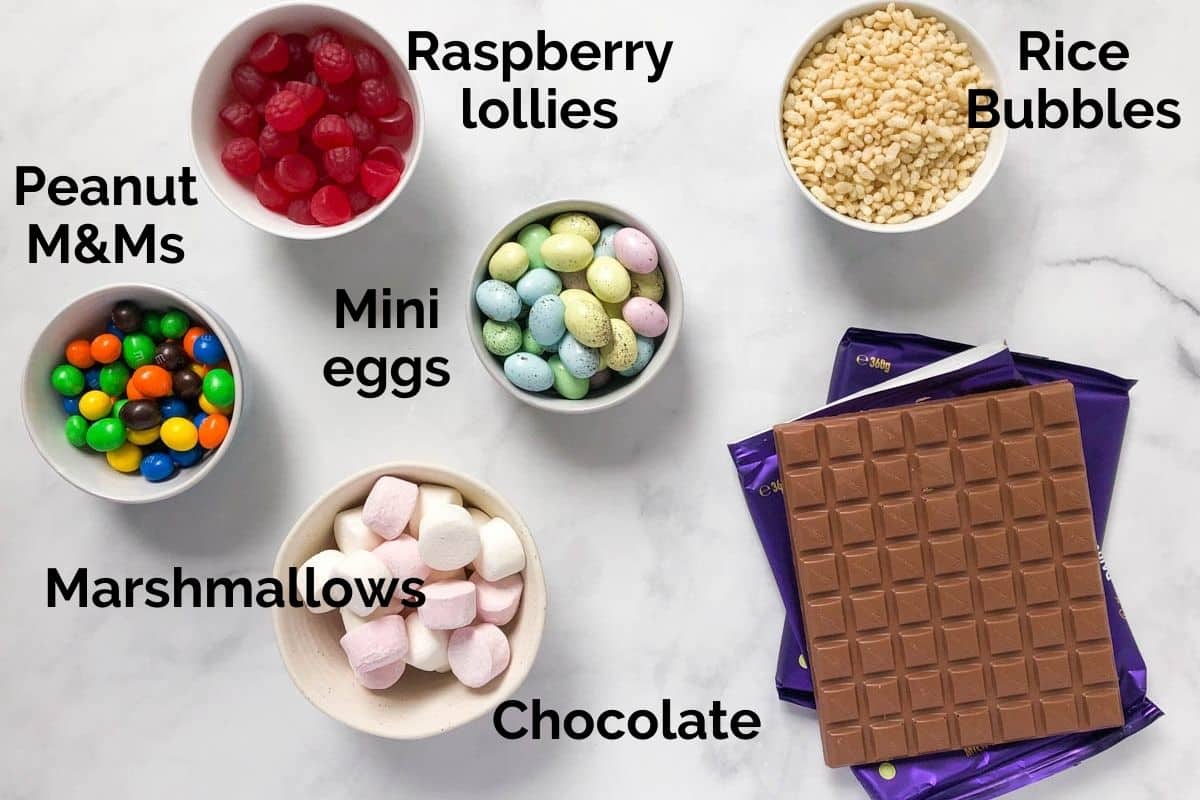
- Chocolate – be sure to use a good quality brand of chocolate that you know and love to eat. I recommend using regular eating chocolate rather than baking chocolate or candy melts. Cadbury Dairy Milk chocolate is my go-to!
- Marshmallows – use a mixture of pink and white, regular-sized marshmallows. Or swap for equal quantities of mini marshmallows.
- Lollies –use up to 1 cup of any of your favourite chopped lollies. I love to use Allen’s Ripe Raspberries. But you can also use snakes, jelly babies or anything soft and fruity. Cut them into small pieces to blend into the slice without becoming too hard to chew.
- Peanut M&Ms –my favourite ingredient to add to rocky road! They give a lovely crunch and sweet/nutty flavour. Alternatively, you can sub for equal quantities of regular salted peanuts or leave the nuts out entirely if you need it to be nut-free.
- Mini Eggs –any type of mini chocolate Easter eggs will work. I love to use Cadbury mini speckled eggs, because their muted colours make the slice so pretty! Try mini milk chocolate eggs, or even Cadbury caramel-filled or crème eggs.
- Rice Bubbles – or Rice Krispies. They add an element of crunch and chewiness to the slice that contrasts with the soft marshmallows and chewy lollies.
- Any of your favourite add-ins – if you’re short on ideas, check the list below.

Step by step guide
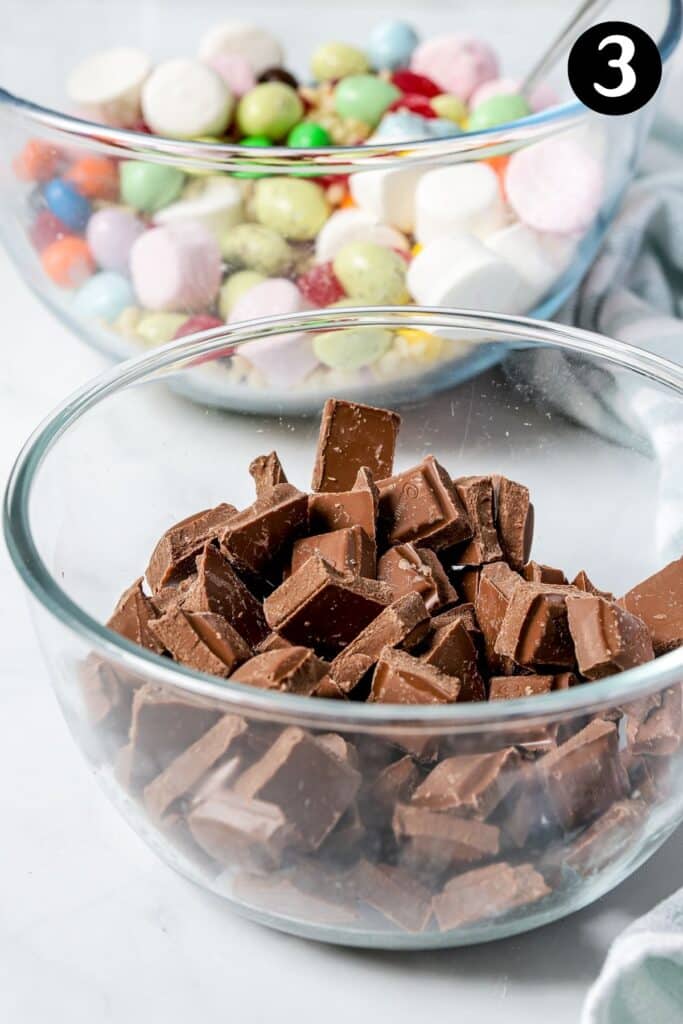
- Start by mixing your add-ins together in a large mixing bowl and line a tray with baking paper. It is important to have everything mixed and ready to go so that the melted chocolate can be immediately added to the mix without delay (or it will start to set).


2. Melt the chocolate – in the microwave until smooth (see notes on how to melt chocolate below).
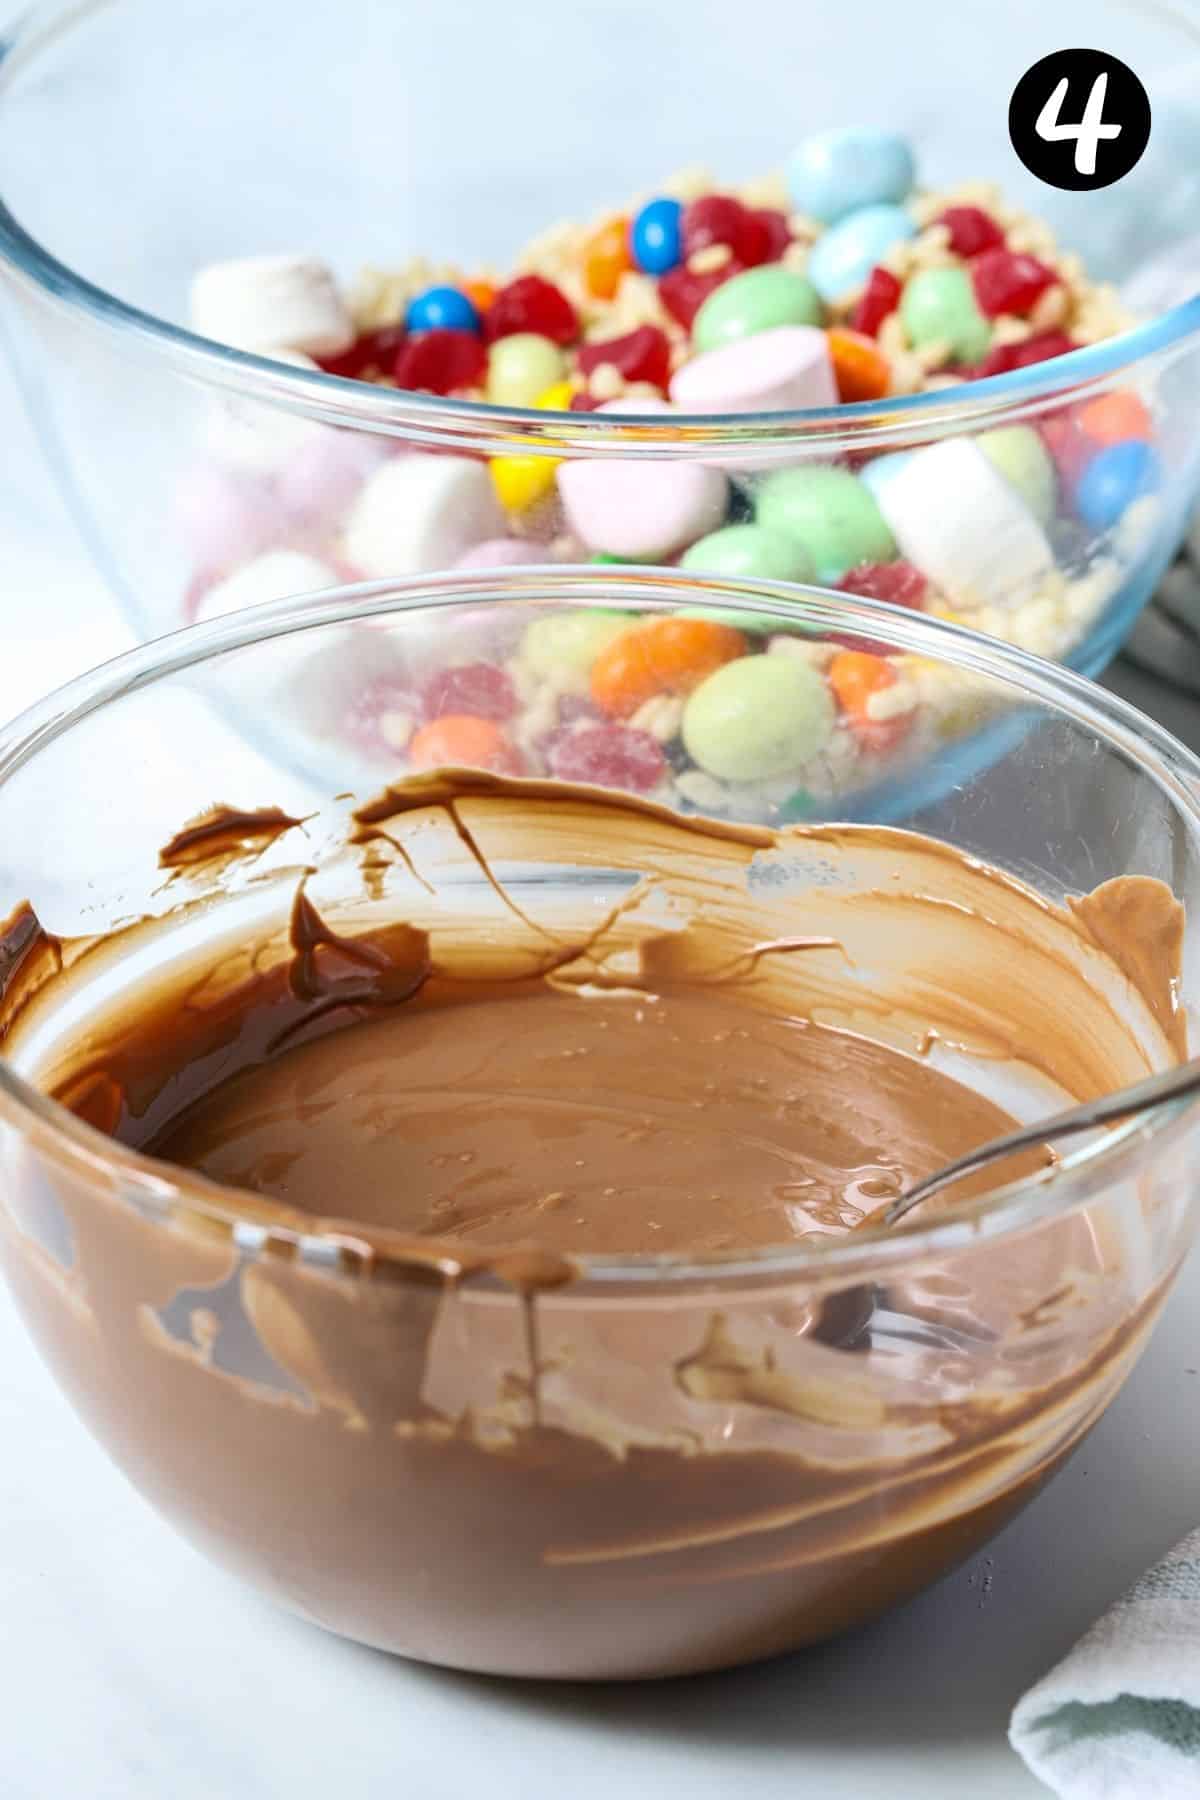
3. Working quickly, pour the chocolate over the top of the fillings and stir everything until combined.
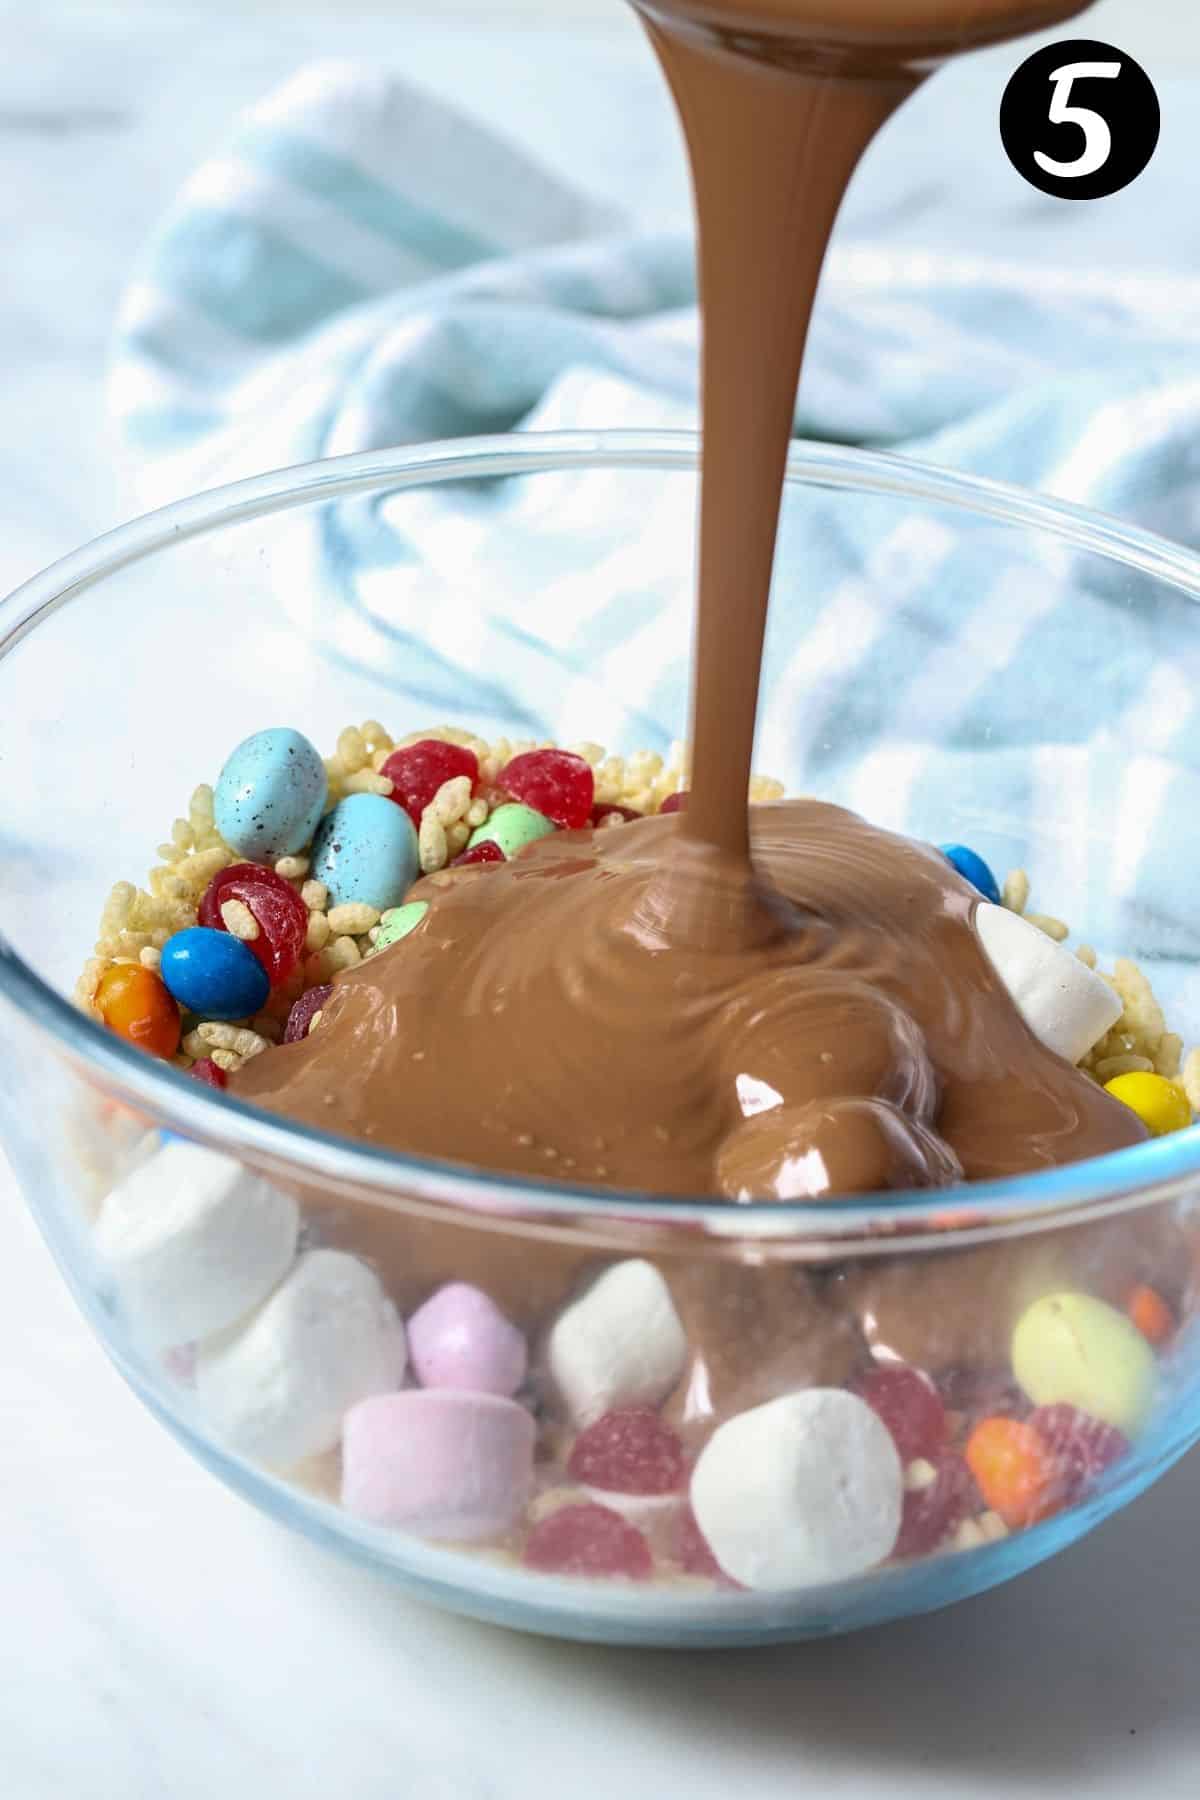
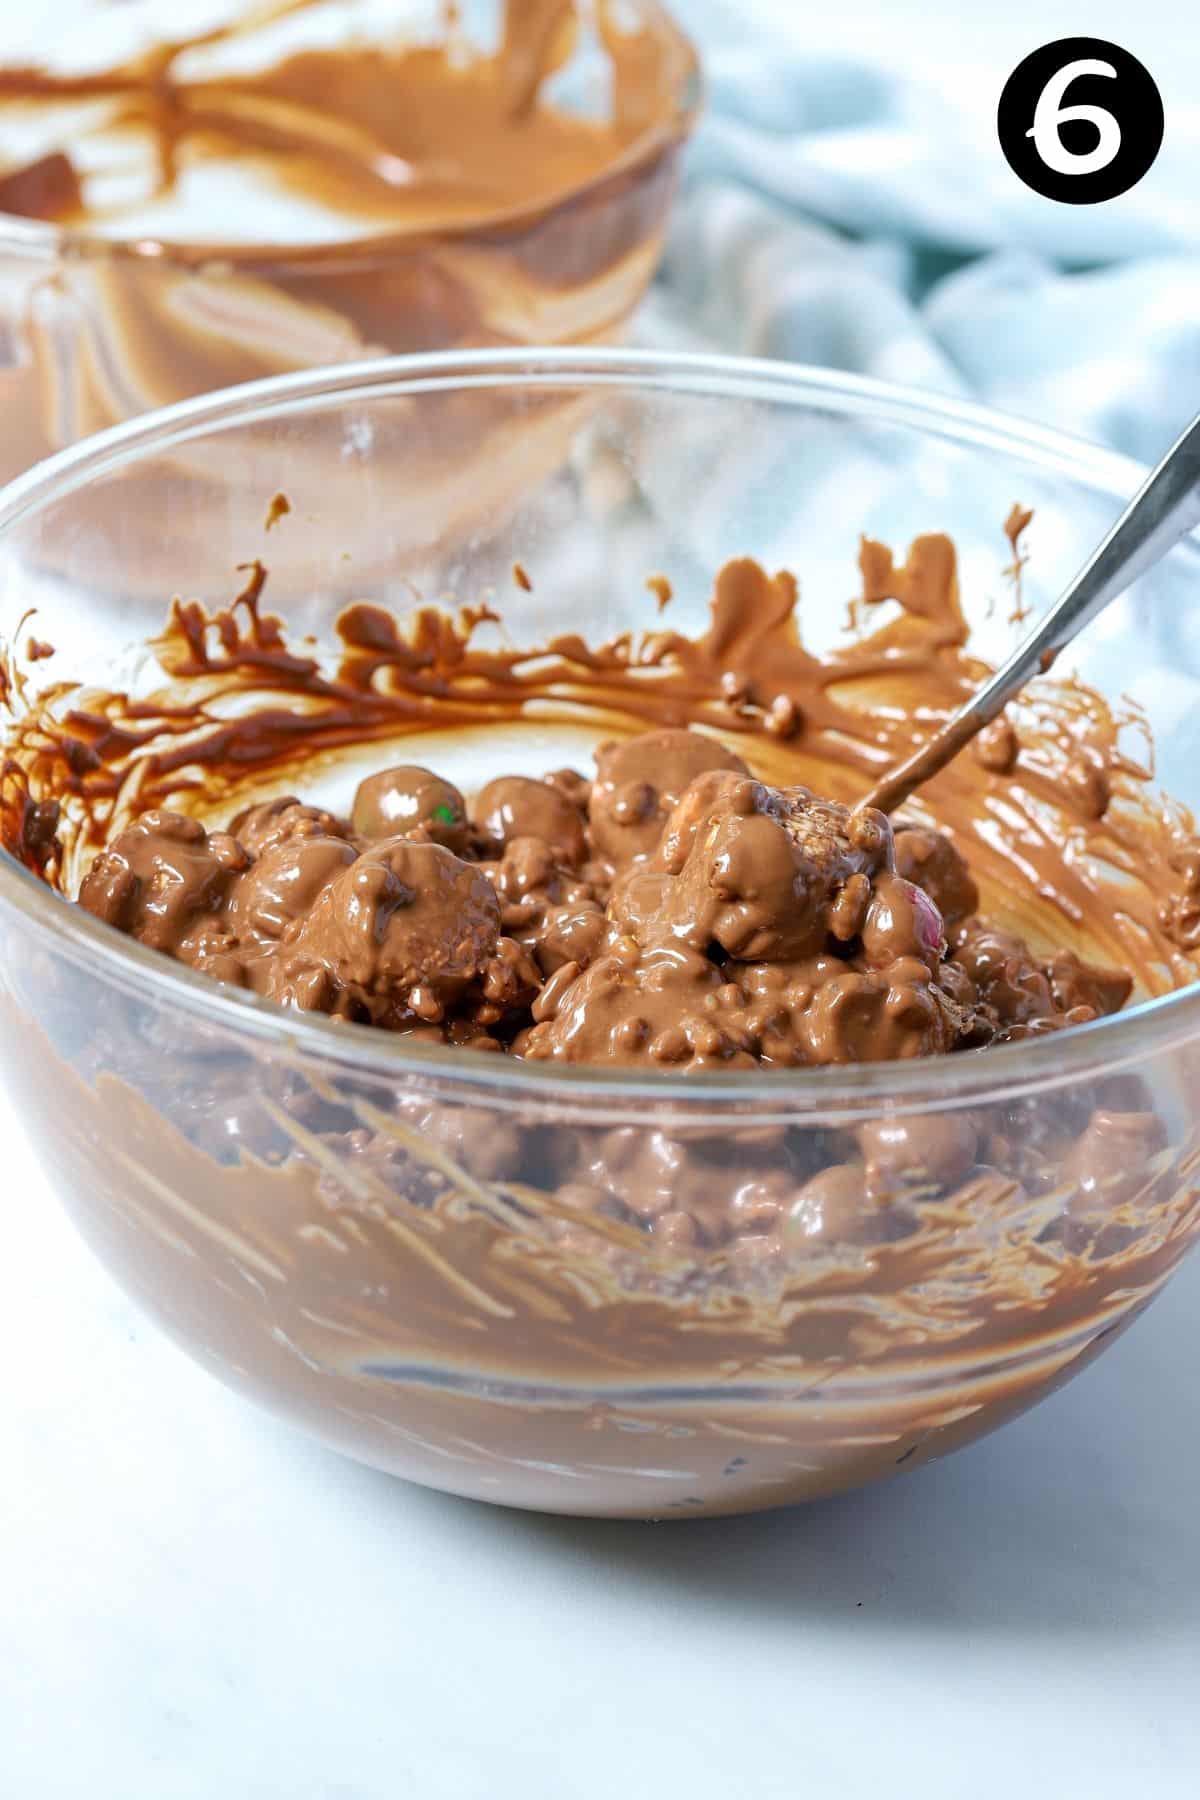
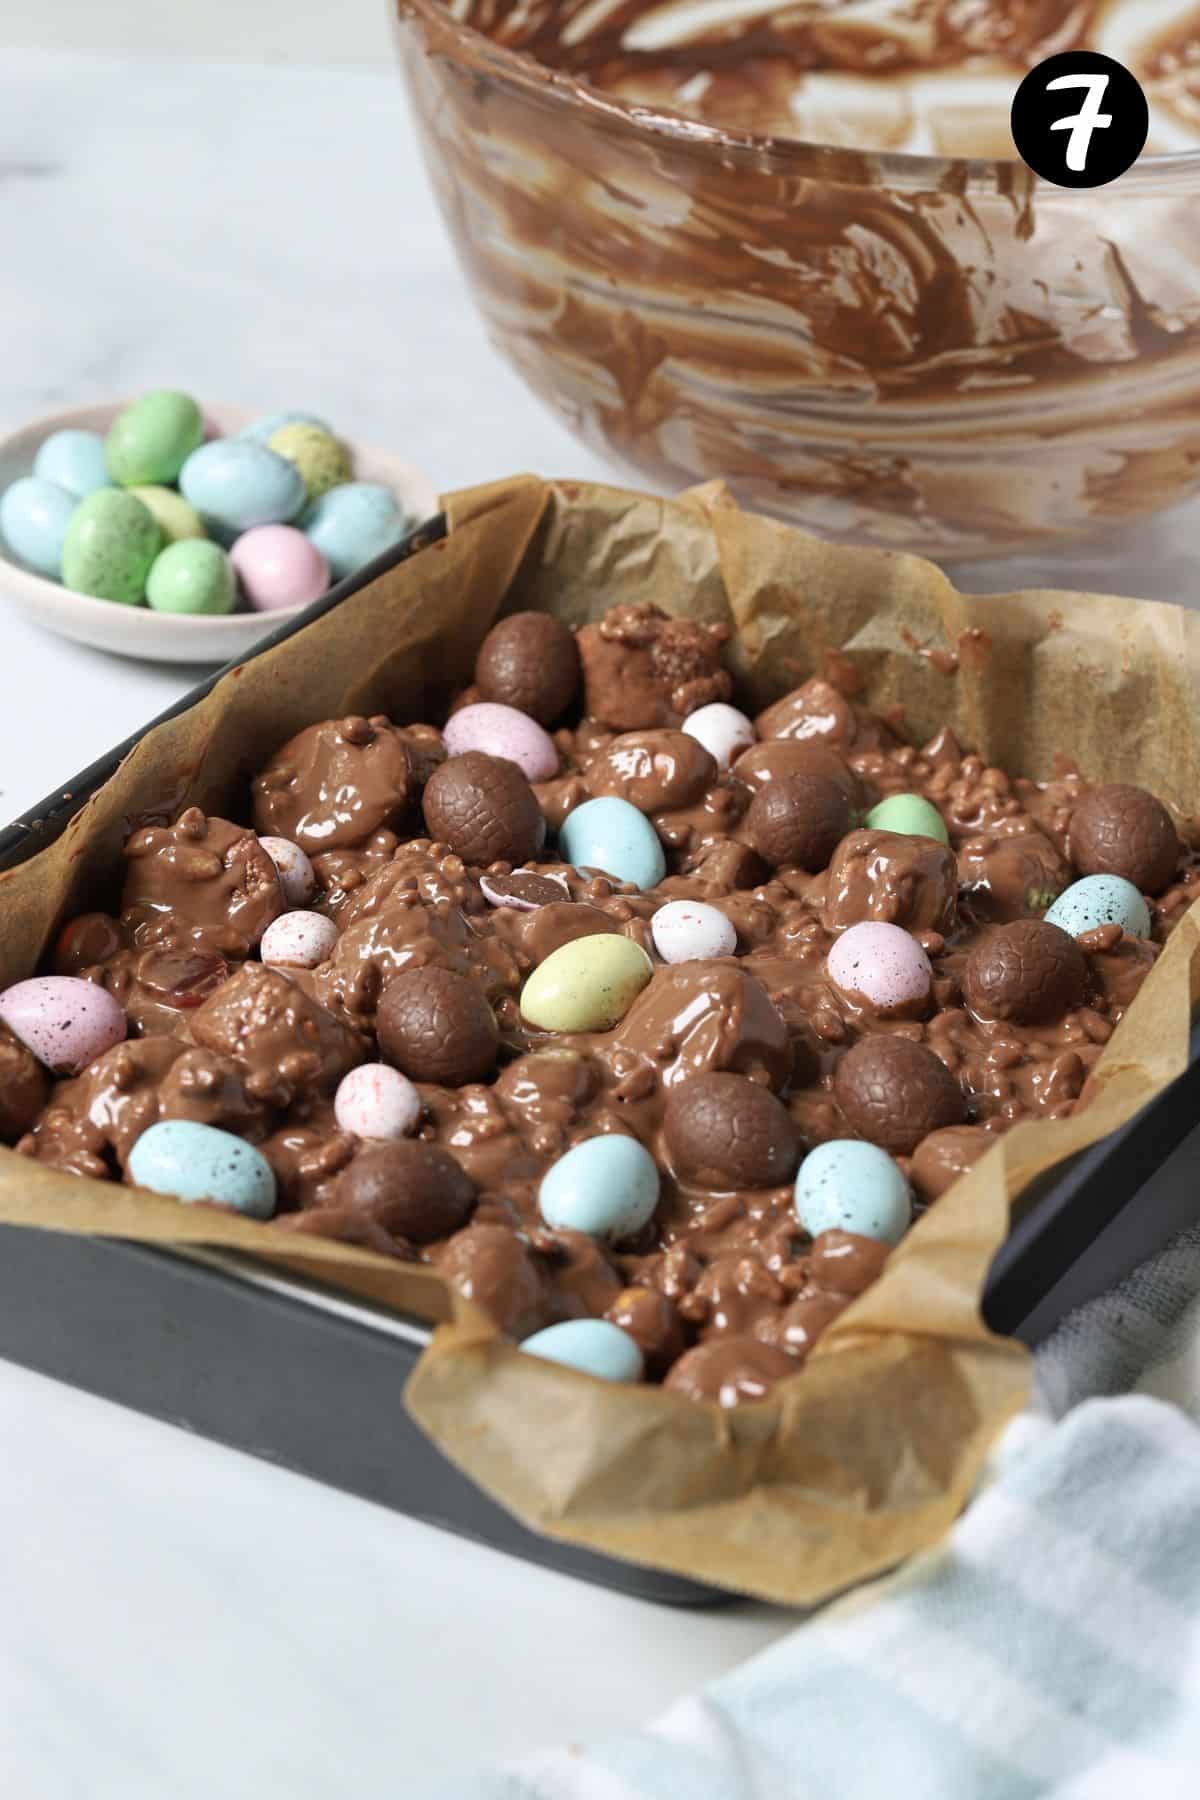
4. Add the mixture to a lined tin and decorate with some additional mini eggs. Place in the fridge to set.
5. Cut into slices and serve or wrap for later.
Rocky road add-ins
The great thing about this recipe is that it is so versatile! There are endless combinations of mix-ins and you can add your favourites for your own personal twist. Classic additions like marshmallows, nuts and lollies are always popular, but you can also choose any of the following from the list below.
- Chopped nuts – macadamias, hazelnuts, pistachios, peanuts.
- Shredded coconut
- Glacé cherries
- Dried fruits – sultanas, blueberries, strawberries, cranberries.
- Salted pretzels
- Lollies – Allen’s snakes, raspberry lollies, marshmallows, jelly babies, Clinkers, Maltesers, red frogs or any of your favourites. Chop them into small pieces.
- Salted crackers
- Sweet biscuits – broken into pieces
- Freeze dried strawberries
- Salted popcorn
- Mini Easter eggs – leftover Easter chocolate, speckled eggs, milk chocolate, caramel eggs or crème filled eggs. They can be added broken or whole.
- M&Ms – peanut, crispy or plain.

How to melt chocolate
While melting chocolate is quite simple and straightforward, there are a few things you can do to avoid burning or graininess and ensure smooth, glossy chocolate.
To melt chocolate in the microwave;
- Break the chocolate into small pieces (or chop) and place the pieces into a dry, microwave-safe bowl.
- Heat in the microwave at 50% power in 20-30 second intervals.
- Use a dry spatula or metal spoon (not wooden spoon) to stir the chocolate in between each 30 second interval. Repeat until the chocolate has mostly melted and appears glossy, with just a few lumps remaining. The small lumps will continue to melt as you stir.
To melt chocolate on the stovetop;
- On your stovetop, bring a pot of water to the boil. Turn the heat down to a low simmer.
- Break the chocolate into small pieces (or chop to evenly sized pieces) and place it into a dry glass or metal bowl. The bowl needs to be able to fit tightly over the top of the pot without falling in or allowing steam to escape. The top of the water should not touch the bottom of the bowl.
- Place the bowl of chocolate onto the pot and continue to stir over the heat until it melts and becomes smooth and glossy. Use a towel or mitt to hold the bowl to avoid burning fingers.
- Remove from the heat and use immediately.
Tips for success
- Work quickly; once the chocolate has melted, it is important to mix everything together and spread the mixture onto the tray as quickly as possible. This is because the chocolate will start to set as soon as it is mixed in with the other ingredients. I recommend having everything chopped and mixed in a bowl, ready to go.
- Use a metal spoon to stir the chocolate during the melting process. Wooden spoons can retain moisture and make the chocolate seize.
- Add 1 tablespoon of vegetable oil or canola oil to the chocolate, before melting. This is optional, but the additional oil will make the chocolate a little easier to slice when it sets.
- For neat slices, heat a large knife under hot water (and then dry) before slicing. This will help the knife move through the chocolate and prevent cracks.
- Storage. Any leftovers will keep in the fridge in an airtight container for 1-2 weeks.
- Make a double batch for gifting! Make some for yourself and make someone’s day with a lovely, wrapped rocky road gift.
- Before melting the chocolate, make sure that your bowl and utensils are completely dry. Any excess moisture in the melting process can cause the chocolate to seize and become grainy.
FAQs
Yes! Rocky road can be frozen for up to 3 months in a freezer-safe, airtight container. I recommend cutting it into slices of your desired size first.
When stored in the fridge in a good quality, airtight container, it will last in the fridge for 1-2 weeks.
Because chocolate is the star of this recipe and ties everything together, it is important to make sure it’s a good quality one. Choose a brand of chocolate that you know and love to eat. I recommend regular eating chocolate over candy melts or cooking chocolate. White, milk or dark will work, depending on your preference.

Related recipes
Try these edible gifts and chocolate Easter treats; there’s something here for everyone!


Tried this recipe? Please leave a star ⭐⭐⭐⭐⭐ rating or leave a review below and let you know how you went!
Hungry for more? Subscribe to my newsletter and follow along on Facebook, Instagram and Pinterest for the latest recipes and news.

Easter Rocky Road with Mini Eggs
Ingredients
- 500 grams chocolate broken or chopped into small pieces. Use a good quality chocolate, like Cadburys.
- 200 grams marshmallows 2 – 2 ½ cups (pink and white marshmallows)
- 190 grams raspberry lollies ¾ cup, cut in half. Or your preferred lollies of choice.
- 175 grams Peanut M&Ms ¾ cup
- 250 grams mini eggs 1 ¼ cup of any leftover chocolate mini Easter eggs, or swap for your preferred chocolate of choice.
- 1 ½ cups Rice Bubbles (Rice Krispies)
Optional
- extra mini eggs, for decorating
Instructions
- Line a slice tray with baking paper.
- Place the rocky road filling ingredients (marshmallows, lollies, M&Ms, Rice Bubbles, mini eggs, other ingredients of choice) into a large mixing bowl and stir to combine.
To heat the chocolate in a microwave;
- Break the chocolate into pieces and add it to a dry, microwave-safe bowl. Microwave on medium (50%) heat in 20-30 second bursts, stirring with a metal spoon at each interval, until the chocolate is smooth and completely melted.
To heat the chocolate on the stove top;
- Place a small pot of water on the stove and bring to a boil. Reduce the heat to a low simmer.
- Break the chocolate into pieces and add it to a dry, heat-proof bowl. *The bowl should fit over the top of the pot snugly, without falling in or leaving gaps for steam to escape. Sit the bowl over the pot of water and stir continually while the chocolate melts. You may need to use a towel or mitt to hold the bowl, as it may get hot.
- Once the chocolate has completely melted, remove from the heat.
To make the rocky road
- Working quickly, pour the melted chocolate over the other ingredients and stir to combine. Working quickly, pour the rocky road mixture into the prepared tray and spread it slightly. Decorate with extra mini eggs or desired toppings.
- Refrigerate for at least 2 hours, until set. Cut into slices. Enjoy!
Notes
- Because chocolate is the star of this recipe and ties everything together, it is important to make sure it’s a good quality one. Choose a brand of chocolate that you know and love to eat. I recommend regular eating chocolate over candy melts or cooking chocolate. White, milk or dark will work, depending on your preference.
- Work quickly; once the chocolate has melted, it is important to mix everything together and spread the mixture onto the tray as quickly as possible. This is because the chocolate will start to set as soon as it is mixed in with the other ingredients. I recommend having everything chopped and mixed in a bowl, ready to go.
- Use a metal spoon to stir the chocolate during the melting process. Wooden spoons can retain moisture and make the chocolate seize.
- Add 1 tablespoon of vegetable oil or canola oil to the chocolate before melting. This is optional, but the additional oil will make the chocolate a little easier to slice when it sets.
- For neat slices, heat a large knife under hot water (and then dry) before slicing. This will help the knife move through the chocolate and prevent cracks.
- Storage. Any leftovers will keep in the fridge in an airtight container for 1-2 weeks.
- Make a double batch for gifting! Make some for yourself and make someone’s day with a lovely, wrapped rocky road gift.
- Before melting the chocolate, make sure that your bowl and utensils are completely dry. Any excess moisture in the melting process can cause the chocolate to seize and become grainy.
- Freezing; Rocky road can be frozen for up to 3 months in a freezer-safe, airtight container. I recommend cutting it into slices of your desired size first.
- Storage; When stored in the fridge in a good quality, airtight container, it will last in the fridge for 1-2 weeks.
- Please note that the nutrition information is based on the slice being cut into 12 pieces, with one piece being one serve. The nutritional information is an estimate only and will vary depending on the type of fillings that you add.
- This recipe is made using Australian cups and spoon measurements. Due to cup sizes varying from country to country, I advise adjusting if necessary.
Nutrition
Are you following us on Facebook, Instagram and Pinterest?
Update Notes: This recipe was originally published in March 2019, but was re-published with new information, helpful tips and photos in April 2022.


Ruthie says
Love it…Super easy and super delicious! ♡
Andrea Geddes says
I’m so happy to hear that you loved it! It’s one of my favourites too. Especially around Christmas loaded with peanut M&Ms! Thanks for letting me know! Andrea.
Jaimie says
Love this Andrea, can’t wait to try this with the kids over the next few days… it will be a hit, no doubt!
TheCookingCollective says
Thanks Jaimie! They are the perfect recipe to make with kids. They’ll be able to help with all of the steps. Enjoy!