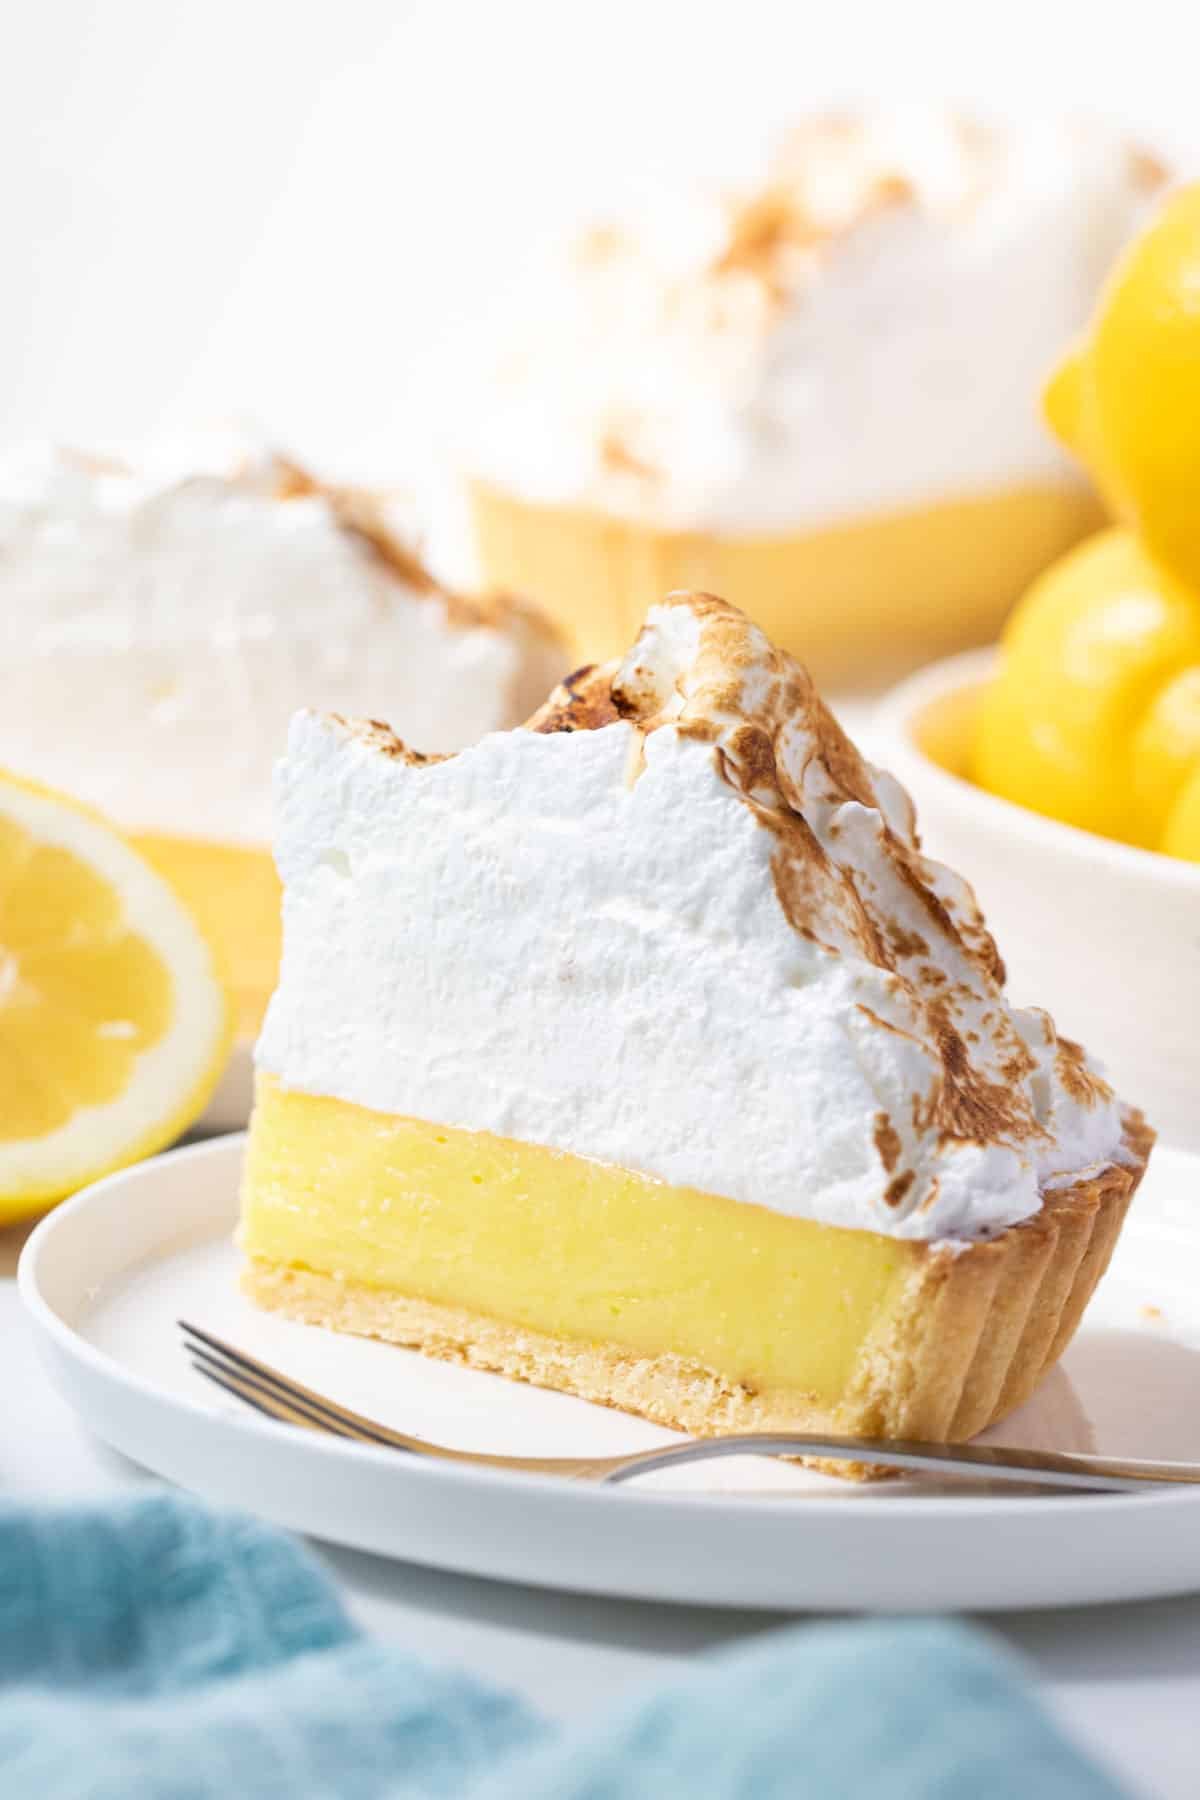
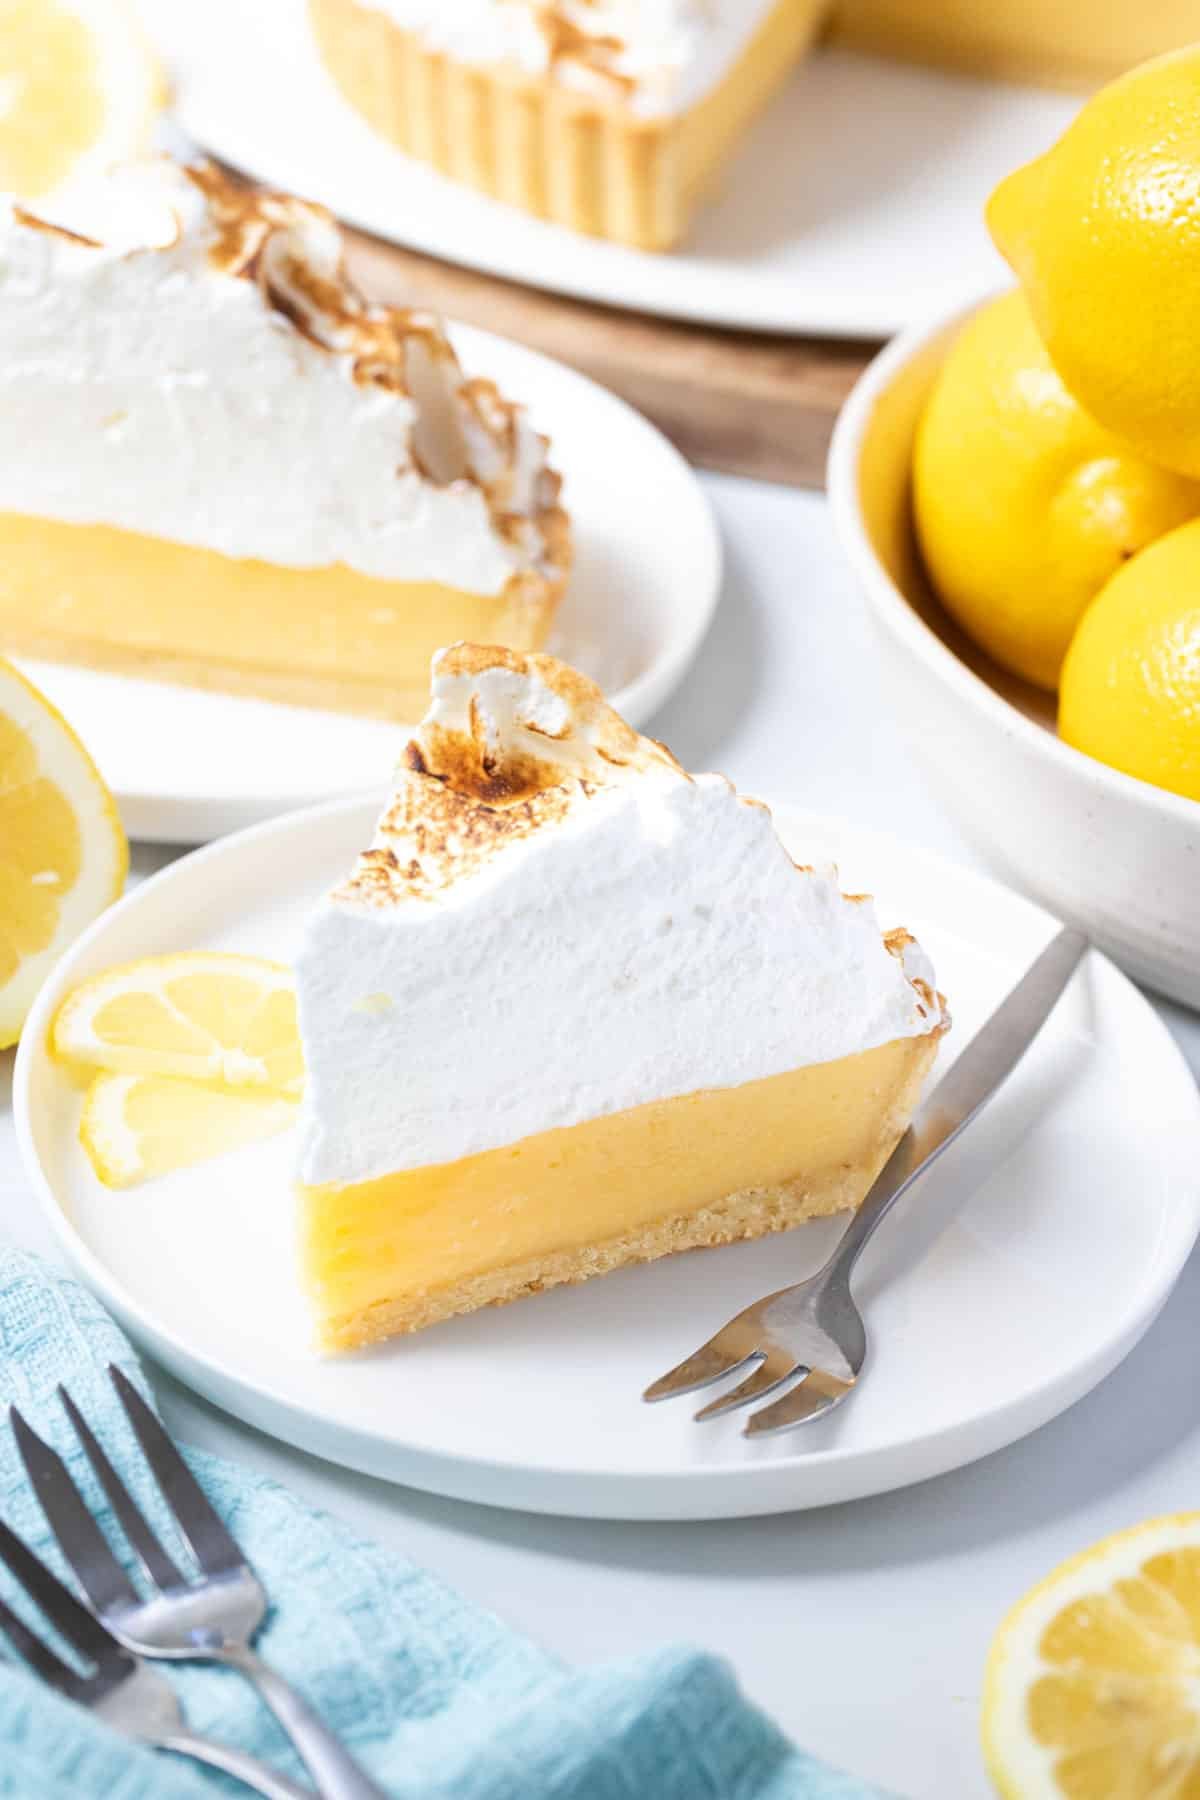
You will love this gorgeous homemade lemon meringue pie, made from scratch. With a crisp and buttery shortcrust pastry base, a smooth and creamy lemon filling and clouds of fluffy Italian meringue, it is sweet, zingy and impossible to resist!
This is a long post full of helpful tips, step-by-step photos and a troubleshooting guide to achieve the pie, every time. To skip these tips and head straight to the recipe, hit the ‘jump to recipe’ button at the top of the post.
Why you’ll love this recipe
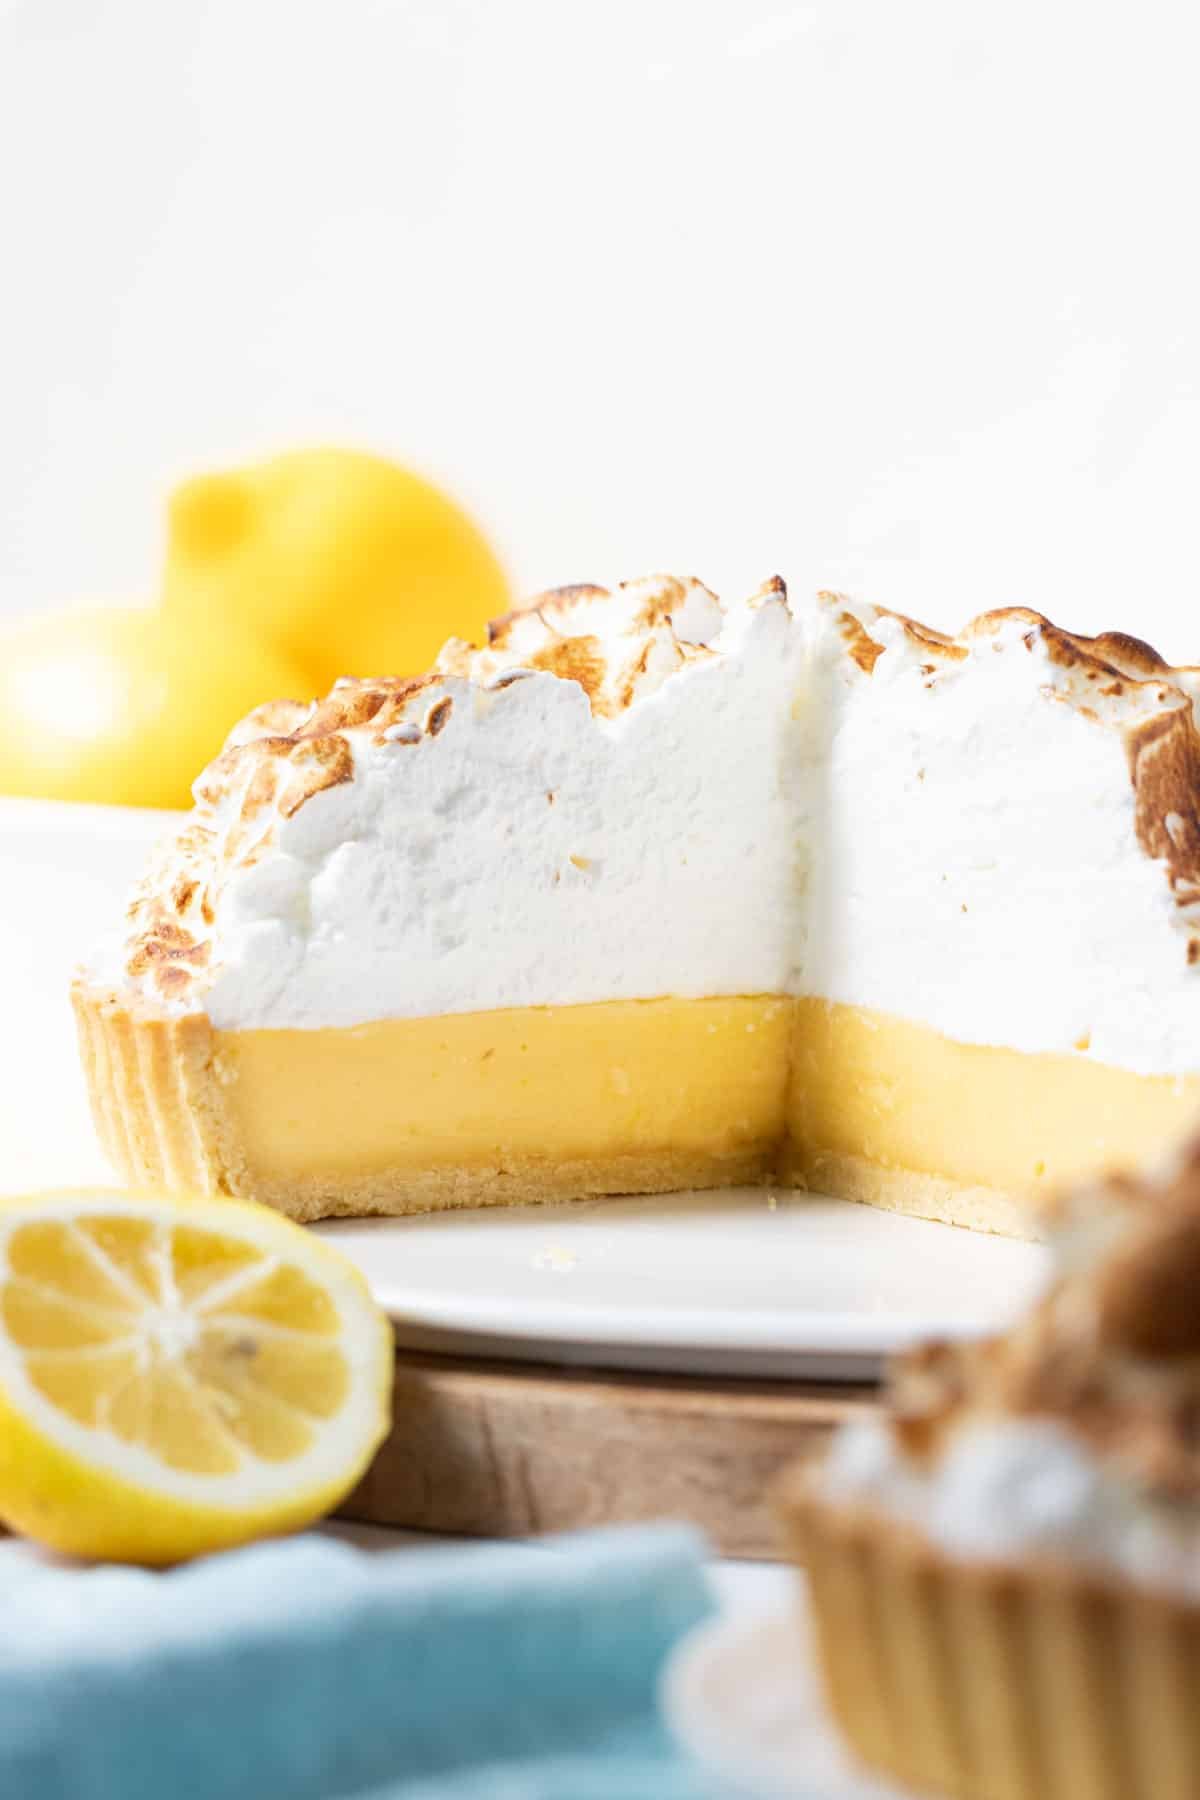
A popular dessert in Australia and New Zealand, lemon meringue pie features a delicious homemade pie crust filled with a smooth and vibrant filling made with real lemons. Piled high with toasted meringue, it is the perfect combination of creamy, crunchy, zesty and sweet!
- Simple ingredients – this recipe uses fresh lemons and a handful of basic pantry staples like flour, sugar and eggs.
- Step by step guide – an easy-to-follow recipe with helpful tips and step-by-step photos to help you achieve a perfect pie.
- Make ahead – make the base and filling the day before and top with the meringue when you are ready to serve.
- Perfect for any occasion – it makes a lovely morning or afternoon tea, or a fabulous showstopping dessert for your next Christmas, Easter or family celebration.
- Made with real lemons – an easy lemon filling that uses both fresh lemon juice and zest.
- Adaptable – below, you’ll find a guide to making your own homemade shortcrust pastry. But if you are short on time or prefer an easier option, you can skip this step and use store-bought pastry. Or a no-bake, crushed biscuit base like the one in this banoffee pie recipe.
- No weepy meringue – this recipe uses Italian meringue; a fluffy, stable meringue that won’t leak onto your pie.
Ingredients you will need
** This post contains tips and instructions to achieve the best possible results. The photo above is a great guide for when you are in the supermarket, but for full ingredient quantities and methods, please scroll down to the detailed recipe card below!
For the shortcrust pastry;
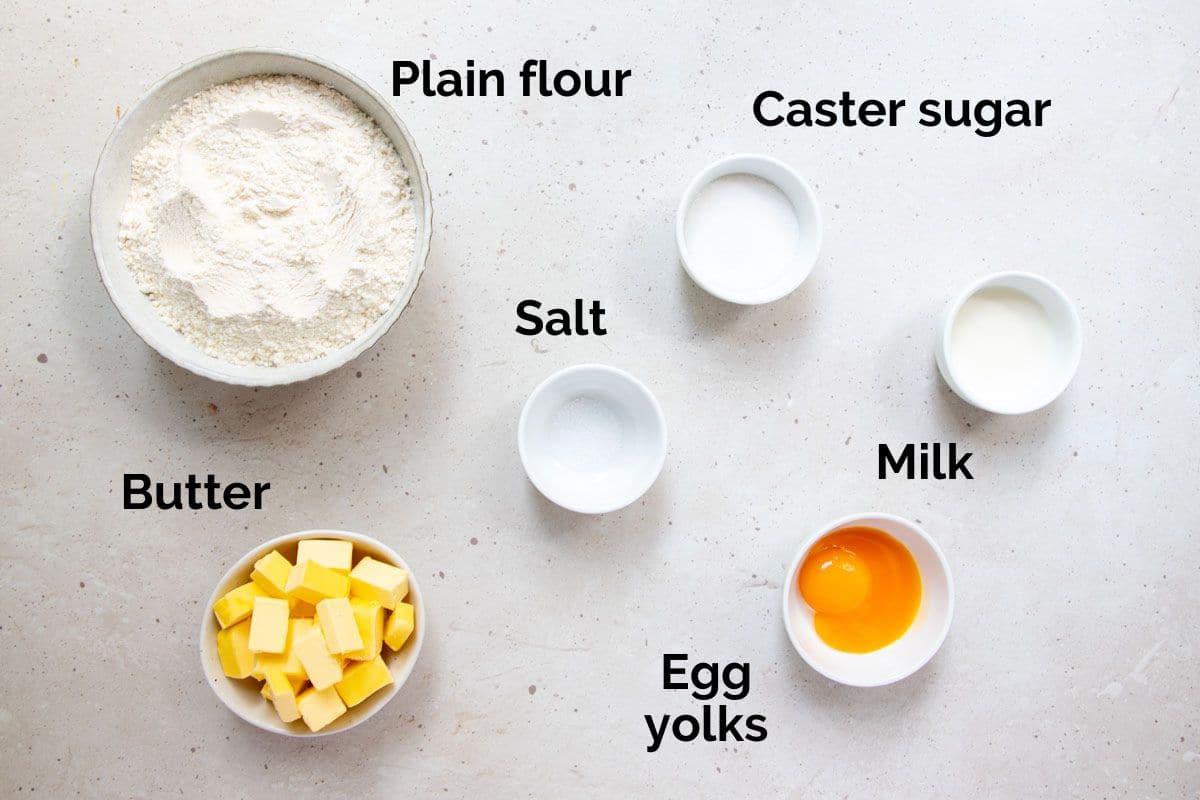
- Plain flour – plain, white all-purpose flour is used to form the pie crust/pastry base. Be sure to weigh or measure and level the flour correctly for a tender, flaky pastry. I have included weights below, for accuracy.
- Butter – for both the shortcrust pastry and the lemon filling. For the pastry, chilled butter is key. Use cold butter, straight from the fridge for tender, flaky pastry. I recommend cutting the butter into cubes and storing it in the fridge or freezer until ready for use. For best results, real butter is recommended, rather than butter substitutes or margarine.
- Egg yolks – act as an emulsifier in the pastry, keeping in moisture and adding tenderness to the crumb. They also add richness. Use chilled yolks, to keep the pastry cold. If keeping separated egg yolks in the fridge, cover them to stop them from drying out.
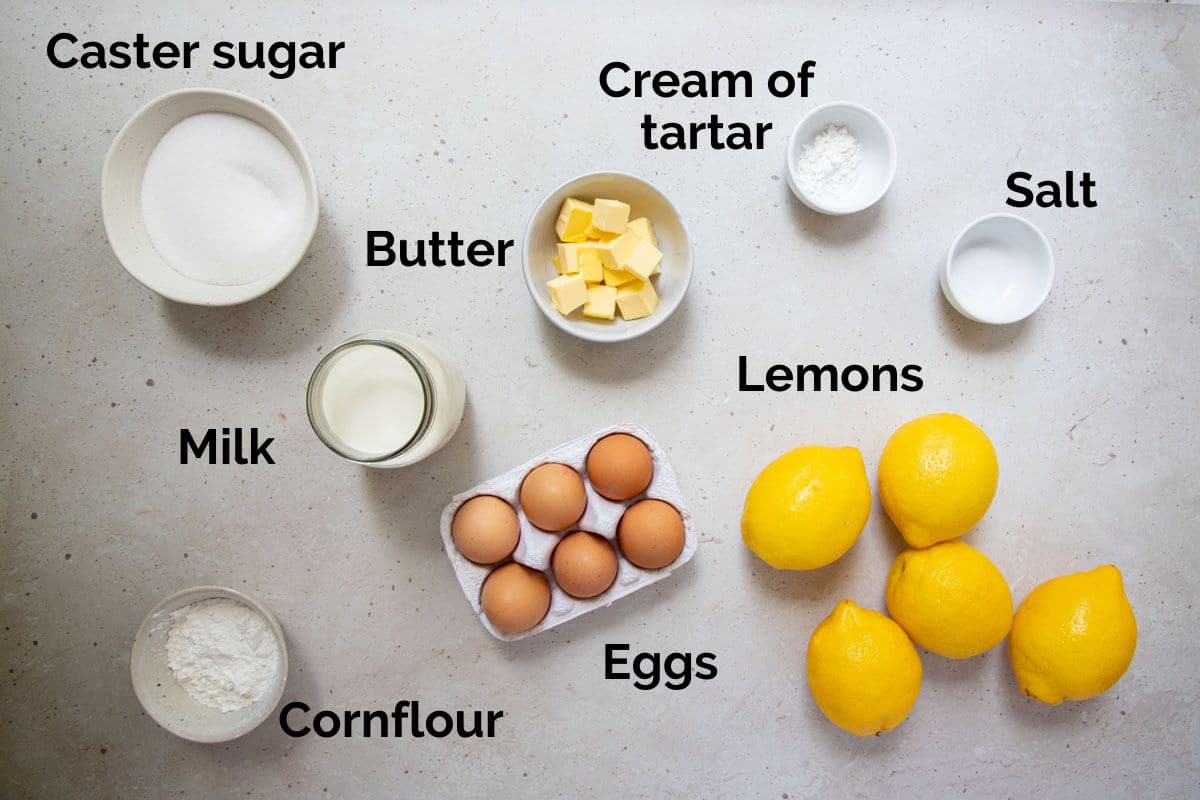
For the lemon filling;
- Lemons – fresh lemons are best, as both the zest and juice are used for maximum lemon flavour. I recommend Meyer lemons for their sweet-tart flavour and high juice content, but any fresh and in-season lemon will work. You will need 5-6 large, juicy lemons for this recipe. I don’t recommend using bottled juice, but it will work if this is all you have. Lemon zest adds extra flavour to the base. More or less lemon zest can be used, depending on how lemony you want the pie to be.
- Milk – the creamy base of the lemon filling. Use regular, full-fat milk for best results.
- Butter – adds richness and creaminess to the filling, as well as helping it to set when chilled. Use real butter for best results.
- Cornflour – also called corn starch, cornflour is an essential ingredient that helps to thicken and set the lemon filling. Measure it accurately and add an extra tablespoon if you want an extra thick, set filling.
- Egg yolks – to thicken the lemon filling. The egg yolks are tempered before being added to the filling, to prevent them cooking too quickly and scrambling.
For the Italian meringue topping;
- Egg whites – the base of the meringue topping. Room temperature egg whites whip faster than cold egg whites. They also expand to a larger volume than cold egg whites. So, make sure the egg whites reach room temperature before beating, for fluffy meringue.
- Caster sugar – caster sugar is boiled with water to form a sugar syrup, which essentially cooks and thickens the meringue. The sugar provides sweetness and stability.
- Cream of tartar – helps to stabilise the egg whites and prevent them from collapsing. Lemon juice can also be used.
Step by step guide
Full recipe quantities and instructions can be found in the detailed recipe card below.
There are three components to lemon meringue pie;
- The pastry crust – made using an easy, sweet shortcrust pastry. Homemade pastry can be substituted for a store-bought, frozen pie crust or crushed biscuit base, if preferred.
- Lemon filling – a smooth, creamy filling which is the perfect balance of tart and sweet.
- Meringue topping – made using a sugar syrup and acid for the ultimate stability and texture. Lightly toasted to perfection, it finishes the pie beautifully.
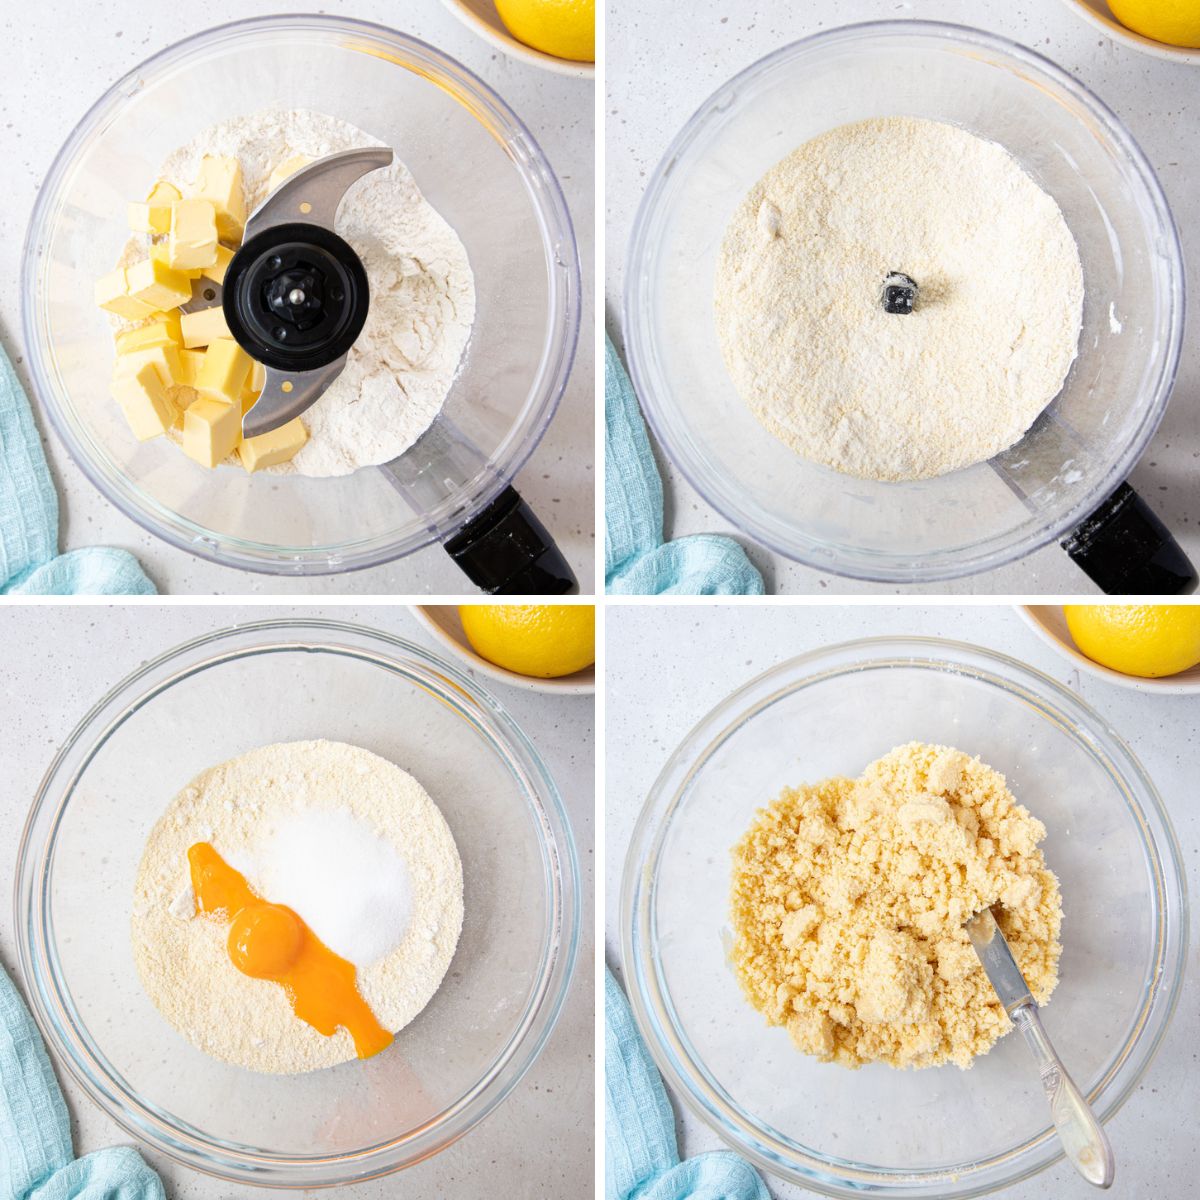
Step 1 – Make the pie crust;
Make the pastry dough by placing the flour and chilled butter together in a food processor and blend until the mixture resembles fine crumbs (with no visible lumps of butter).
** If you don’t have a food processor, use your fingers to rub the butter into the dough.
Then, add the sugar, salt and egg yolks and stir together with a knife. Use your hands to squish the mixture together into a ball. If the pastry feels dry or crumbly, add a little milk, one teaspoon at a time. But try to get by without using milk, for a more tender pastry.
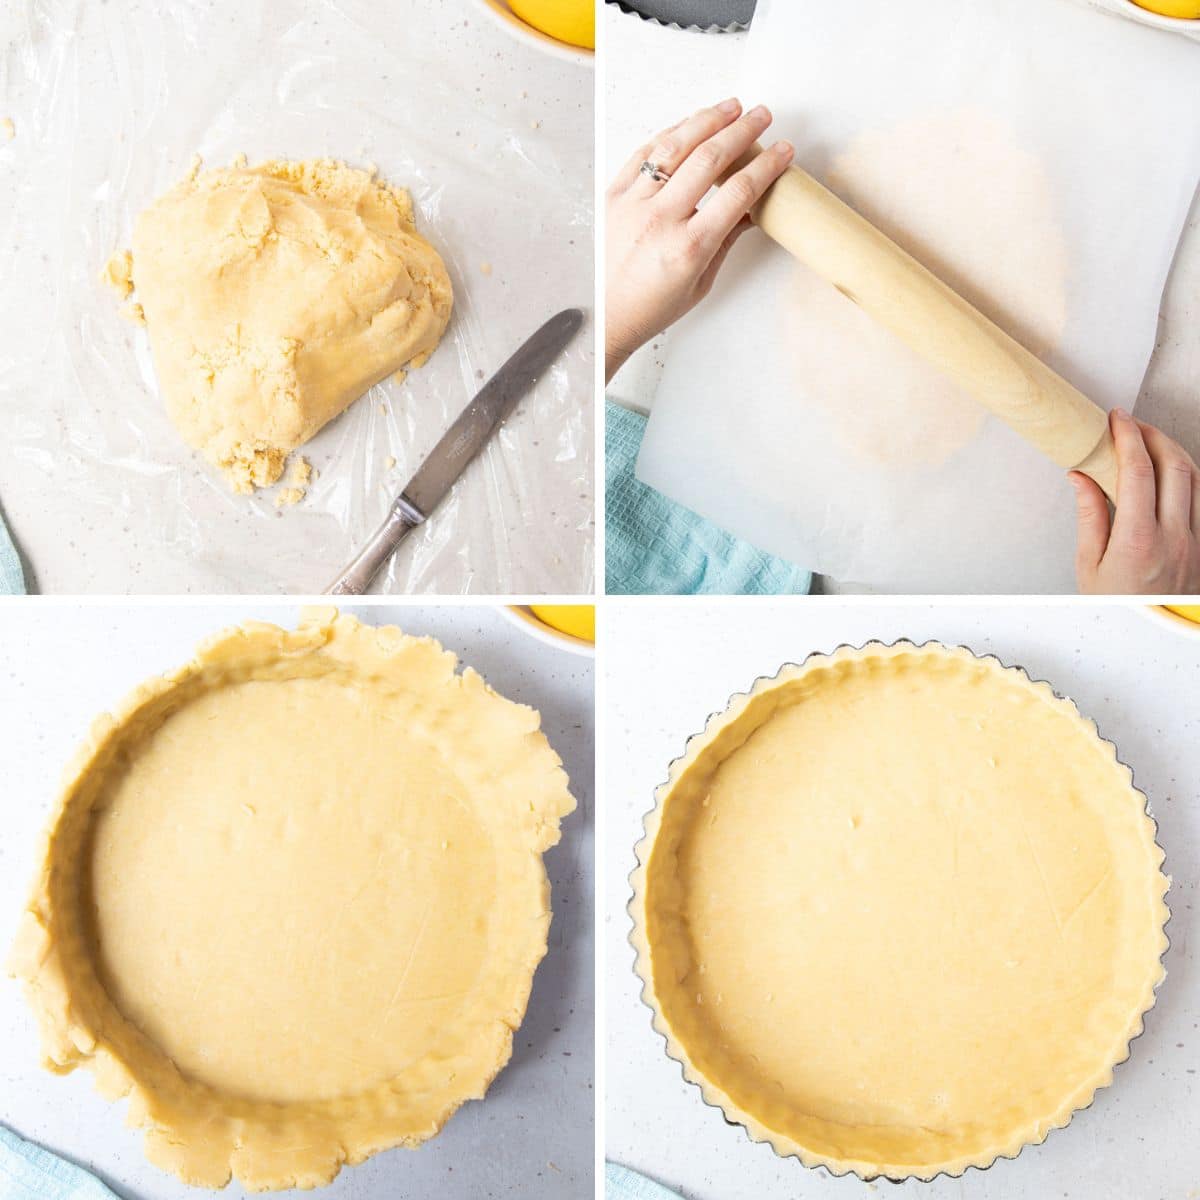
Wrap the dough and rest it in the fridge for 30 minutes. Resting and chilling the dough is important, to stop the dough from shrinking while baking. **To save time, the dough can be prepared the day before and stored in the fridge.
Step 2 – Blind bake the pie crust;
After the dough has rested, roll it between two sheets of baking paper to 5mm thickness and gently press the rolled pastry into a 23 cm flan/pie tin. **I highly recommend a tin with a removable bottom for easy removal of the pie once baked.
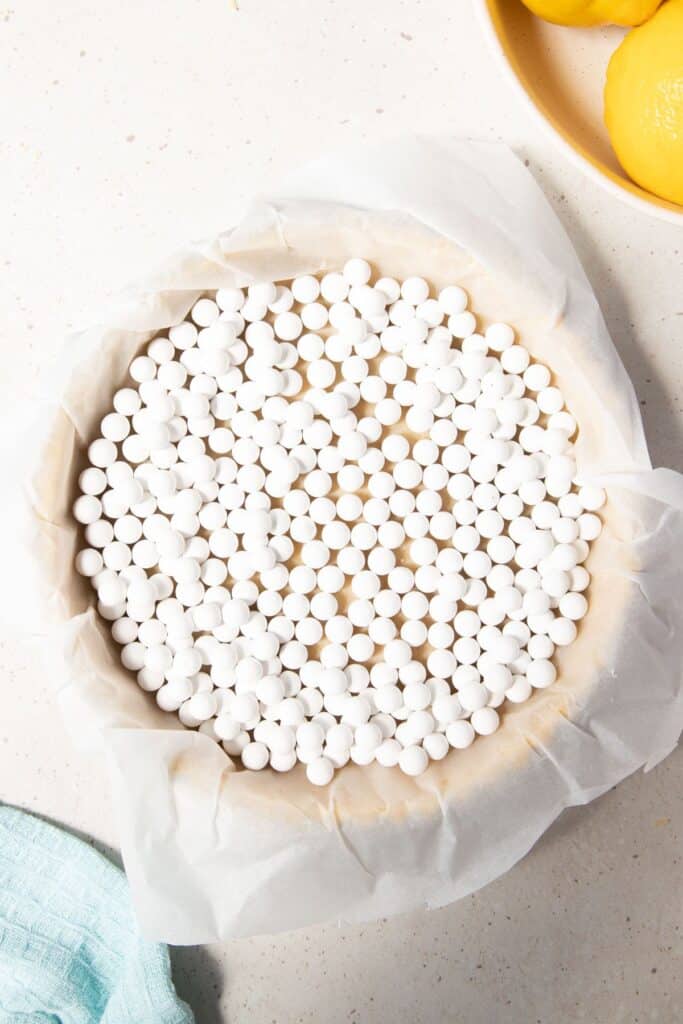
** The pie crust needs to be blind baked before adding the lemon filling, as there is no other baking involved.
Place a layer of baking paper over the dough and cover with baking beads. **If you don’t have baking beads, you can use dried beans or rice.
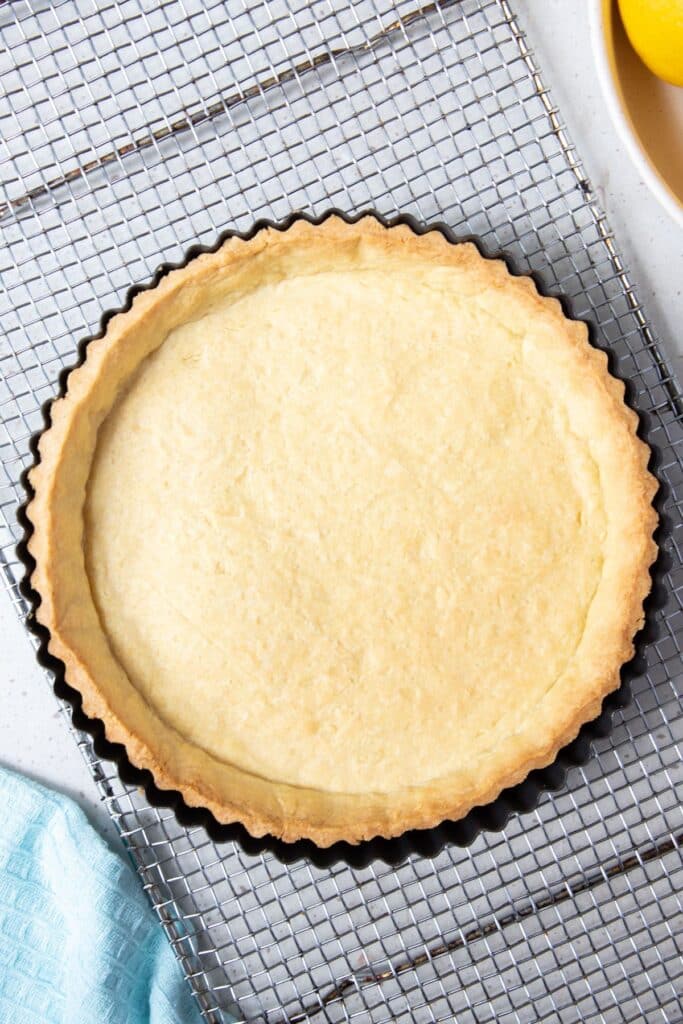
Baking beads help the pastry to keep its shape while baking. The baking paper is removed after 10-15 minutes and the pastry is cooked for a further 5-10 minutes, until golden brown.
Let the pastry cool to room temperature before adding the lemon filling.
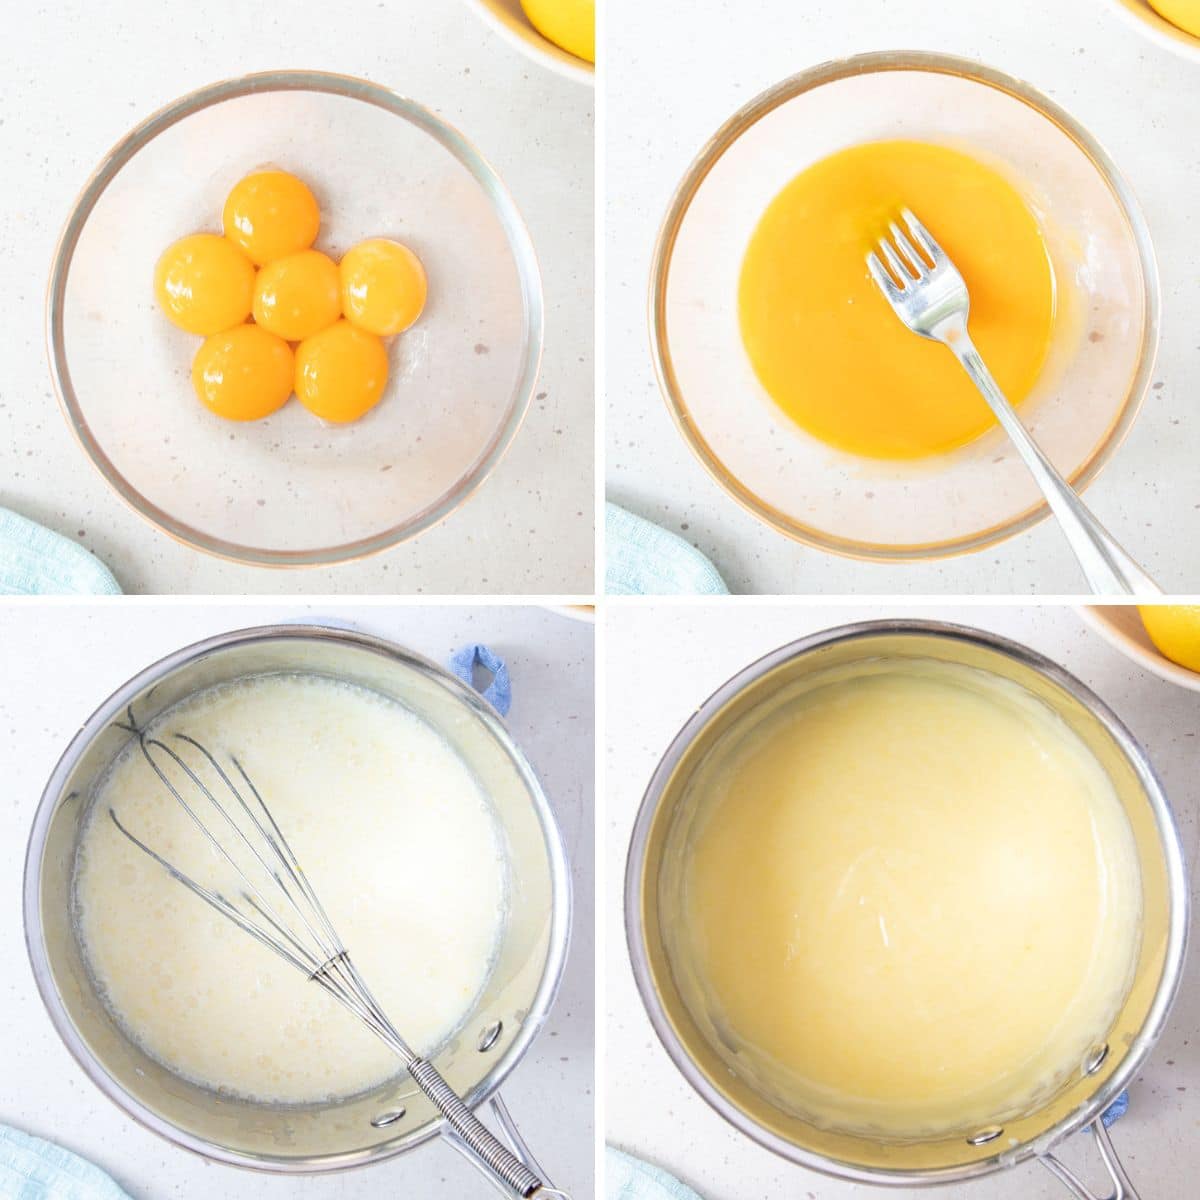
Step 3 – Prepare the lemon filling;
The lemon filling for the pie is made using lemon juice and zest, egg yolks, sugar, butter and milk. Everything is thickened to a custard-like consistency using cornflour, so that the filling holds its shape when cut.
To make the lemon filling, whisk the egg yolks in a small bowl or measuring jug and set aside for later.
Heat 1 cup of the milk and the caster sugar in a saucepan until the sugar has dissolved.
Make a slurry with the cornflour and the remaining milk and add it to the hot milk and sugar mixture, whisking to combine.
Add the butter, lemon juice and zest to the milk mixture and whisk to combine. Continue to whisk over low heat until the mixture thickens (this will take around 3-4 minutes).
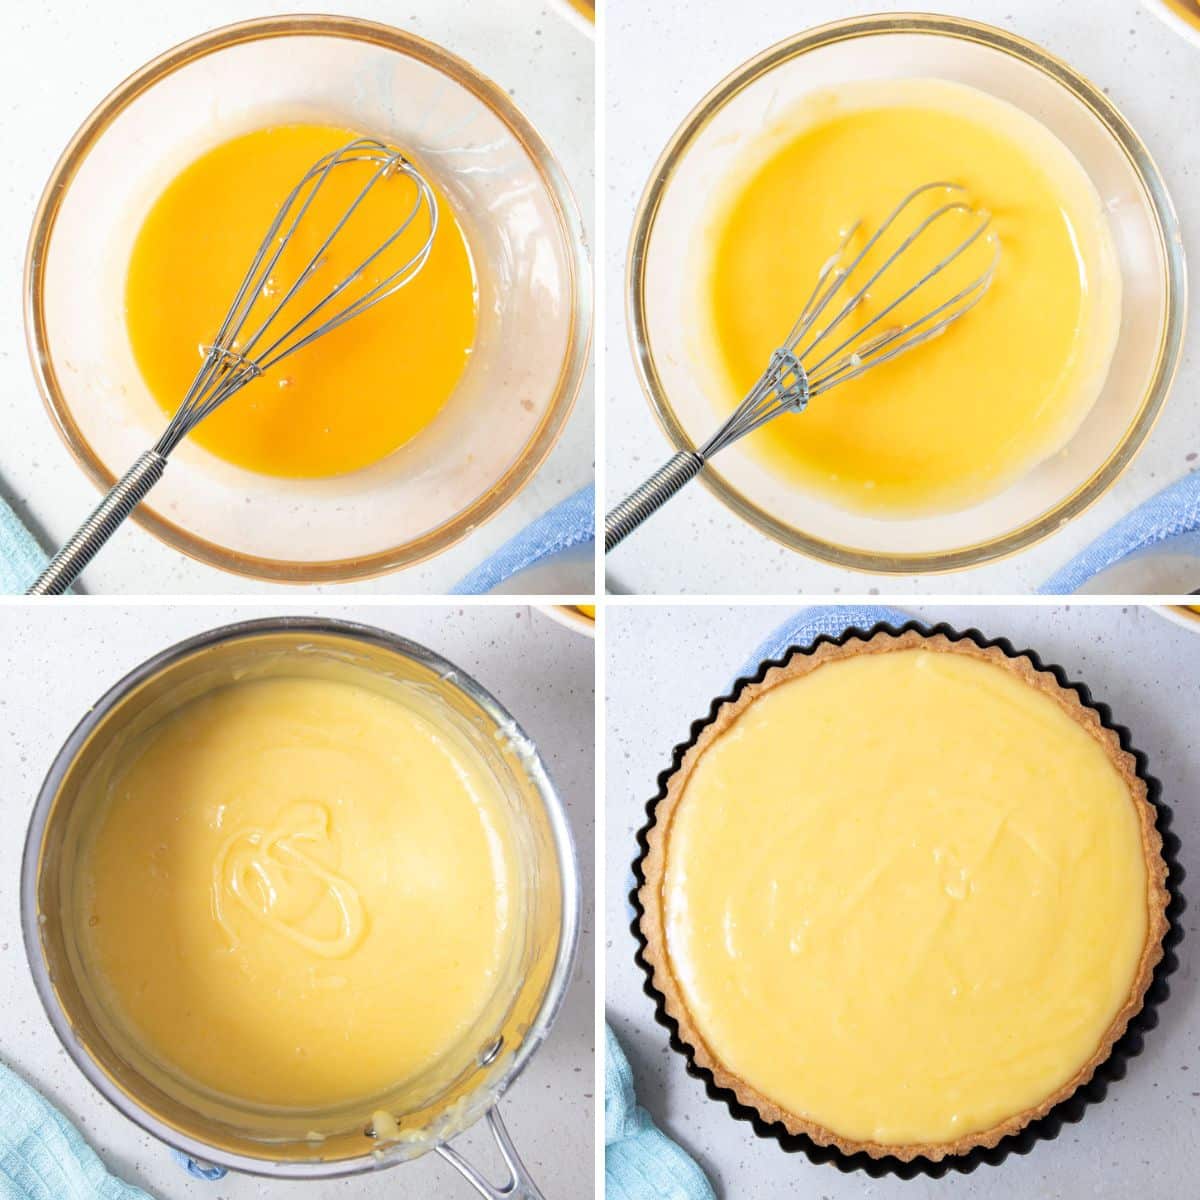
Temper the eggs;
Tempering the eggs helps to create a smooth filling, without scrambling the egg yolks by cooking them too quickly. We achieve this by introducing some of the hot lemon mixture to the egg yolks, a little at a time, to increase the temperature gradually and stabilise the yolks.
Whisk 3-4 tablespoons of the hot mixture, one tablespoon at a time, into the beaten egg yolks.
Then, carefully whisk the egg yolk mixture into the lemon filling. Keep the heat on low and whisk only until the mixture starts to bubble. Turn the heat off.
Immediately pour the hot lemon filling into the cooled pie crust.
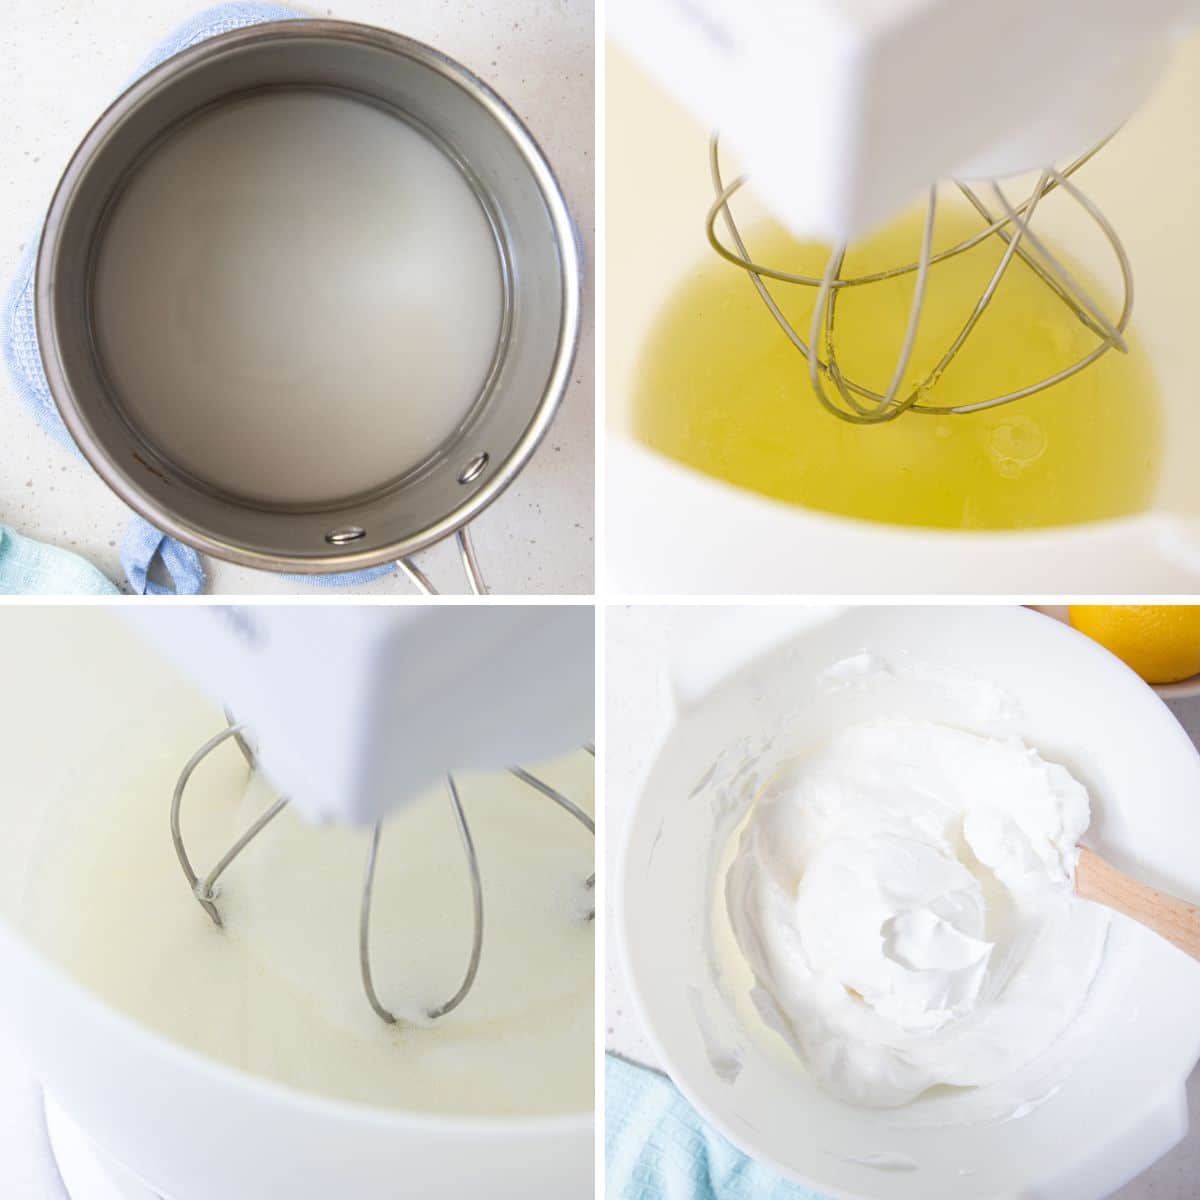
Step 4 – Make the Italian meringue topping;
Italian meringue is the most stable type of meringue, as the boiled sugar syrup cooks the egg whites as they beat. This results in a soft, glossy and marshmallow-y meringue that doesn’t need to be baked in the oven. It is most often used for piping on top of pastries and desserts such as baked Alaska, because it holds its shape so well.
To make the sugar syrup, heat the caster sugar and water in a saucepan and simmer for 10-15 minutes, until it reaches “soft ball stage”. Soft ball stage is where you can drop a bit of the syrup into cold water and it will form a soft ball. If you have a candy thermometer, the temperature needs to reach 115 C/239 F.
**If you don’t have a thermometer, just test at the 10-minute mark and keep an eye on it until a little syrup added to cold water turns soft.
Using a clean, dry stand mixer, add the egg whites and beat at low-medium speed until soft peaks form. This should take around 5 minutes.
At the same time, continue to bring the sugar syrup up to 121 C/250 F. If you don’t have a thermometer, the syrup needs to reach “hard ball” stage. This is where the sugar concentration has increased and there is less moisture in the syrup. At hard ball stage, a little syrup dropped into cold water will harden.
Leave the beaters running and turn the speed to medium-high. Carefully pour a thin, continual stream of the hot sugar syrup into the egg whites as they beat. Once the sugar syrup is incorporated, add the cream of tartar and continue to beat the meringue for around 5 minutes, until the mixture is thick, glossy and holds its shape without falling.
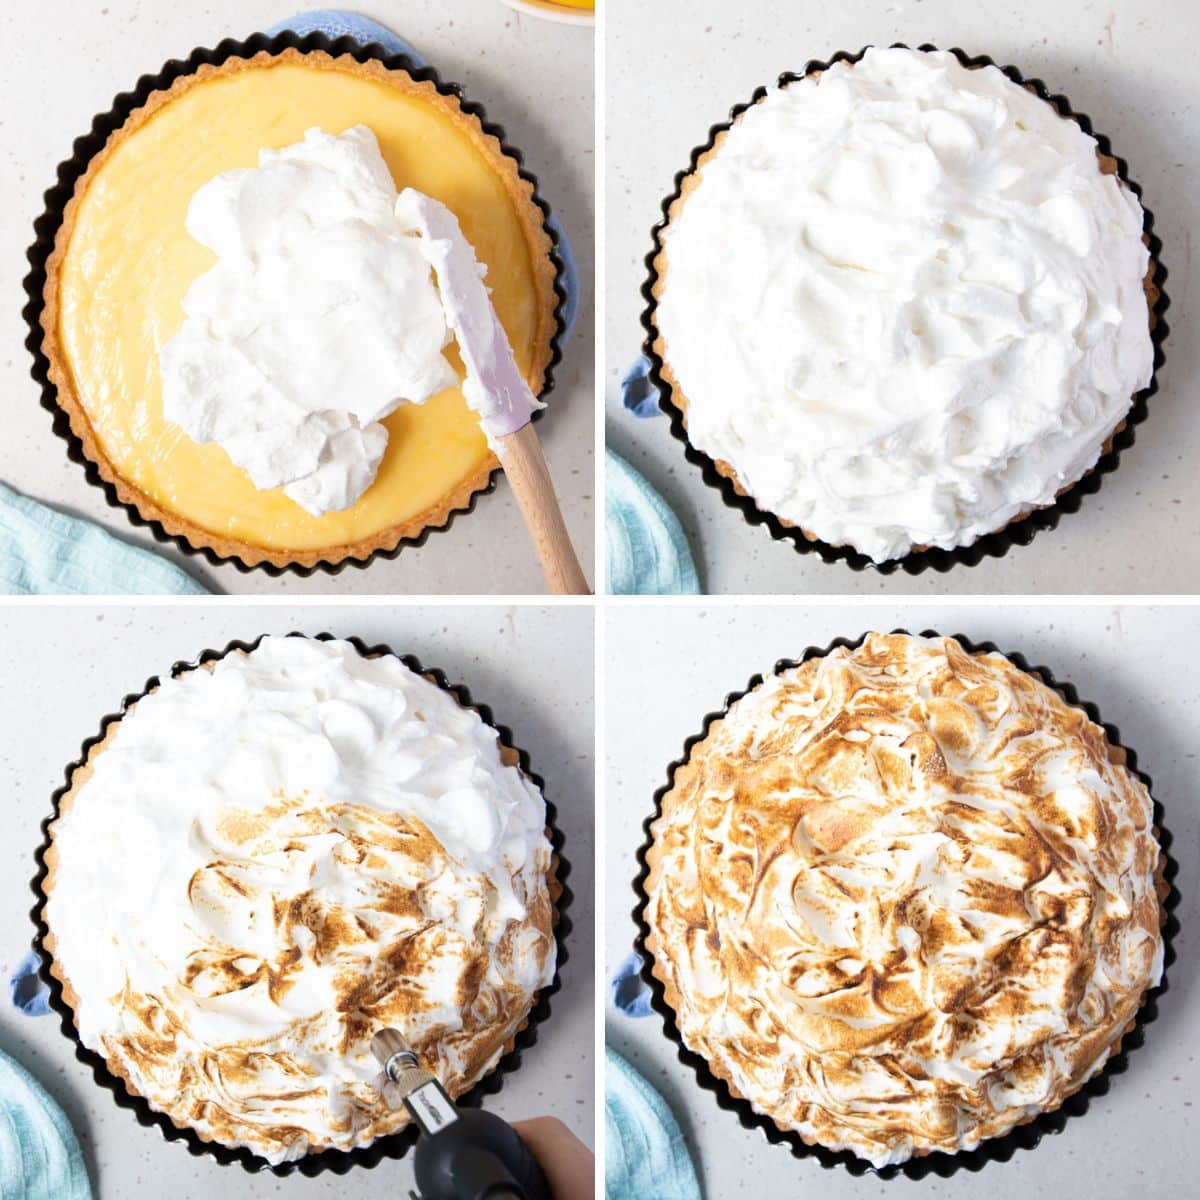
Step 5 – Toast the meringue;
Add the meringue to the top of the lemon pie and toast using a hand-held blowtorch. If you don’t have a blowtorch, place it under a hot grill/broiler (at least 20cm distance from the hot element to prevent burning) for a few minutes, until browned.
** If using a grill/broiler, keep an eye on the meringue the entire time, as it will brown very quickly and you don’t want it to burn.
Full recipe notes and ingredient quantities are found in the recipe card below.
Expert tips
- While Italian meringue is a little more time-consuming than regular meringue, it is still super easy to make and worth the extra effort. The sugar syrup cooks the egg whites, preventing the need for further cooking. And it also helps to stabilise the meringue and prevent weeping.
- The meringue can be added to a cold lemon filling if prepared ahead of time, but adding it to a warm filling will help to stop the meringue sliding from the top. If making the entire pie in one day, add the meringue to the lemon filling while it is still warm.
- If you are short on time, make the pie crust and add the lemon filling the night before and store it in the fridge overnight. Then, top it with fresh meringue the following day when ready to serve.
- For perfectly fluffy meringue, make sure you use clean, dry equipment and make sure there are no traces of egg yolk in the egg whites. Any residual egg yolk (even the tiniest drop!) or oil on your equipment can interfere with the egg whites and prevent them from forming perfectly stiff peaks. Separate the eggs one at a time and transfer each egg white to the clean mixer bowl to prevent contamination if a yolk breaks.
- Use room temperature eggs. Room temperature egg whites whip more easily and hold more air than cold eggs. Separate your eggs, cover and allow them to reach room temperature before beating. To speed up the process, add whole eggs to a bowl of warm water for 5 minutes.
- Use cold ingredients for the shortcrust pastry. Chilling the butter will help the crust to maintain its structure as it bakes. Cut it into cubes and keep it in the fridge or freezer until required. Keeping the butter cold means that it will melt in little pockets when it enters the oven, rather than before. This creates super tender, flaky pastry.
- Don’t skip the chilling times. Keeping everything cold is imperative to making flaky pastry. Use cold eggs yolks and butter and keep everything in the fridge until ready for use. The pastry is rested in the fridge between each stage to keep it cold and stop it from shrinking back in the oven.
- The lemon filling should reach a thick, custard-like consistency before adding it to the pastry. When ready, the mixture will coat the back of a spoon and leave a line if you run your finger through it. It will continue to set in the fridge as it cools. After assembling the pie, it is important to allow the filling to cool completely for at least 2-3 hours in the fridge before cutting the pie.
- Stop the meringue from shrinking back by spreading it right up to (and touching) the pie crust. This way, the meringue holds onto the crust and won’t fall back.
- For a stronger lemon flavour, add a little more lemon juice. Just be sure to reduce equal quantities of the milk used in the filling to compensate.
- Prefer mini lemon meringue pies? Easy! Follow the recipe card below, but cut and shape the rolled dough into cupcake trays, instead of one large pie tin. Reduce the blind baking time and fill the mini tart cases with the lemon filling before adding the meringue.
- For lemon meringue pie with biscuit base; don’t have time to make the pie crust? Use a store-bought pie case, or substitute the homemade pastry for an easy, no-bake biscuit base like this one here.
- Use a tin with a removeable bottom for easy removal of the finished pie. A flan/tart tin or springform tin will work best.
- Blind bake the pastry crust before adding the lemon filling. The pastry needs to be cooked before the fillings are added.
FAQs
Like all lemon meringue pies, this one is best eaten fresh in the first 1-2 days. But the elements of this pie can be easily made ahead, ready to assemble later. The pie crust can be baked and filled with the lemon filling and stored in the fridge for up to 3 days before adding the meringue. When you are ready to serve, add the meringue topping, torch and slice!
I love to bake with Meyer lemons which are more fragrant and a touch sweeter than regular lemons which make them perfect for this dessert. However, any type of lemon can be used in this recipe.
Once the pie has cooled, place it into the fridge to set before serving. While the pie is best eaten within 1-2 days of being made, if you do have leftovers, you can store them in the refrigerator in an airtight container for 2-3 days.
Both the baked pie crust and the lemon filling can be frozen for up to 3 months. I recommend making and adding fresh meringue on the day you want to serve it. To freeze, allow the pie to cool completely and add to an airtight container (or carefully wrap) and lay it flat in the freezer. To thaw, leave it in the fridge overnight. Top with freshly made meringue, torch, slice and serve!
Italian meringue is the most stable type of meringue. It requires boiling hot sugar syrup to be drizzled into whipped egg whites. The sugar syrup cooks the egg whites resulting in a soft, glossy meringue that doesn’t require baking. It is perfect for piping on top of pies and desserts because it holds it shape so well.
This recipe uses Italian meringue, which is more stable than regular meringue. You don’t have to worry about weeping, as long as the lemon filling does not have any condensation when you add the meringue. Baking the meringue can destabilise it, so toasting the top with a blowtorch is preferred, where possible.
There are 3 reasons why the lemon filling may not be set enough to slice;
1. The filling wasn’t properly thickened on the stovetop. The filling should reach a thick, custard-like consistency before adding it to the pastry.
2. The filling was overworked, which can lessen the cornflour’s ability to hold its structure. Only cook the filling on low heat, long enough for the mixture to thicken. After the tempered eggs have been added, heat the mixture only until it reaches a low simmer and then immediately turn off the heat.
3. The filling didn’t have enough time in the fridge. It needs 2-3 hours to fully set before slicing.
This filling relies on the cornflour (as well as the egg yolks and butter) to thicken, so it also helps to measure the ingredients accurately. Too little cornflour and the mixture won’t set. If you’re unsure, you can add another tablespoon of cornflour.
Related recipes


Tried this recipe? Please leave a star ⭐⭐⭐⭐⭐ rating or leave a review below and let you know how you went!
Hungry for more? Subscribe to my newsletter and follow along on Facebook, Instagram and Pinterest for the latest recipes and news.

Homemade Lemon Meringue Pie
Ingredients
For the pastry
- 250 grams plain flour approx. 2 cups, measured and levelled.
- 125 grams butter chilled, chopped into cubes. Keep it in the fridge until ready for use.
- 2 tablespoons caster sugar
- 1 pinch salt
- 2 large egg yolks 35 grams, chilled.
- 1-2 tablespoons chilled milk use only if needed.
Lemon Filling
- 6 large egg yolks lightly beaten
- 1 cup caster sugar 215 grams
- 1 ½ cups milk whole, full cream milk. 375ml.
- ⅓ cornflour 50 grams. Use an extra 1 tablespoon of cornflour if you want an extra thick filling.
- 80 grams butter unsalted, chopped into cubes
- ⅔ cup lemon juice freshly squeezed. Approx. 4-5 lemons
- 1-2 tablespoons lemon zest or more for extra lemon zing
- 1 pinch salt
For the meringue
- 1 cup caster sugar 215 grams.
- ¾ cup water 185 ml.
- 4 egg whites room temperature.
- ½ teaspoon cream of tartar
Instructions
For the pastry
- Place the flour and chilled butter in a food processor and blitz until the mixture resembles breadcrumbs. If using your hands, rub the butter into the flour mixture until the mixture resembles breadcrumbs. Try to keep the mixture cold, even if you need to return it to the fridge in between steps.
- Add the sugar, salt and egg yolks and stir with a knife. Squish the mixture together with your hands, into a rough ball. If the mixture is too dry or crumbly add a little of the milk, 1 teaspoon at a time, until everything comes together. But try to avoid this for a more tender pastry.
- Cover the dough with cling wrap and place into the fridge to rest for at least 30 minutes.
- Remove the pastry from the fridge and let it sit for a few minutes (if you try to roll it straight from the fridge, the pastry will crumble). Roll the pastry flat between 2 pieces of baking paper until about 5mm in thickness.
- Add the pastry to a 23 cm tart tin with a removable bottom and place it back into the fridge for about 30 minutes, or until firm.
- Pre-heat your oven to 180 °C/356 F.
- Once the pastry is firm, trim the edges and press a fork over the bottom of the pastry to prevent bubbling.
- Line the top of the pastry with a piece of baking paper and cover with baking beads (or uncooked rice or dried beans). Bake for 15-20 minutes. Then, remove the baking paper and beads and bake for a further 5-10 minutes, until lightly golden.
- Remove the pie crust from the oven and set aside to cool to room temperature.
For the lemon filling.
- Place the egg yolks into a cup or small jug and beat lightly with a fork.
- Place the caster sugar and 1 cup of the milk into a medium saucepan and whisk over low heat until the sugar has dissolved.
- In a small jug, mix the cornflour with the remaining (½ cup) milk and stir until smooth and lump free. Whisk the cornflour slurry into the milk and sugar mixture.
- While continuing to whisk over low heat, add the butter, lemon juice and zest and whisk until combined and the butter has melted.
- Cook the mixture over low heat, continually whisking, for around 3-4 minutes, or until it thickens to a thick, custard-like consistency. Remove from the heat.
- Stirring continually and adding 1 tablespoon at a time, add 3-5 tablespoons of the hot lemon mixture to the beaten egg yolks. This helps to introduce the heat the the egg yolks slowly, without scrambling.
- Return the pan to low heat and, continually whisking, add the egg yolk mixture into the lemon mixture. Heat only until the mixture starts to gently bubble and turn the heat off.
- Once thickened, immediately pour the lemon filling into the cooled pastry case.
For the meringue
- Combine the caster sugar and water in a small pan and bring to the boil, stirring until the sugar dissolves.
- Reduce the heat to low and gently simmer for around 10-15 minutes, until the syrup reaches 115 C/239 F (if you don't have a thermometer, the syrup should be at "soft ball stage", where if you drop a bit of it into cold water, it will form a soft ball.
- In a clean, dry bowl of an electric stand mixer, start beating the egg whites at low-medium speed until soft peaks form (around 5 minutes).
- Meanwhile, bring the sugar syrup to 121 C/250 F. (Again, if you don't have a candy thermometer, the syrup should now be at 'hard ball stage', where a little syrup added to cold water will form a hardened ball.
- With the mixer motor running on medium speed, gradually pour a thin, continuous ribbon of sugar syrup into the meringue. Once the sugar syrup is incorporated, turn the speed to medium-high and add the cream of tartar. Beat for a further 5 minutes, until the meringue is thick and glossy.
To assemble
- Top the warm lemon pie with the finished meringue and shape some peaks with a metal spoon. Use a hand-held blow torch to toast the meringue top to a golden-brown colour. Alternatively, place the pie in an oven at least 20cm away from a hot grill/broiler and heat until the meringue is browned, but not burnt. Keep a close eye on the meringue, as this process can happen quickly.
- Refrigerate the pie for at least 2-3 hours, for the lemon filling to fully set before slicing.
Notes
- While Italian meringue is a little more time-consuming than regular meringue, it is still super easy to make and worth the extra effort. The sugar syrup cooks the egg whites, preventing the need for further cooking. And it also helps to stabilise the meringue and prevent weeping.
- If you are short on time, make the pie crust and add the lemon filling the night before and store it in the fridge overnight. Then, top it with fresh meringue the following day when ready to serve.
- For perfectly fluffy meringue, make sure you use clean, dry equipment and make sure there are no traces of egg yolk in the egg whites. Any residual egg yolk (even the tiniest drop!) or oils on your equipment can interfere with the egg whites and prevent them from forming perfectly stiff peaks. Separate the eggs one at a time and transfer each egg white to the clean mixer bowl to prevent contamination if a yolk breaks.
- Use room temperature eggs. Room temperature egg whites whip more easily and hold more air than cold eggs. Separate your eggs, cover and allow them to reach room temperature before beating. To speed up the process, add whole eggs to a bowl of warm water for 5 minutes.
- Use cold ingredients for the shortcrust pastry. Chilling the butter will help the crust to maintain its structure as it bakes. Cut it into cubes and keep it in the fridge or freezer until required. Keeping the butter cold means that it will melt when it enters the oven, rather than before. This creates super tender, flaky pastry.
- Don’t skip the chilling times. Keeping everything cold is imperative to making flaky pastry. Use cold eggs yolks and butter and keep everything in the fridge until ready for use. The pastry is rested in the fridge between each stage to keep it cold and stop it from shrinking back in the oven.
- The lemon filling should reach a thick, custard-like consistency before adding it to the pastry. When ready, the mixture will coat the back of a spoon and leave a line if you run your finger through it. It will continue to set in the fridge as it cools. After assembling the pie, allow the filling to cool completely for at least 2-3 hours in the fridge before cutting the pie.
- Stop the meringue from shrinking back by spreading the meringue right up to (and touching) the pie crust. This way, the meringue holds onto the crust and won’t fall back.
- For a stronger lemon flavour, add a little more lemon juice. Just be sure to reduce the amount of milk used in the filling to compensate.
- Prefer mini lemon meringue pies? Easy! Follow the recipe card below, but cut and shape the rolled dough into cupcake trays, instead of one large pie tin. Reduce the blind baking time and then fill the mini tart cases with the lemon filling before adding the meringue.
- For lemon meringue pie with biscuit base; don’t have time to make the pie crust? Use a store-bought pie case, or substitute the homemade pastry for an easy, no-bake biscuit base like this one here.
- Use a tin with a removeable bottom for easiest removal of the finished pie. A flan/tart tin or springform tin will work best.
- Blind bake the pastry crust before adding the lemon filling. The pastry needs to be cooked before the fillings are added.
- Make ahead; the elements of this pie can be easily made ahead, ready to assemble later. The pie crust can be baked and filled with the lemon filling and stored in the fridge for up to 3 days before adding the meringue (although it is best eaten in the first 1-2 days). When you are ready to serve, add the meringue topping, torch and slice!
- Storage; Once the pie has cooled, place it into the fridge to set before serving. While the pie is best eaten within 1-2 days of being made, if you do have leftovers, you can store them in the refrigerator in an airtight container for 2-3 days.
- Freezing; Both the baked pie crust and the lemon filling can be frozen for up to 3 months. I recommend making and adding fresh meringue on the day you want to serve it. To freeze, allow the pie to cool completely and add to an airtight container (or carefully wrap) and lay it flat in the freezer. To thaw, leave it in the fridge overnight. Top with freshly made meringue, torch, slice and serve!
- Please note that the nutrition information is based on the pie being divided into 12 slices, with one slice being one serve. The nutritional information is an estimate only and does not take into account any additional toppings or sides served with the pie.
- This recipe is made using Australian cups and spoon measurements. Any reference to cups or spoons in this recipe is in Australian metric. Due to cup sizes varying from country to country, I advise adjusting if necessary.
Nutrition
Are you following us on Facebook, Instagram and Pinterest?
Update Notes: This recipe was originally published in February 2019, but was re-published with new information, helpful tips and photos in November 2022.


Jen says
This really is a delicious recipe. A lovely intense lemon flavour & lush meringue topping. A joy to make & serve to a very appreciative family. Thank you for sharing!
Andrea Geddes says
Hi Jen! I’m so happy to hear that you and your family enjoyed the pie. It’s my favourite! Thanks for taking the time to let me know. Andrea 🙂
Nicole says
This looks delicious and was just about to make it when I noticed recipe stated 1 cup plain flour which was 250 grams. This doesn’t seem to be quite right as 1 cup was about 160g when weighted. Can you please clarify whether it’s 1 cup or 250g. Thanks so much.
Andrea Geddes says
Hi Nicole! I’m so sorry for the confusion and thank you for picking up my error! I have amended the recipe card to reflect 250 grams/2 cups of plain flour. I hope you enjoy the pie! Andrea 🙂
Nicole says
Hi Andrea, many thanks for,your prompt response. I went with the 250g however my dough was not very successful at all… noticed in the rolling out stage. Looking back over the recipe I noticed that your notes state add the egg yolk ( one assumes that’s one yolk) however the recipe ingredients state 2 egg yolks ( which is what I went with). Sorry, to be a nuisance but can you clarify whether it is 1 egg yolk or 2..I am suspecting it may be one…. Again many thanks.
Andrea Geddes says
Hi Nicole, the recipe is definitely 2 egg yolks. And then 1-2 tablespoons chilled milk (or more or less, if needed). It’s hard for me to help without knowing what your dough looked like- was it too soft or too crumbly? The egg yolks should be added (and I add 1 tablespoon of milk), first and then more milk- but only if needed.
Nicole says
Hi Andrea, Again mega thanks for replying. My mixture was very soft and when rolled out very sticky…I have obviously done something suspect. I went with it anyway and baked it. Made the filling (must have done everything right as it looked and tasted divine). I’m yet to make the meringue, as it’s for a dinner tomorrow but am hopeful that I won’t stuff anything up. Thanks again. I will definitely be doing again, to ensure I do the pastry right and to be able to lick the lemon filling bowl again. Thanks for sharing your wonderful recipes.
Andrea Geddes says
Ah yes, it sounds like a little too much liquid if the dough was sticky. It should be soft, but not sticky and not too dry/crumbly. I am so glad that you are happy with the filling and I hope your pie was a success! Thanks for your kind words. Andrea 🙂
Darleen says
In the U.S. we have sweetened condensed mild or canned milk, which is concentrated milk. I am assuming it’s the concentrated canned milk you need for this recipe as the filling calls for sugar as well.
Andrea Geddes says
Hi Darleen! We have sweetened condensed milk and canned milk (as well as evaporated milk) here in Australia too. But what I am referring to in this recipe is regular dairy milk from the refrigerator section in the supermarket. You may refer to it as “whole milk”. Canned condensed milk would be too thick for the lemon filling. I hope that helps!
Sylvie says
Lemom Meringue Pie is ALWAYS a good idea hehe! Such a classic and delicious dessert, and the ratio of lemon to meringue is simply perfect here. YUM!!
TheCookingCollective says
Sylvie, I completely agree! There’s always a good reason to eat lemon meringue pie!