Cheese and Vegemite scrolls, made from scratch with simple ingredients. A classic Aussie treat, these fluffy scrolls are made with a simple yeast dough, filled with Vegemite and bubbly golden cheese – and taste just like your favourite bakery version! They are perfect served warm from the oven or as a tasty lunchbox treat. Oven and air fryer instructions below.

Why you’ll love this recipe
- So easy to make – all you need to do is layer a simple homemade dough with Vegemite and shredded cheese, roll, cut and bake!
- A classic Australian flavour combination that everyone will love. They taste just like the famous cheesymite scrolls from Baker’s Delight!
- Basic ingredients – made using a handful of simple pantry ingredients like flour, yeast and Vegemite.
- Affordable – they are tasty, filling and SO cheap to make.
- Freezer friendly – make a double batch and use them for an easy lunchbox or afternoon snack.
Ingredients you will need
** This post contains tips and instructions to achieve the best possible results. The photo above is a great guide for when you are in the supermarket, but for full ingredient quantities and methods, please scroll down to the detailed recipe card below!
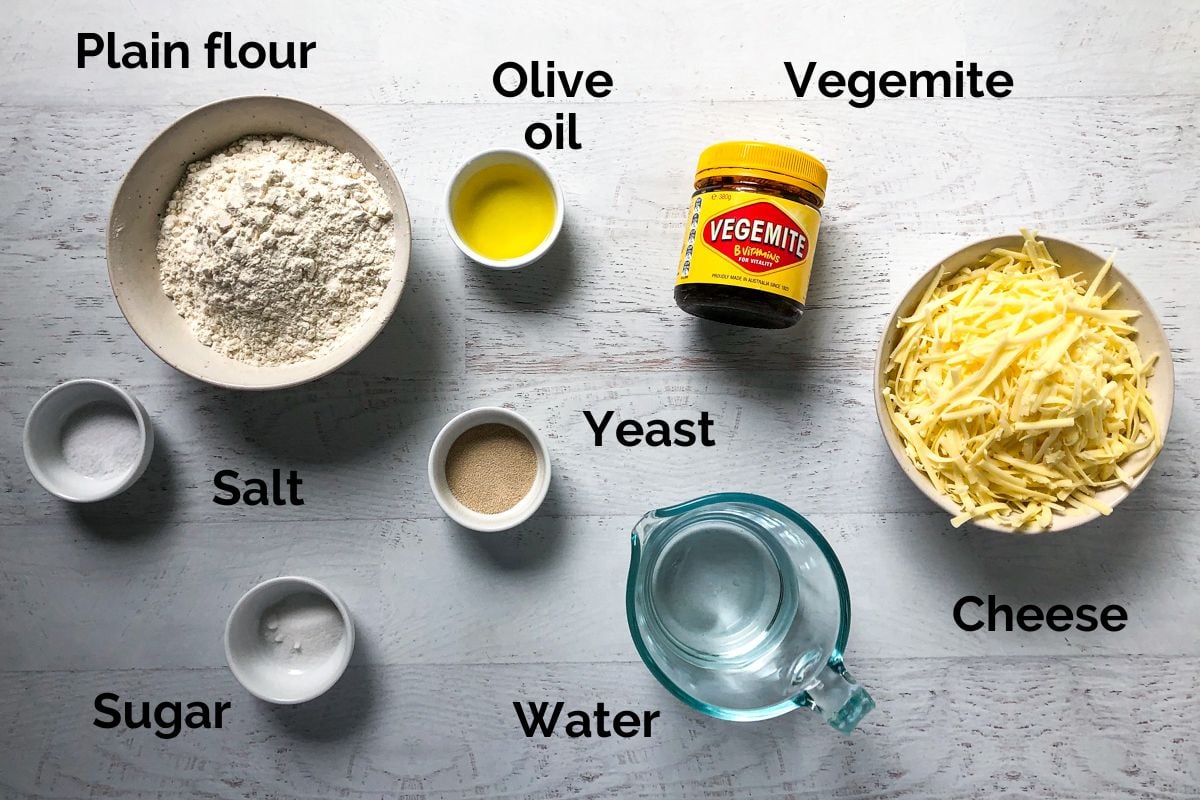
- Plain flour – all-purpose flour is used to form the dough. ‘00’ baker’s flour can be used for a finer, softer, “bakery-like” texture. White or wholemeal flour can be used interchangeably, depending on preference and what you have available.
- Yeast – makes the dough rise and gives a yeasty, savoury flavour. Use instant, dry yeast from the shelf in supermarket or health food stores. Once opened, keep your yeast in the fridge.
- Vegemite – the star ingredient! An Aussie pantry staple, it can easily be found in supermarkets or online. It is a thick, dark and salty spread with a strong umami flavour. It’s made from yeast extract with added vitamins and folate that is perfect for spreading on toast or using in savoury baking. Use it sparingly and add more or less, according to your Vegemite tolerance. A little goes a long way! Alternatively, Marmite, Promite, Mightymite or OzEmite can be used.
- Cheese – any type of tasty cheese can be used. A shredded pizza blend works well, or try Colby, aged cheddar or any type of all-purpose, shredded cheese that you have on hand.
- Sugar – is used to feed the yeast and help the dough rise. It shouldn’t be skipped.

Step by step instructions
**Full ingredient list and detailed step-by-step instructions can be found in the recipe card below.
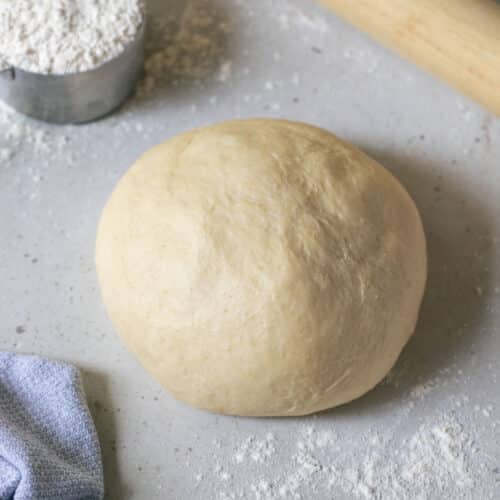
1. Make the dough – Using standard pizza dough ingredients; flour, sugar, yeast, salt, water and olive oil. Mix the dry ingredients and add the olive oil and enough warm water to form a soft dough.
Mix with your hands until the dough comes together and feels soft. Cover the dough and leave it to rest in a warm place for at least 30-60 minutes. It should double in size during this time.
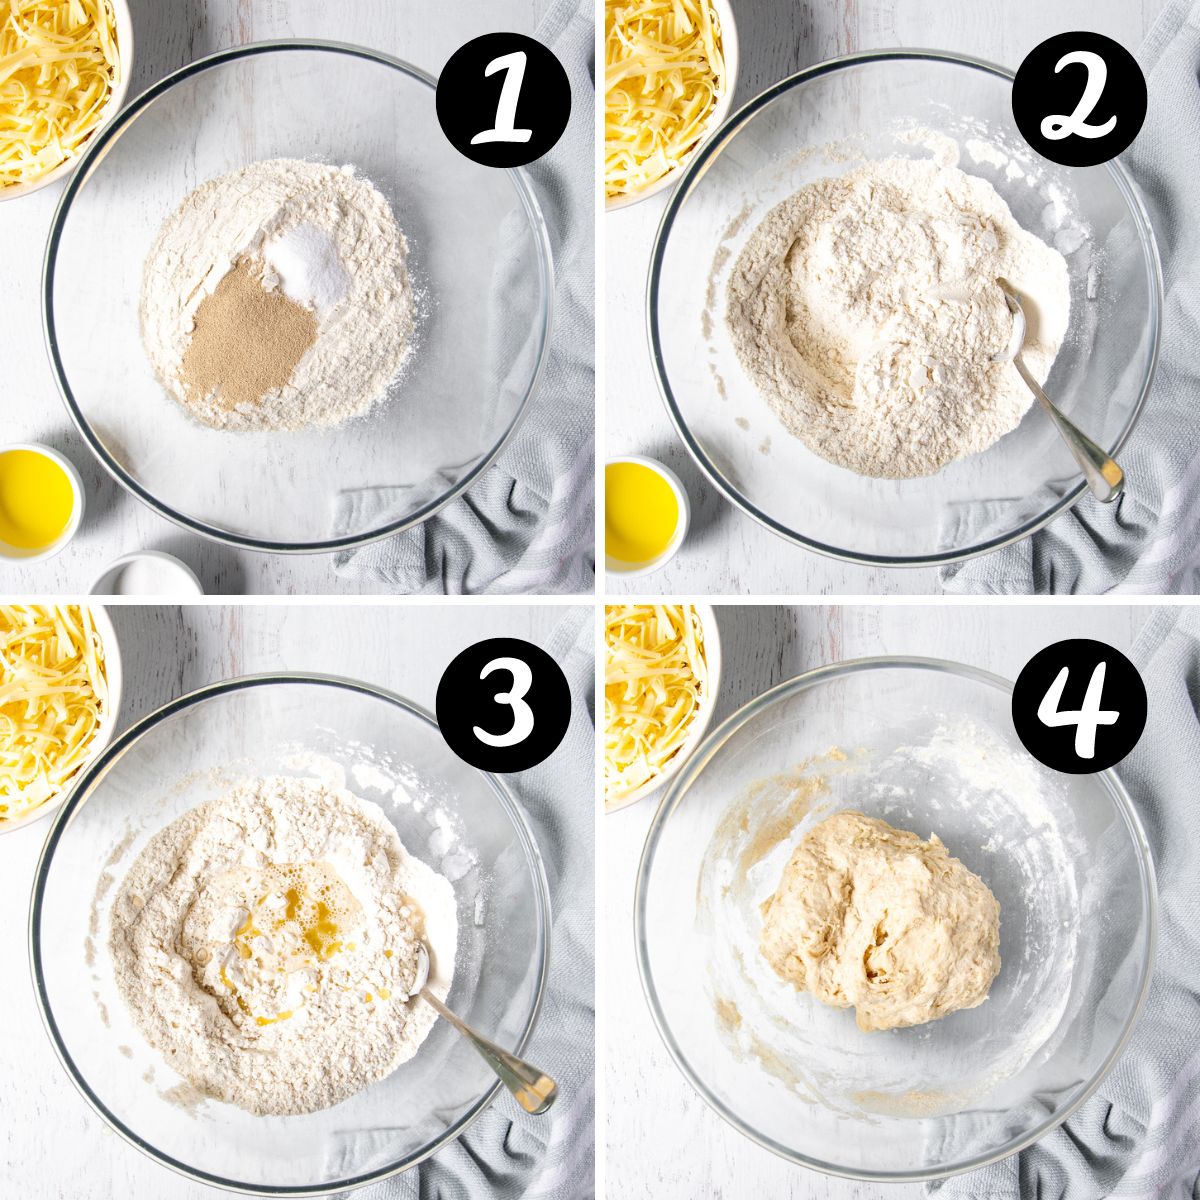
2. Knead the dough – Once rested, use your hands to knead the dough on a lightly floured bench for around 5 minutes, until soft.
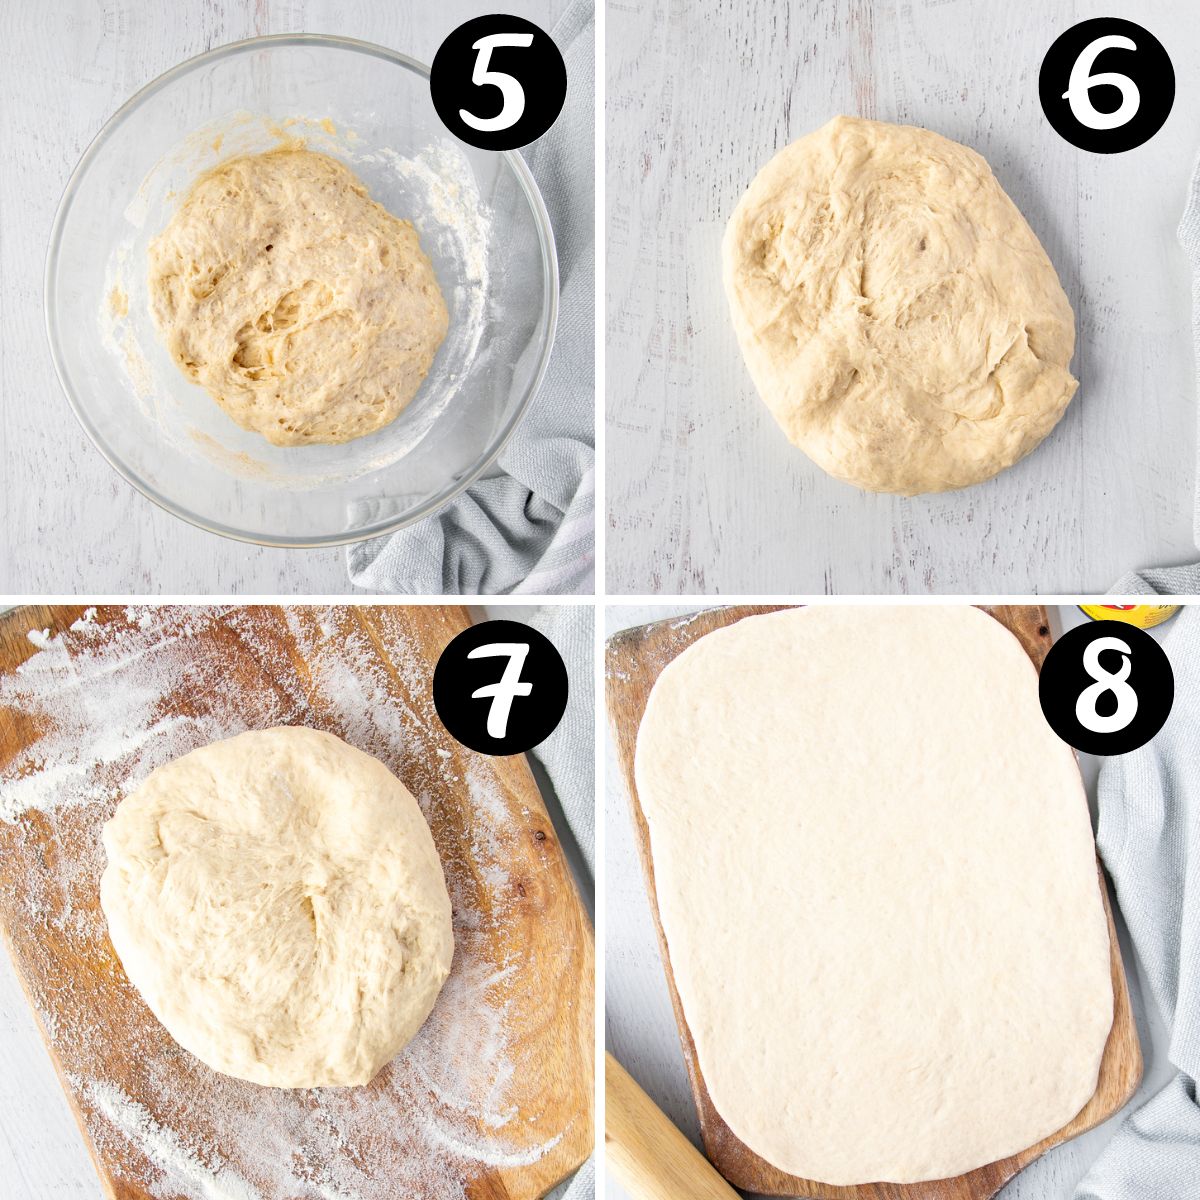
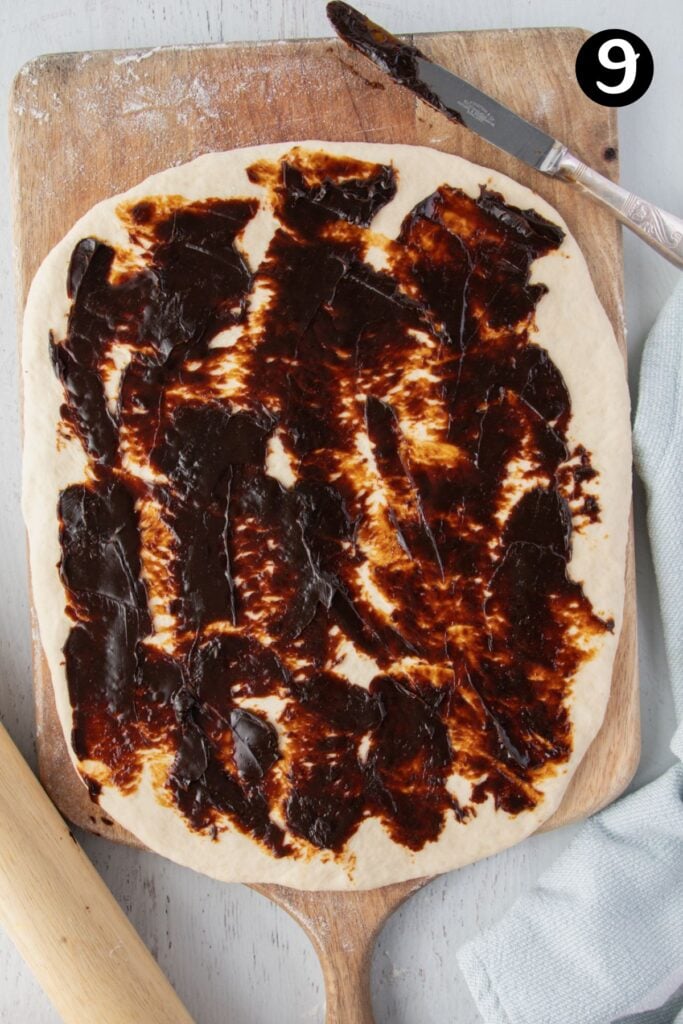
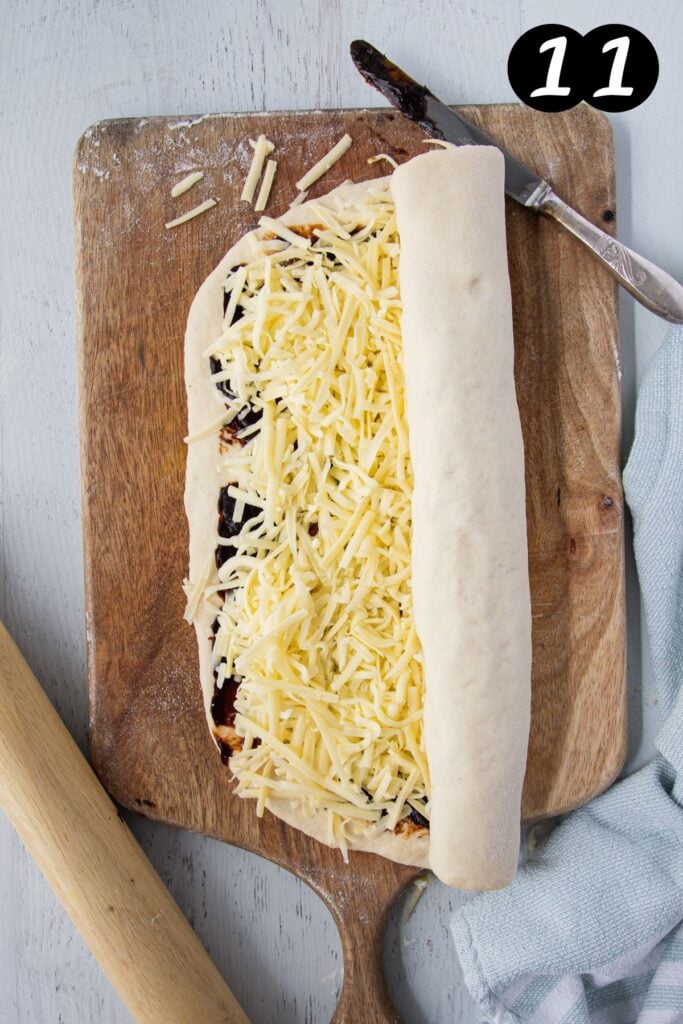
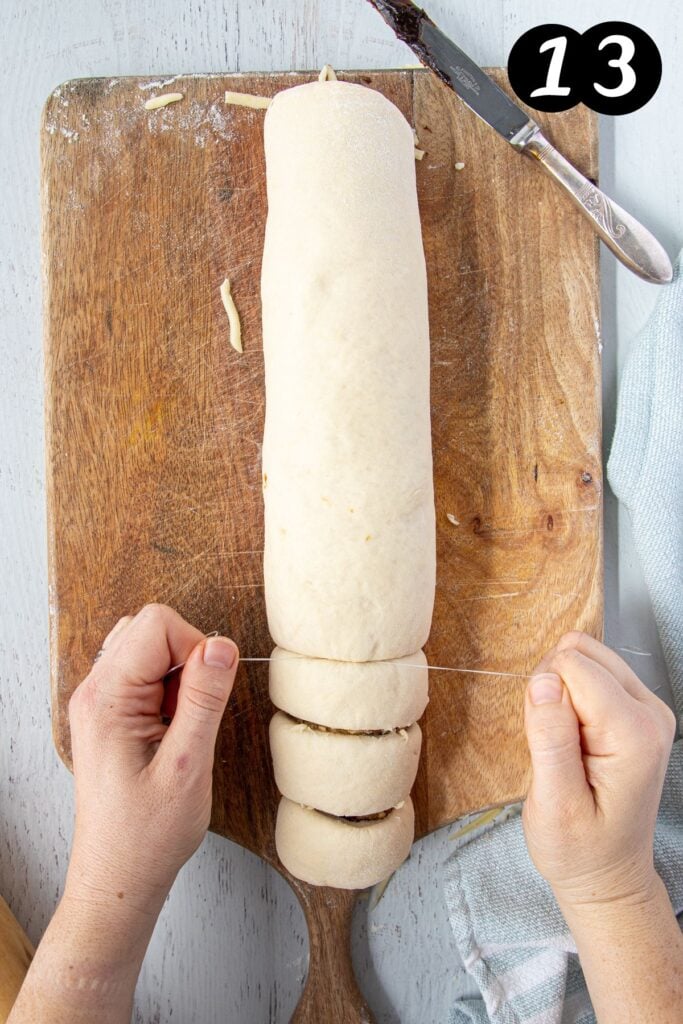
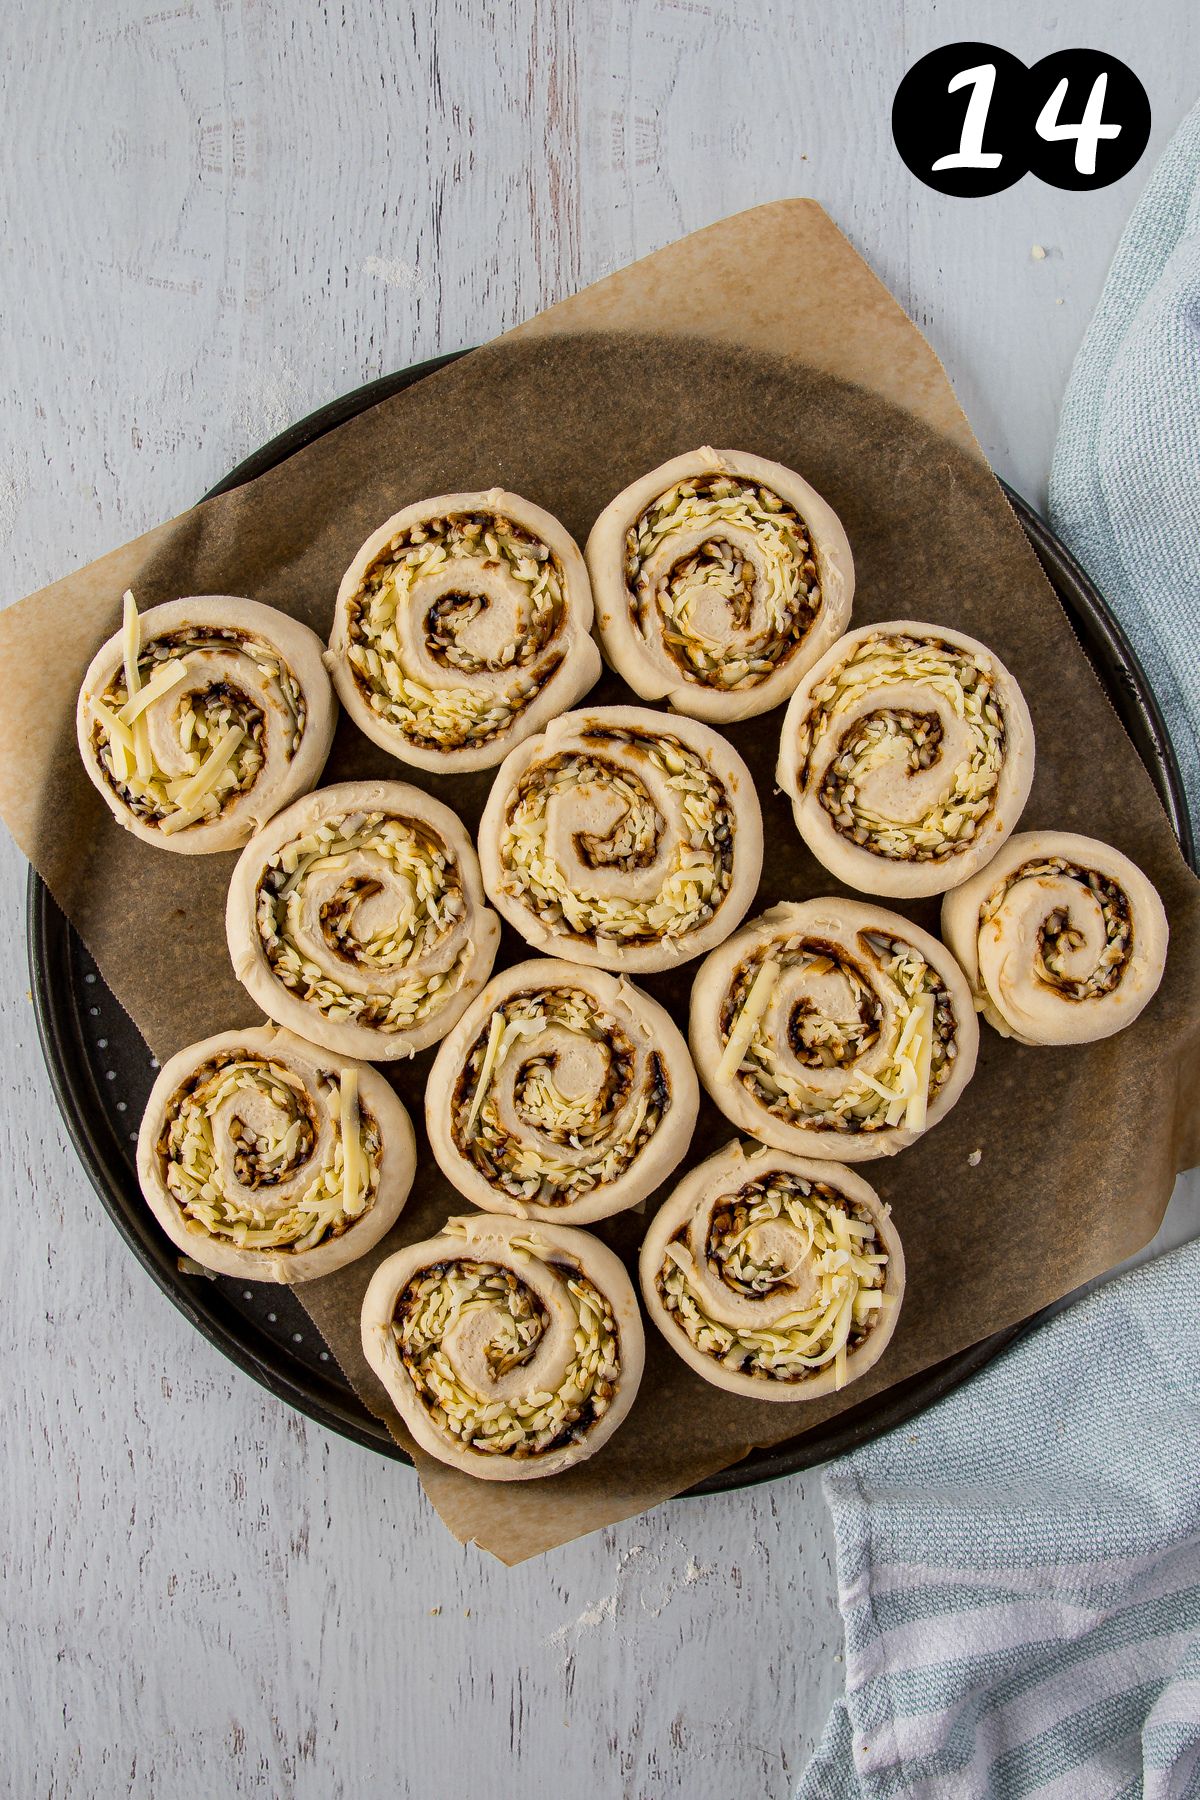
3. Shape the scrolls – roll the dough out into a rough rectangle shape, approximately 30 x 23cm in size. Spread the Vegemite over the top, then sprinkle with the shredded cheese. Tightly roll the dough and cut it into 12 scrolls. A sharp knife or dental floss can be used (see my tips below!).


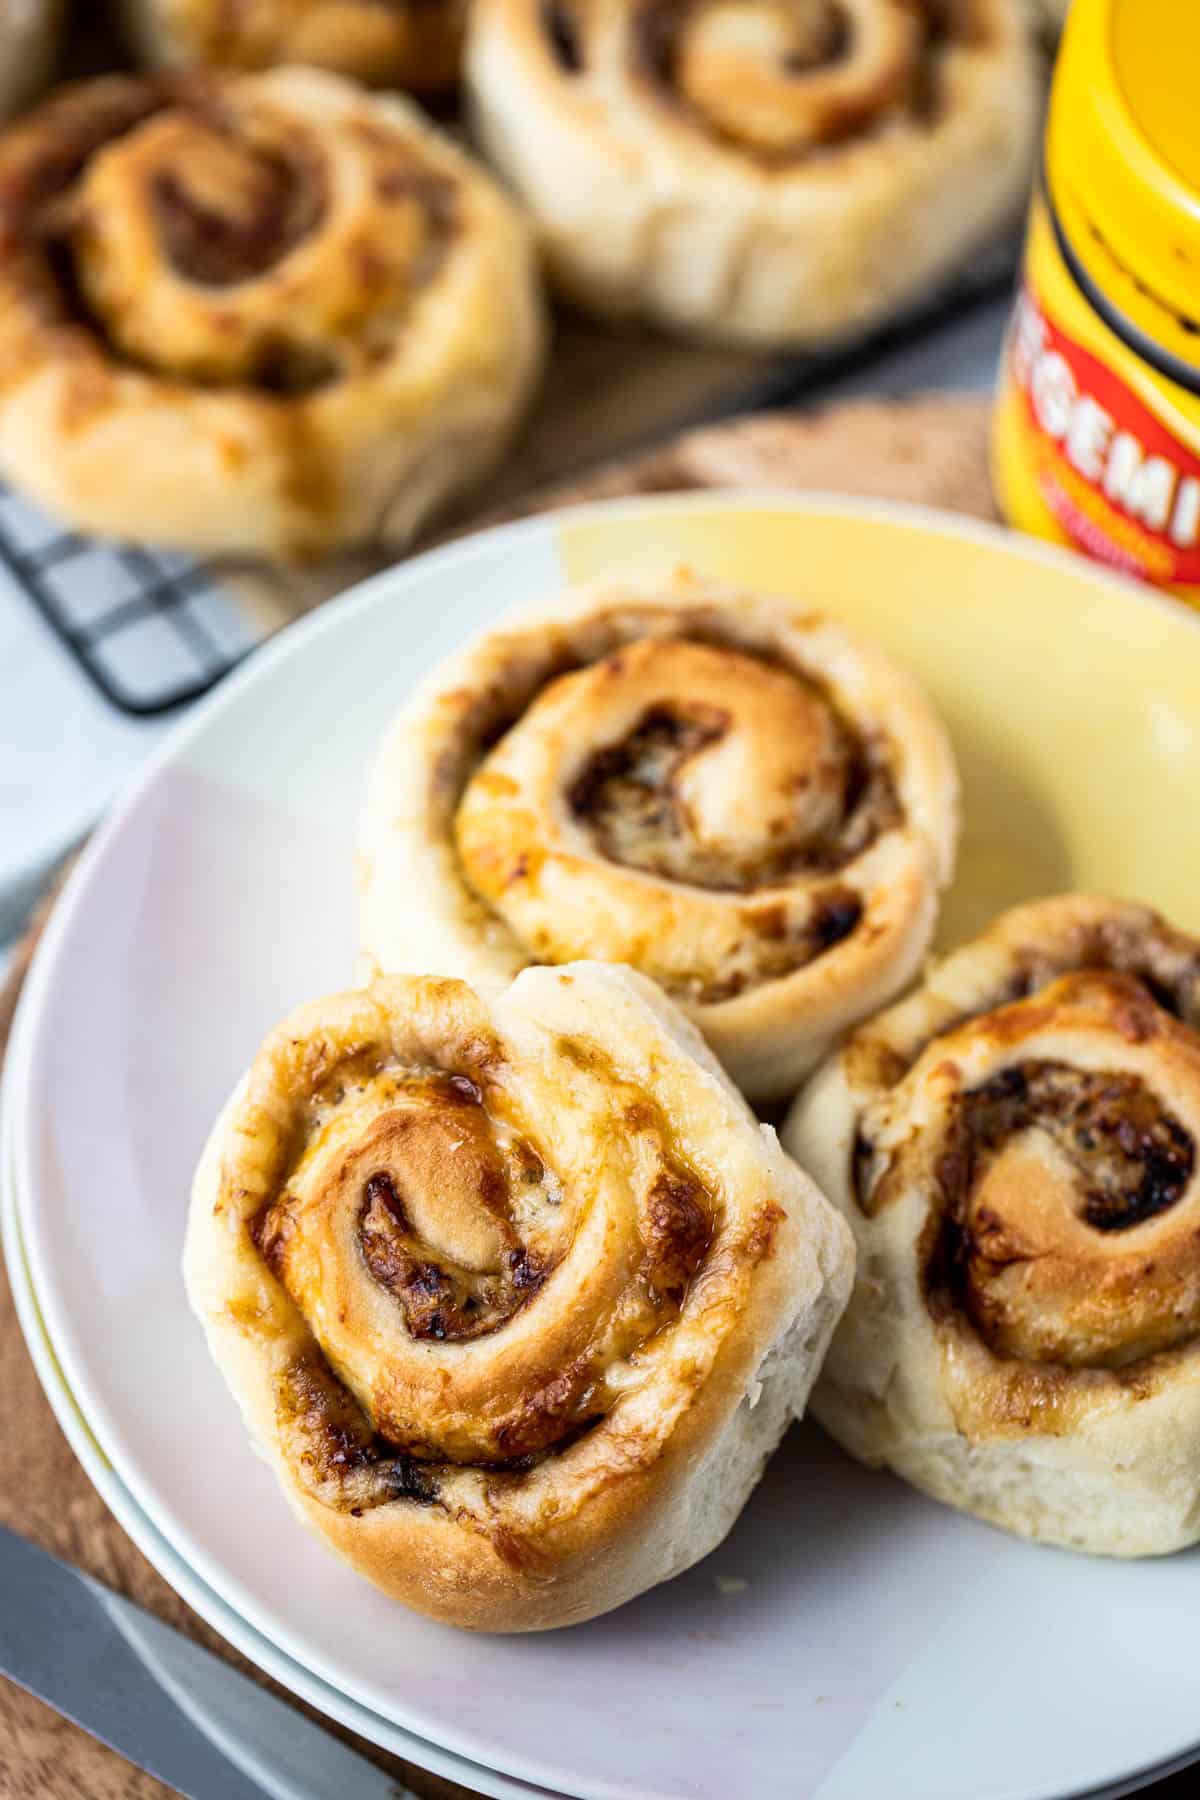
4. Bake – place the scrolls onto a lined baking tray and bake until puffed and golden brown.
Expert tips
- The water for the dough must be warm to touch, not hot. If the water is too hot, it will kill the yeast and the dough won’t rise.
- Find a warm spot for the dough to rise. The yeast in the dough will work much better in a warm area. In summer, place it in a window in the sun or another warm part of your house. In winter, place it safely near a heater or if it is really cold, place the bowl of dough in a shallow sink filled with hot water.
- Roll the scrolls tightly and seal the edges to prevent the scrolls coming apart while baking.
- Give the scrolls a little space between each other on the baking tray. It’s ok for them to touch while baking, but you don’t want them to completely merge or the dough will take longer to cook through in the middle.
- Cutting hack; use unflavoured dental floss to cut the scrolls. A clean, sharp knife will also work, but floss will make even, perfectly shaped scrolls without squishing. Place the floss under the rolled dough and bring it up and cross it over the top, before pulling tight making a perfect scroll! (See the image above).
- Want more? This recipe makes about 12 scrolls, but they can be made larger or smaller, depending on preference (cooking times will vary). The recipe can also be multiplied to portion out and freeze, ready to grab-and-go.
- Want to mix it up? Follow the same recipe, but change up the fillings. The scroll recipe works for any fillings. Try ham and cheese, spinach with feta and cheese, shredded chicken with sweet chilli sauce and cheese, pesto and cheese or ham with cheese and pineapple.
FAQs
While best eaten fresh, leftover scrolls will keep in an airtight container at room temperature for 2-3 days. Allow the scrolls to cool completely and wrap them in a towel before placing them in a container, for best results.
These scrolls keep beautifully in the freezer, making them a convenient grab-and-go snack. Once cooled, place them in an airtight container, separating any layers with baking paper to prevent sticking. Freeze for up to 3 months. Then, allow to thaw at room temperature and eat cold or reheated.
These scrolls can be made in pre-heated air fryer at 200 C/392 F for 10-12 minutes. The scrolls need to be placed slightly apart, in a single layer. You may need to cook in batches, depending on the size of your air fryer.
How do I know when they are ready?
Whether you use an oven or air fryer, cooking times will vary slightly, depending on the type of oven and the size of the scrolls. When the scrolls are ready, they will have increased in size, become crisp and golden on the outside and fluffy in the middle. There should be no raw dough remaining.
Related recipes


Tried this recipe? Please leave a star ⭐⭐⭐⭐⭐ rating or leave a review below and let you know how you went!
Hungry for more? Subscribe to my newsletter and follow along on Facebook, Instagram and Pinterest for the latest recipes and news.

Cheese and Vegemite scrolls
Ingredients
- 300 grams plain flour white or wholemeal/wholewheat flour
- 20 grams dry yeast instant yeast
- 1 teaspoon sugar
- 1 teaspoon salt
- ¾-1 cup warm water warm to touch, not hot.
- 2 tablespoons olive oil
- 4 tablespoons Vegemite or add more or less, to taste.
- 3 cups cheese Colby, cheddar, mozzarella or pizza blend, shredded.
Instructions
- To make the dough, combine the flour, yeast, sugar and salt in a mixing bowl.
- Make a well in the centre and add ¾ cup warm water (warm to touch; not too hot or it will kill the yeast) and olive oil. Mix with your hands for 1-2 minutes until combined and soft. *Add a little more water to the dough if needed. The dough should be soft, smooth and not too sticky.
- Place the dough back into the mixing bowl and cover firmly with plastic or compostable cling wrap. Allow the dough to sit in a warm area and rise for at least 30-60 minutes. The dough should double in size over this time.
- Pre-heat oven to 220 °C/428 F (200C° fan forced). Line a baking tray with baking paper.
- Once the dough has rested, place the dough on a bench and knead for around five minutes, until soft.
- Using a rolling pin, roll dough to a rectangular shape, approximately 30 x 20cm in size.
- Spread the Vegemite over the dough to desired thickness. Cover the Vegemite with the shredded cheese.
- Starting from the long end, roll the dough tightly into a roll, to the top. Seal the end with a little water to prevent the dough separating during cooking. Cut the rolled dough into 12 scrolls and place onto the lined baking tray.
- If you have time, the scrolls can be assembled in the tray and then covered to rise again for a further 30 minutes, to make them extra fluffy. This step is optional.
Oven instructions
- Bake for 20 minutes, or until the scrolls are golden and cooked through in the middle. Remove from the oven and allow to cool on a wire rack.
- Place the scrolls onto a wire rack to cool slightly before eating.
Air fryer instructions
- Pre-heat air fryer to 200 °C/392 F.
- Place the scrolls into the air fryer basket in a single layer (you may need to cook in batches).
- Cook for around 10-12 minutes, or until golden and cooked through.
- Place the scrolls onto a wire rack to cool slightly before eating.
Notes
- Plain flour – all-purpose flour is used to form the dough. ‘00’ baker’s flour can be used for a finer, softer, “bakery-like” texture. White or wholemeal flour can be used interchangeably, depending on preference and what you have available.
- Cheese – any type of tasty cheese can be used. A shredded pizza blend works well, or try Colby, aged cheddar or any type of all-purpose, shredded cheese that you have on hand.
- Alternatively, Marmite, Promite, Mightymite or OzEmite can be used.
- The water for the dough must be warm to touch, not hot. If the water is too hot, it will kill the yeast and the dough won’t rise.
- Find a warm spot for the dough to rise. The yeast in the dough will work much better in a warm area. In summer, place it in a window in the sun or another warm part of your house. In winter, place it safely near a heater or if it is really cold, place the bowl of dough in a shallow sink filled with hot water.
- Roll the scrolls tightly and seal the edges to prevent the scrolls coming apart while baking.
- Give the scrolls a little space between each other on the baking tray. It’s ok for them to touch while baking, but you don’t want them to completely merge or the dough will take longer to cook through in the middle.
- Cutting hack; use unflavoured dental floss to cut the scrolls. A clean, sharp knife will also work, but floss will make even, perfectly shaped scrolls.
- Want more? This recipe makes about 12 scrolls, but they can be made larger or smaller, depending on preference (cooking times will vary). The recipe can also be multiplied to portion out and freeze, ready to grab-and-go.
- Want to mix it up? Follow the same recipe, but change up the fillings. The scroll recipe works for any fillings. Try ham and cheese, spinach with feta and cheese, shredded chicken with sweet chilli sauce and cheese, pesto and cheese or ham with cheese and pineapple.
- Storage; While best eaten fresh, leftover scrolls will keep in an airtight container at room temperature for 2-3 days. Allow the scrolls to cool completely and wrap them in a towel before placing them in a container, for best results.
- Freezing; These scrolls keep beautifully in the freezer, making them a convenient grab-and-go snack. Once cooled, place them in an airtight container, separating any layers with baking paper to prevent sticking. Freeze for up to 3 months. Then, allow to thaw at room temperature and eat cold or reheated.
- Please note that the nutrition information is based on the dough being divided into 12 scrolls, with one scroll being one serve. The nutritional information is an estimate only and does not take into account any additional toppings or sides served with the scrolls.
- This recipe is made using Australian cups and spoon measurements. Due to cup sizes varying from country to country, I advise adjusting if necessary.
Nutrition
Are you following us on Facebook, Instagram and Pinterest?
Update Notes: This recipe was originally published in January 2019, but was re-published with new information, helpful tips and photos in June 2022.


Mags says
My kids were dubious and said these weren’t going to taste as good as the ones from Bakers Delight. Well, didn’t I surprise them! Both kids loved these and said they’re better than the store bought ones. So I’ve just added another fantastic recipe to the lunchbox repertoire! Thanks so much for a great and easy recipe.
Andrea Geddes says
Hi Mags! You have made my day. I’m so happy to hear that you and your kids enjoyed these scrolls. They are a much cheaper (and just as delicious) option to store-bought version. You’re very welcome. Thanks for your comment. Andrea 🙂
E says
Tastes like the ones from Coles but better. Love the cook mode and doubling/halving/tripling feature.