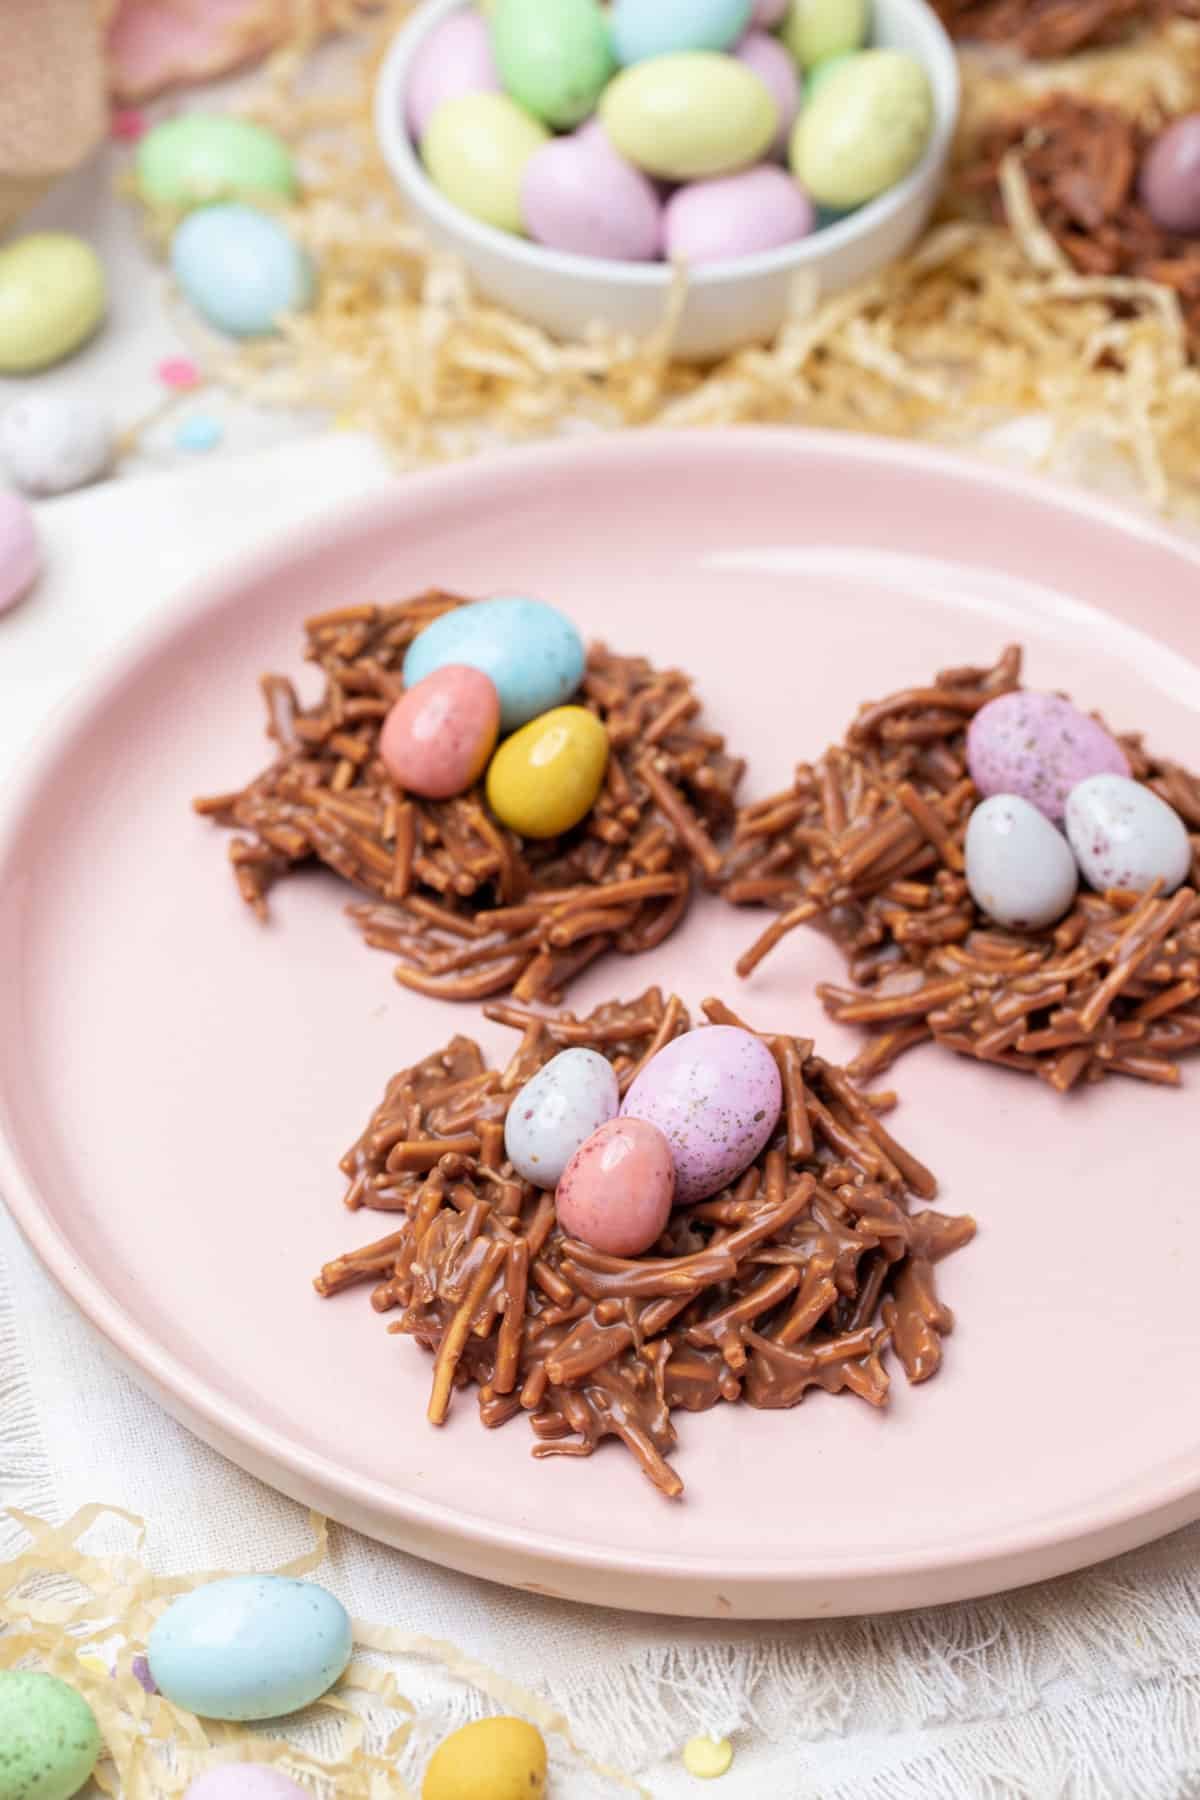
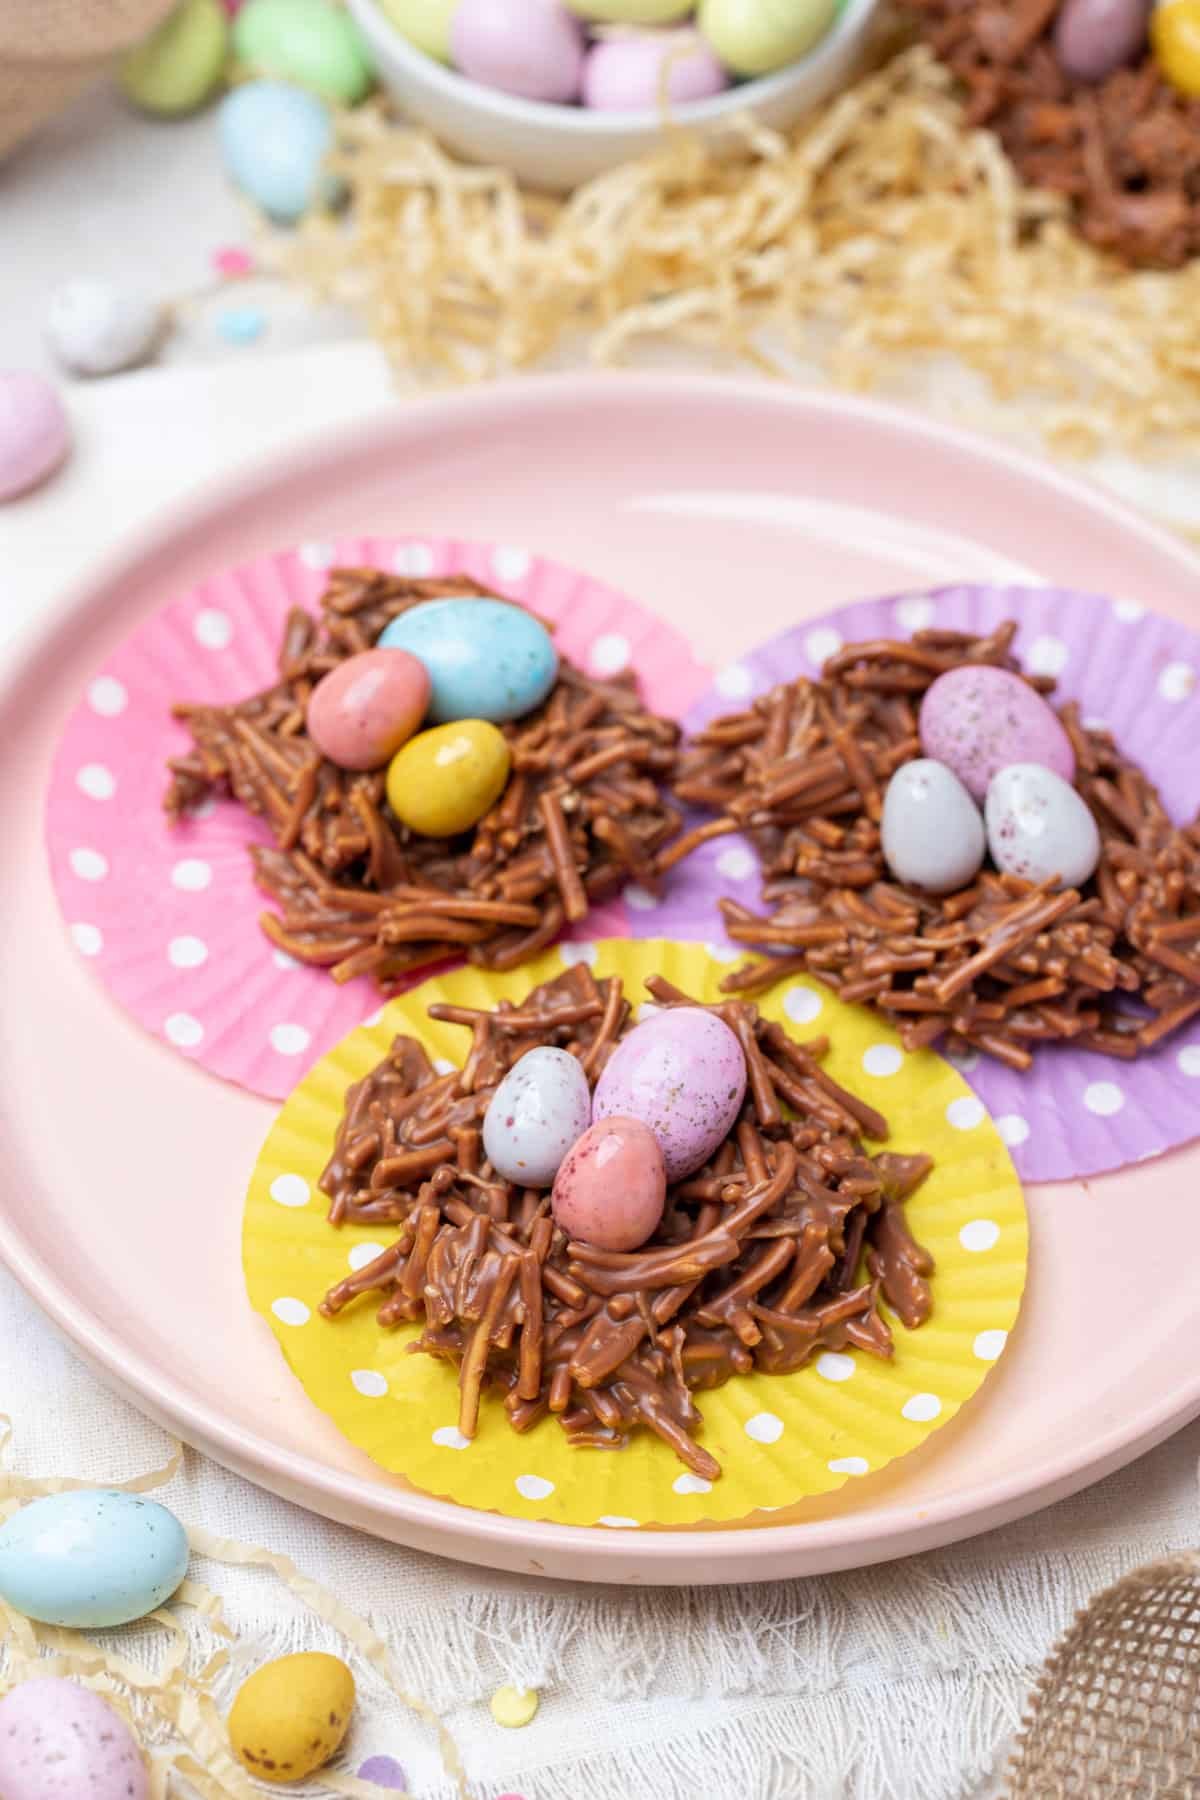
You’ll love these easy chocolate nests. Stuffed with crunchy fried noodles and coconut and encased in creamy milk chocolate, they are the perfect no-bake treat for Easter, Christmas and parties. You only need 4 ingredients and they take just minutes to prepare!
Why you’ll love this recipe
- Quick and easy – all you have to do is melt, stir, shape and chill!
- No baking required.
- Perfect for Easter – fill the mini nests with speckled Easter eggs for the perfect Easter treat. Or use M&Ms, Smarties, mini marshmallows or your favourite mini treats to enjoy them at any time of year.
- Kids can help – this is such a fun Easter activity, perfect for getting the kids involved!
- Easy to scale – make a double or even a triple batch for parties, entertaining or gifting.
- So irresistible! They are the perfect combination of savoury and sweet, with the most satisfying crunch!
- Made in the microwave – no need to turn on your oven and no candy thermometers required.
Ingredients you will need
** This post contains tips and instructions to achieve the best possible results. This photo is a great guide for when you are in the supermarket, but for full ingredient quantities and methods, please scroll down to the detailed recipe card below!

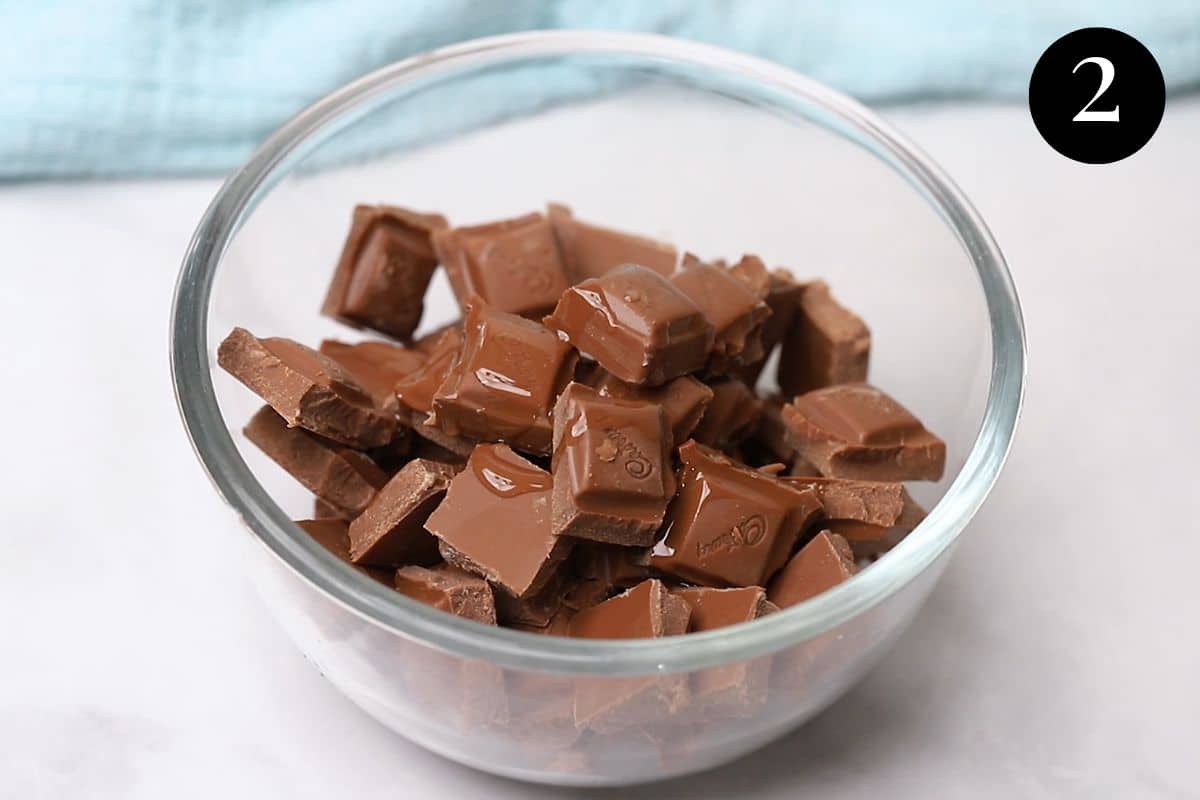
- Chocolate – this recipe uses milk chocolate, but you can use milk, dark or white chocolate depending on your preference. Choose a good quality chocolate that you know and love to eat.
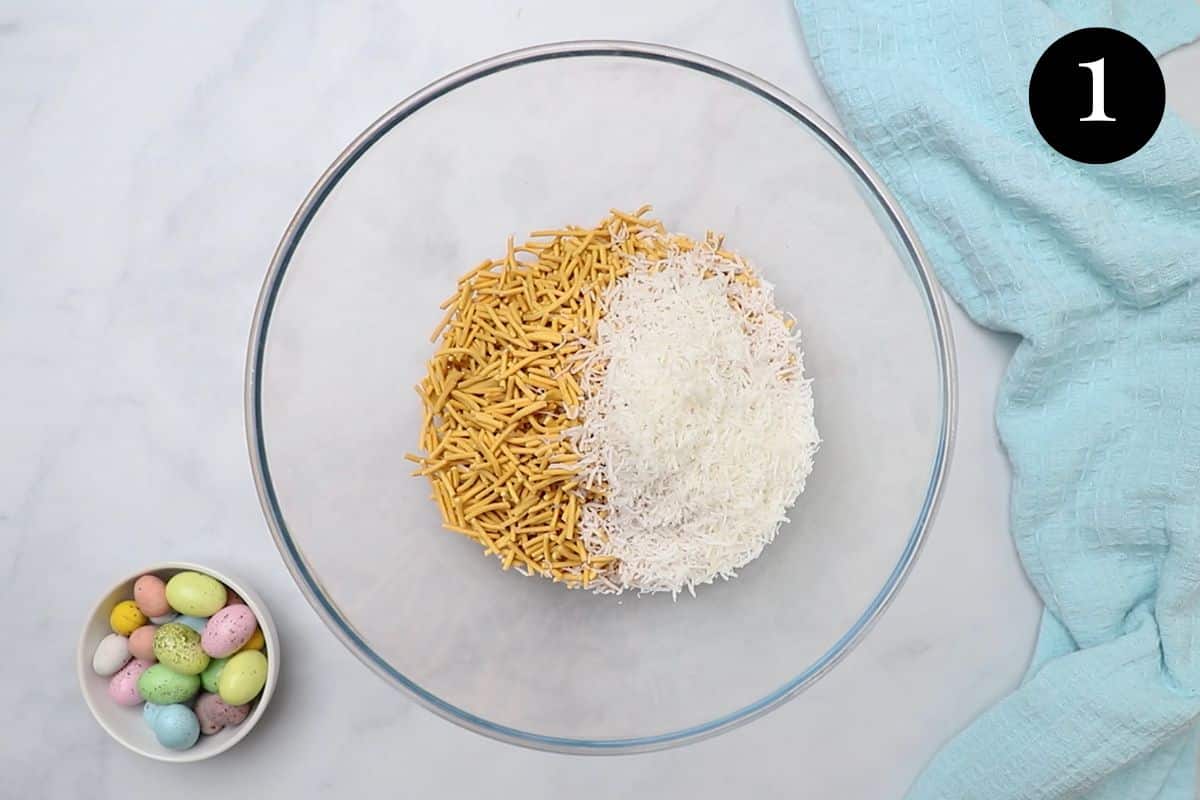
- Fried noodles – crispy fried noodles like Chang’s are used to provide crunch and savoury flavour. Chang’s noodles are short wheat noodles that are fried in oil and are ready to eat, straight from the packet (no cooking required). They can be found in supermarkets around Australia, as well as online. If Chang’s noodles aren’t available in your area, sub for any type of short, ready to eat fried noodle or even broken pretzels.
- Shredded coconut – for flavour and texture. I recommend shredded coconut for overall appearance and texture, but finer desiccated coconut can also be used.
- Mini Easter eggs – colourful, speckled chocolate Easter eggs are the perfect addition, as they make these treats look just like a mini birds’ nest! But you can also use M&Ms, Smarties or any mini chocolate treat.
- Oil (optional) – a tablespoon of canola or vegetable oil is added to the chocolate, to add shine and make it slightly softer to eat. It can be omitted, if preferred. Be sure to use a light, neutral tasting oil so that the flavour is not overpowering.
How to make them
Full ingredient notes and quantities can be found in the detailed recipe card below. But here is a brief overview of what you can expect;
Step 1; Stir the noodles and coconut together in a mixing bowl.
Step 2; Melt the chocolate and oil together in the microwave, until smooth.
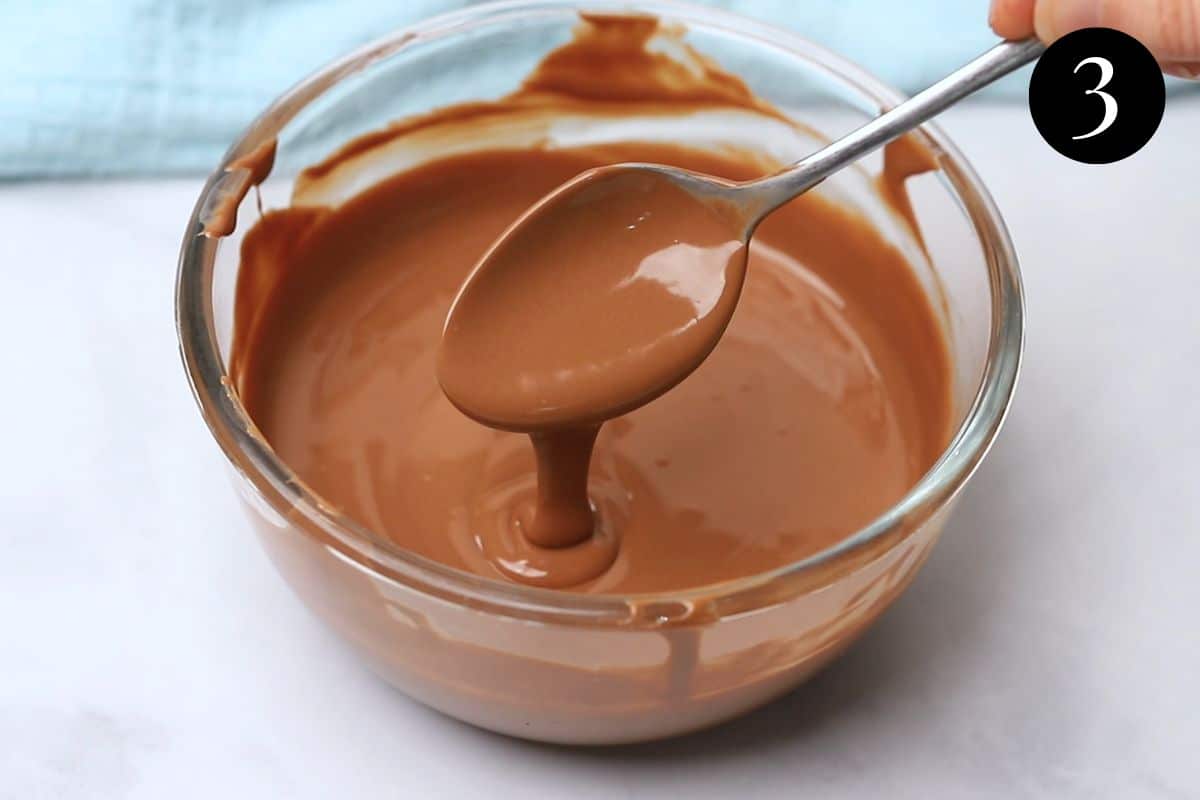
Step 3; Pour the melted chocolate over the noodles and coconut and stir to combine.
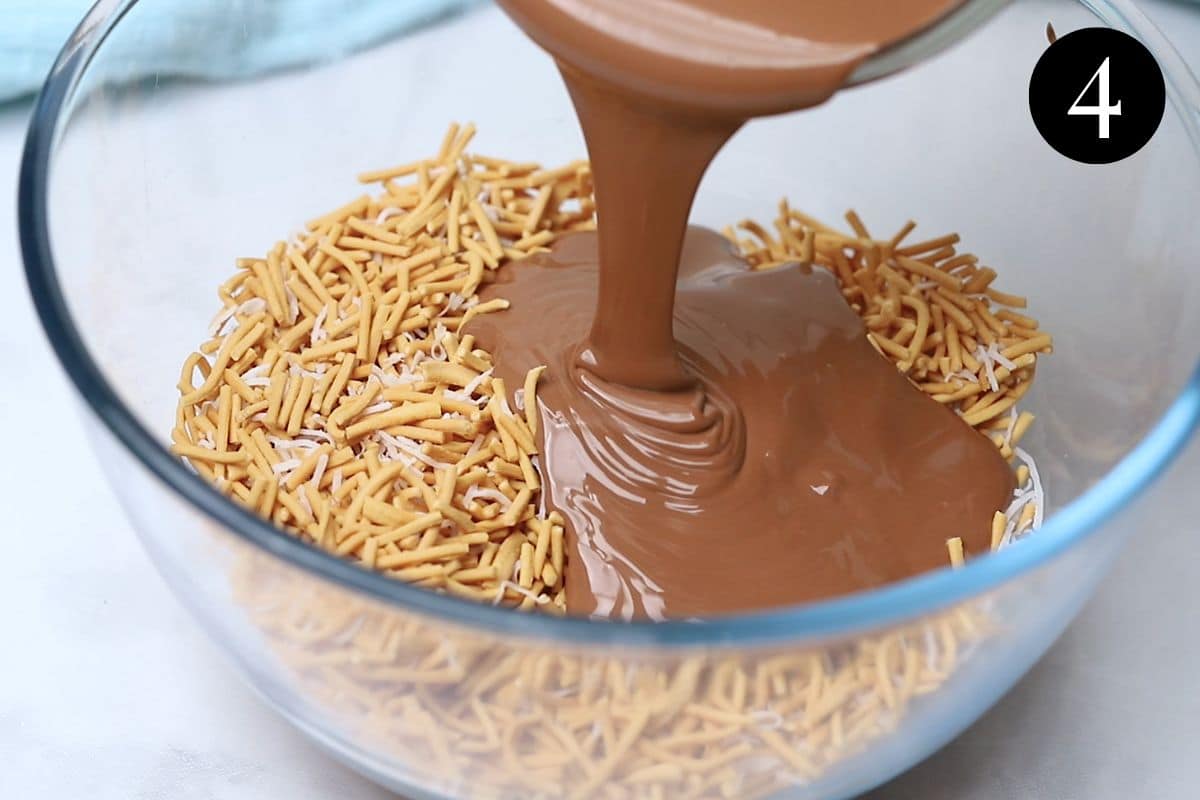
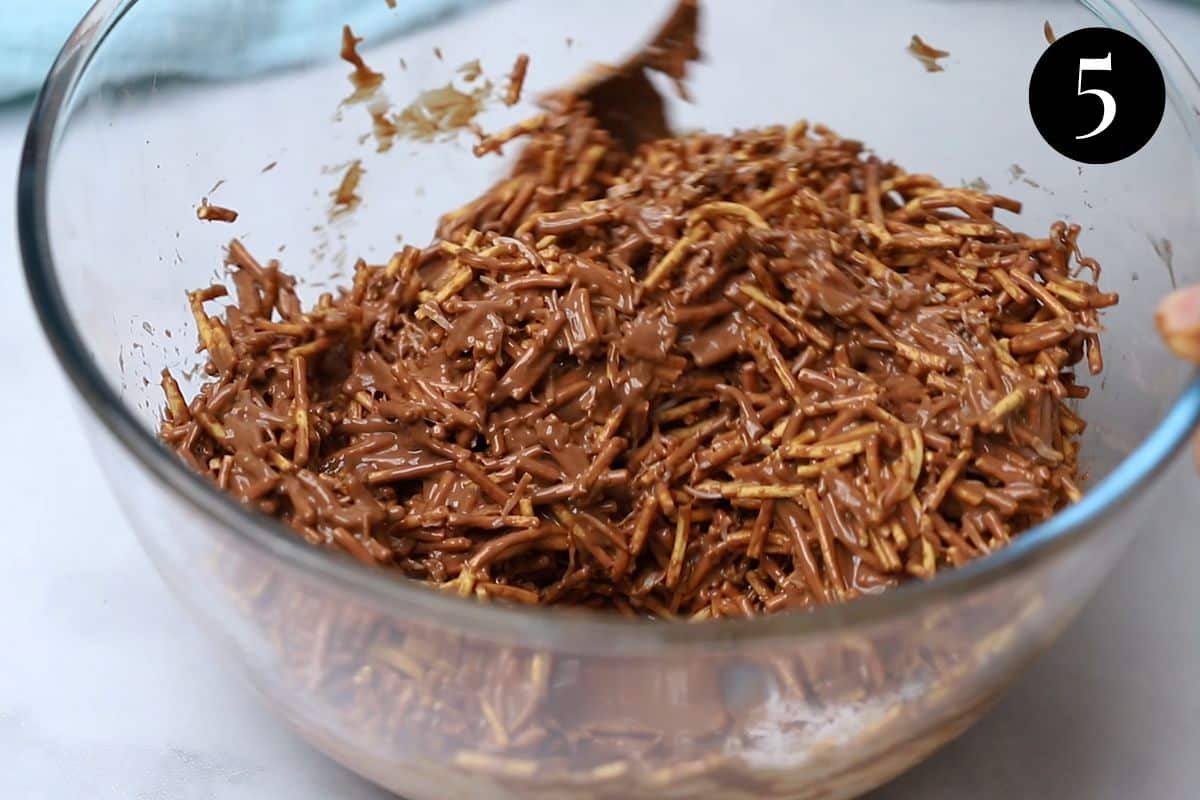
This step requires you to work quickly so that the chocolate doesn’t set.
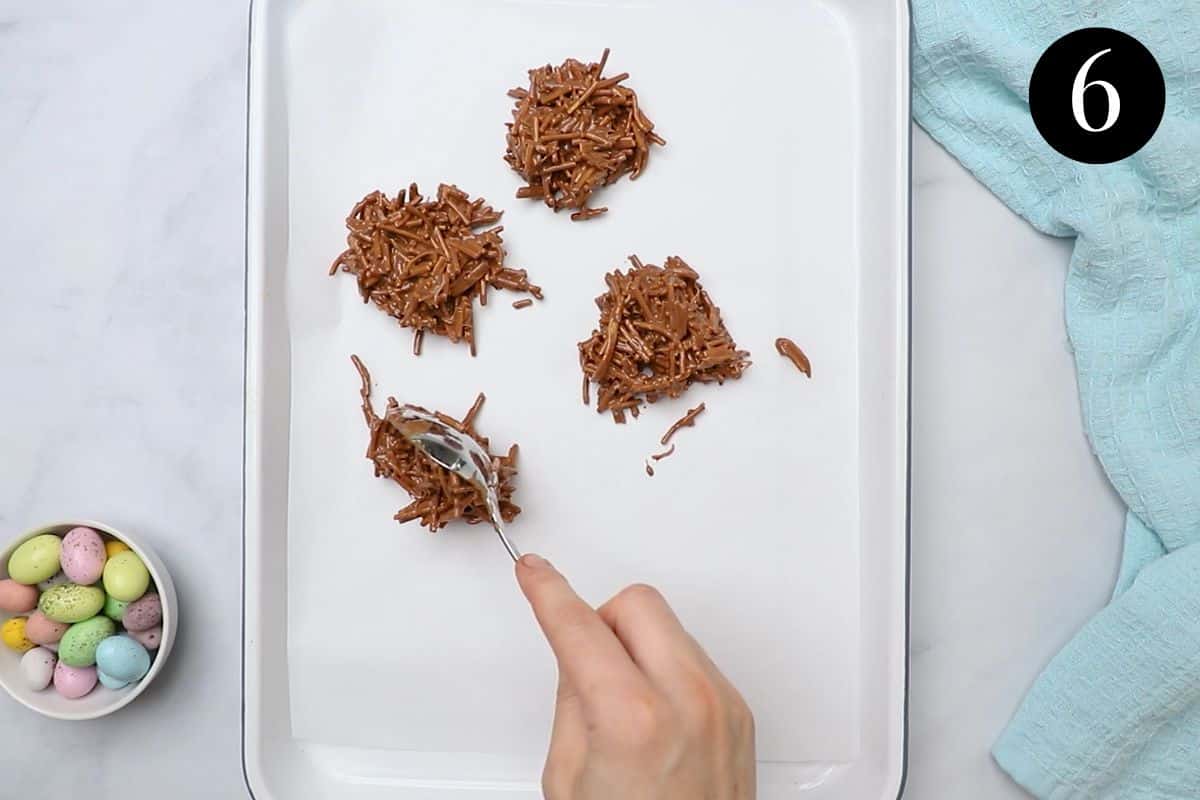
Step 4; Spoon the mixture onto a lined baking tray and use a spoon to gently mould each one into a nest shape. Press a small indent into the top of the nests to hold the eggs.
Place the Easter eggs or chocolate pieces into the centre of each nest.
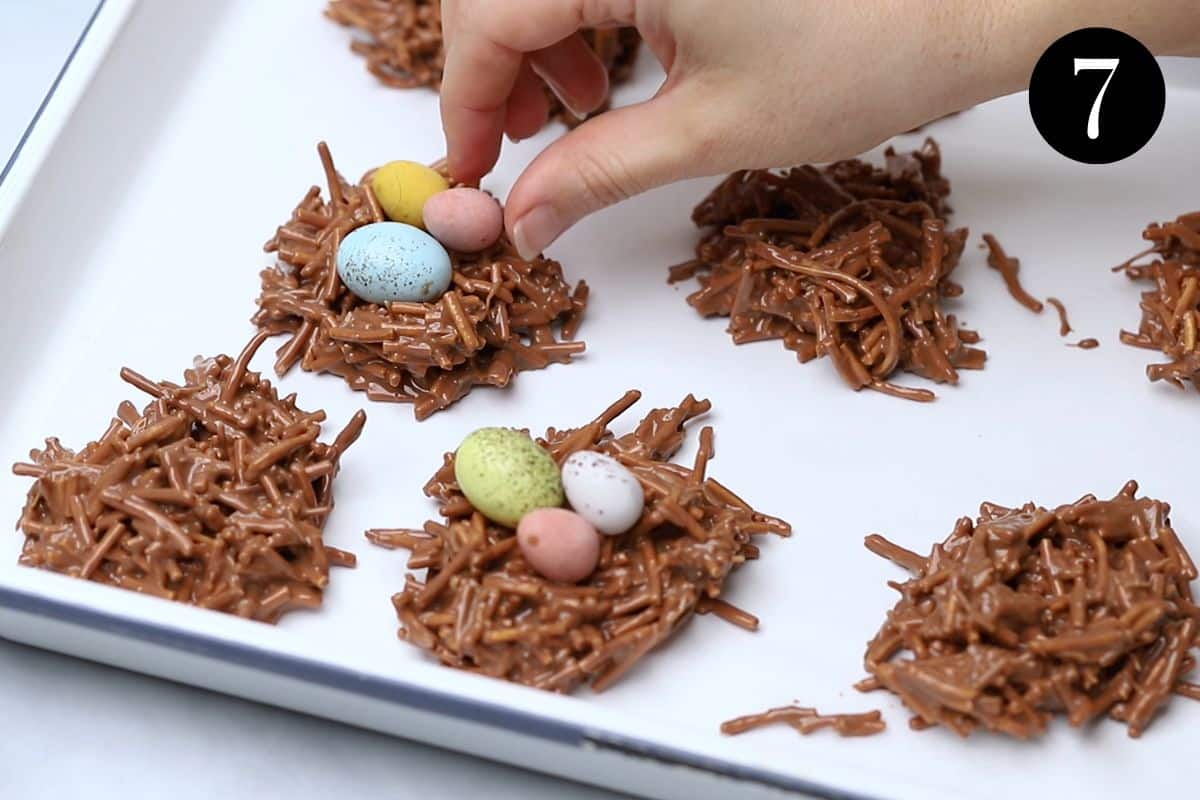
Step 5; Refrigerate until set and keep in the fridge for up to 2 weeks.
Expert tips
- Work quickly; once the chocolate has melted, it is important to mix everything together and shape the mixture into individual nests as quickly as possible. This is because the chocolate will start to set as soon as it is mixed in with the other ingredients. I recommend having all of the ingredients measured and prepared, ready to go.
- Use a metal spoon to stir the chocolate during the melting process. Wooden spoons can retain moisture and make the chocolate seize.
- You can stir 1 tablespoon of canola oil into the chocolate, before melting. This is optional, but the additional oil will make the chocolate glossy and a little easier to eat when it sets.
- Make a double batch for gifting!
- Before melting the chocolate, make sure that your bowl and utensils are completely dry. Any excess moisture in the melting process can cause the chocolate to seize and become grainy.
- This recipe makes about 16 nests, but you can make them into smaller, bite-sized nests if preferred.
FAQs
Any leftovers will keep in the fridge in an airtight container for up to 2 weeks, perfect for making ahead for Easter celebrations!
These nests can be frozen for up to 1 month. However, I recommend leaving the mini Easter eggs off until you are ready to serve them, as the colours can fade or run when thawed. Allow the nests to set in the fridge and then store in an airtight container in the freezer, separating any layers with baking paper. Take them out of the freezer about 30 minutes before you want to eat them.
Related recipes


Tried this recipe? Please leave a star ⭐⭐⭐⭐⭐ rating or leave a review below and let you know how you went!
Hungry for more? Subscribe to my newsletter and follow along on Facebook, Instagram and Pinterest for the latest recipes and news.

Chocolate Nests with Mini Easter Eggs
Ingredients
- 350 grams milk chocolate broken into pieces. Choose a good quality chocolate that you like to eat.
- 200 grams fried noodles (2 ¼ cups). I used Chang's noodles, but most fried, ready to eat noodles will suit this recipe
- ½ cup shredded coconut
- 1 tablespoon canola oil optional
To decorate
- mini Easter eggs to decorate
Instructions
- Line a tray with baking paper and set aside.
- Place the noodles and coconut into a mixing bowl and set aside.
To melt the chocolate in the microwave;
- Break the chocolate into pieces and place it into a microwave safe bowl with the oil.
- Microwave on medium heat in 30 second bursts, stirring with a metal spoon each time, until the chocolate is smooth and completely melted.
To melt the chocolate over the stove top;
- Place a small pot of water on the stove and bring to a boil. Reduce the heat to low. Find a heat-safe bowl that fits snugly over the top of the simmering water, without letting steam escape. The bottom of the bowl should not touch the water.
- Break the chocolate into pieces and add it to the bowl, along with the oil. Stir over the heat until the chocolate is completely melted and smooth. Remove from the heat.
To make the nests;
- Working quickly, pour the melted chocolate over the noodles and coconut and stir until completely combined.
- Place heaped tablespoons of the chocolate mixture into separate piles on the lined tray (or place them into individual patty cases). Using the spoon, gently mould the mixture into nest shapes and press a small dent in the centre to hold the Easter eggs.
- Decorate with the Easter eggs or your preferred fillings and refrigerate for at least 1-2 hours, or until set.
Video
Notes
- Work quickly; once the chocolate has melted, it is important to mix everything together and shape the mixture into individual nests as quickly as possible. This is because the chocolate will start to set as soon as it is mixed in with the other ingredients. I recommend having all of the ingredients measured and prepared, ready to go.
- Use a metal spoon to stir the chocolate during the melting process. Wooden spoons can retain moisture and make the chocolate seize.
- You can stir 1 tablespoon of canola oil into the chocolate, before melting. This is optional, but the additional oil will make the chocolate glossy and a little easier to eat when it sets.
- Make a double batch for gifting!
- Before melting the chocolate, make sure that your bowl and utensils are completely dry. Any excess moisture in the melting process can cause the chocolate to seize and become grainy.
- This recipe makes about 16 nests, but you can make them into smaller, bite-sized nests if preferred.
- Storage; Any leftovers will keep in the fridge in an airtight container for up to 2 weeks, perfect for making ahead for Easter celebrations!
- Freezing; These nests can be frozen for up to 1 month. However, I recommend leaving the mini Easter eggs off until you are ready to serve them, as the colours can fade or run when thawed. Allow the nests to set in the fridge and store in an airtight container in the freezer. Take them out of the freezer about 30 minutes before you want to eat them.
- Please note that the nutrition information is based on the mixture being made into 16 nests, with one nest being one serve. The nutritional information is an estimate only and does not take into account any additional toppings or sides served with the nests.
- This recipe is made using Australian cups and spoon measurements. Any reference to cups or spoons in this recipe is in Australian metric. Due to cup sizes varying from country to country, I advise adjusting if necessary.
Nutrition
Are you following us on Facebook, Instagram and Pinterest?
Update Notes: This recipe was originally published in March 2019 but was re-published with new information, helpful tips and photos in March 2023.


Leave a Reply