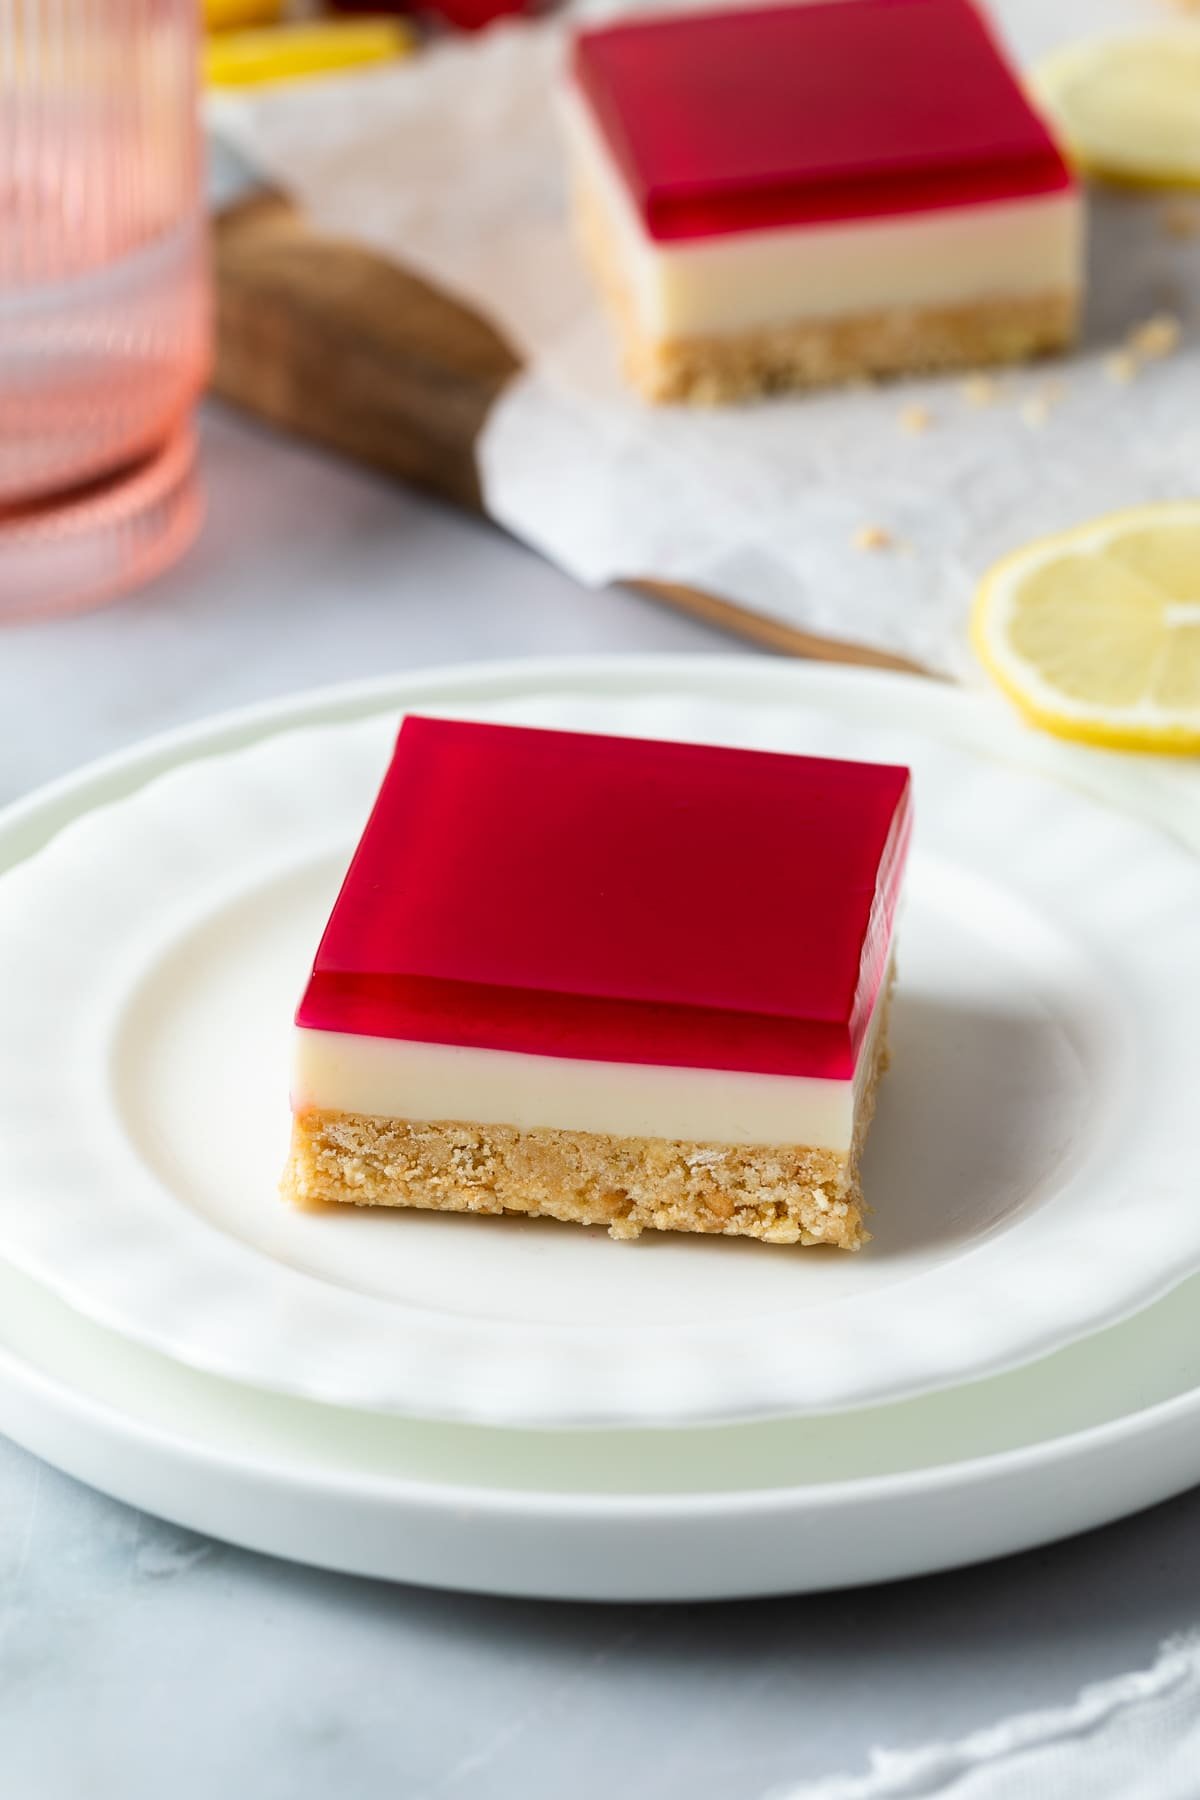
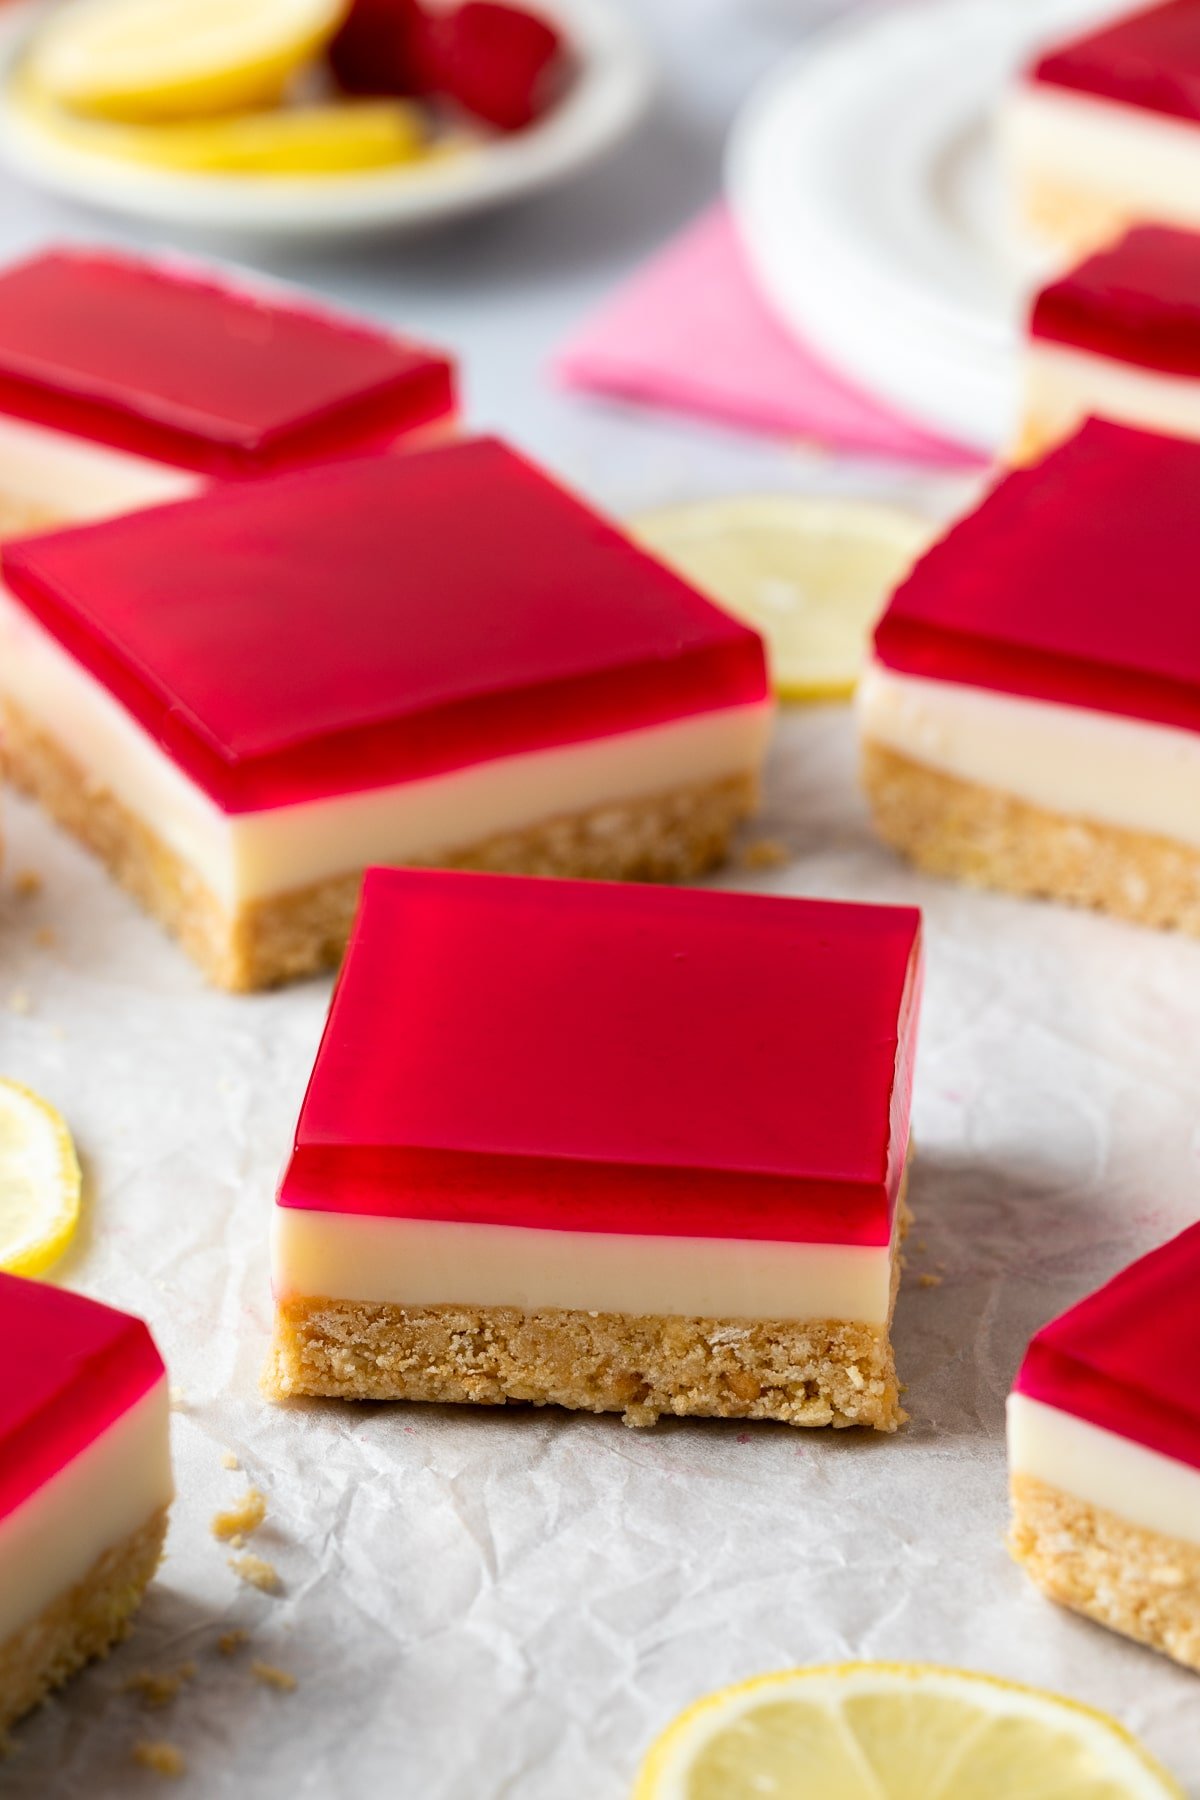
A classic Australian bakery staple, this easy jelly slice is the perfect no-bake treat. Featuring a buttery biscuit base, a creamy condensed milk filling and raspberry jelly topping, it takes only 10 minutes to prepare and is perfect for morning tea or dessert.
Jump to:
Why you will love this recipe
- Quick and easy – 10 minutes of hands-on time and 6 ingredients are all you need. You won’t even need to turn on the oven!
- Easy to adapt – use your preferred biscuits for the base and use your favourite flavour or colour of jelly for the topping. You can also add some fresh berries to the condensed milk layer for more flavour and an impressive visual effect when sliced. This recipe can also be adapted to use gluten-free biscuits, if required.
- Simple enough to make with kids (with a little help).
- Make ahead – make it the day before to set in the fridge overnight and slice it when you are ready to serve.
- Perfect for any occasion – this slice is perfect for morning or afternoon tea, parties and entertaining. Or, serve it alongside this Chocolate Ripple cake and pavlova for Christmas or Easter celebrations.
If you love no-bake slices and want some more Aussie treats, check out this lemon coconut slice, chocolate peppermint slice, chocolate lamingtons or chewy Mars bar slice.
Ingredients you will need
** This post contains tips and instructions to achieve the best possible results. This photo is a great guide for when you are in the supermarket, but for full ingredient quantities and methods, please scroll down to the detailed recipe card below!
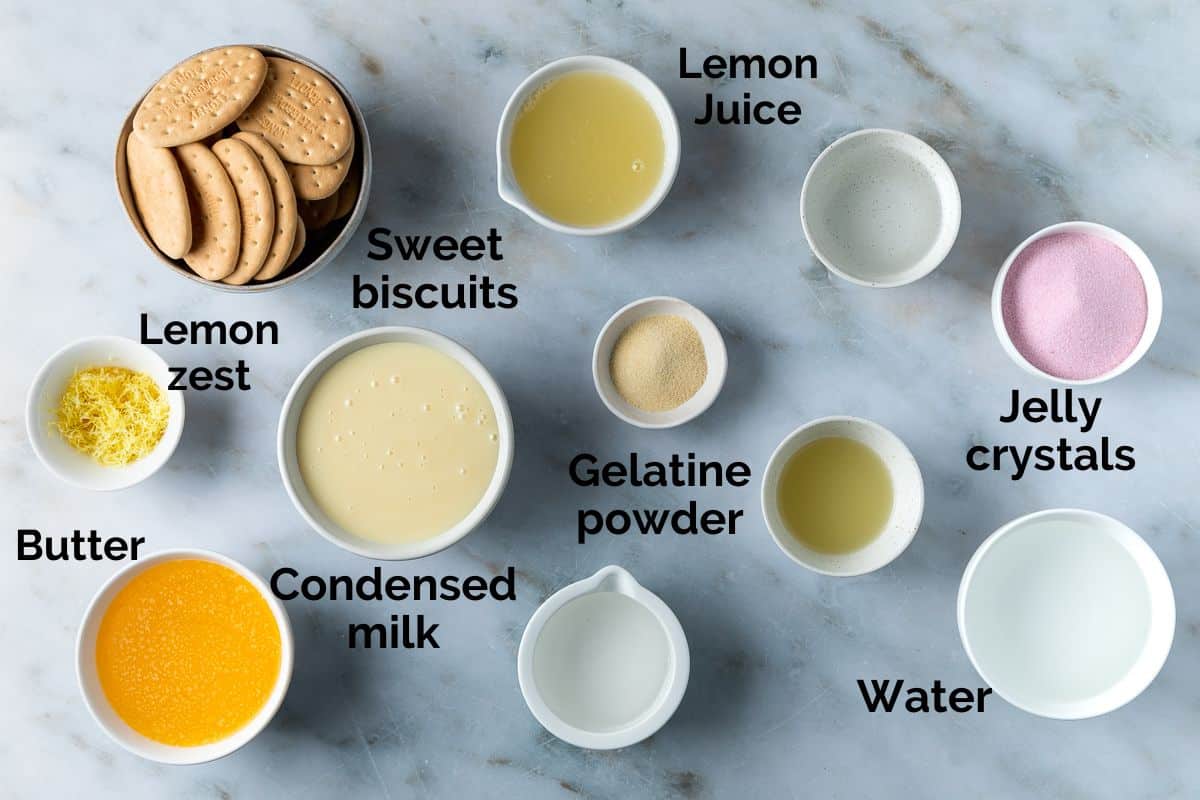
- Biscuits – plain, sweet tea biscuits like Arnott’s Marie or Arrowroot biscuits are crushed to fine crumbs and mixed with butter to form the biscuit base. Crush the biscuits in a food processor or add them to a Ziploc bag and crush them with a rolling pin. Alternatively, Digestive biscuits, Graham Crackers, Scotch Finger or Arnott’s Nice biscuits can be used. Or, use equal quantities of gluten-free biscuits, if required.
- Sweetened condensed milk – cow’s milk that has been cooked down to reduce the water content by about 60%, resulting in a thick, syrupy product that is commonly used in desserts and no-bake slices. You will need a can of full-fat sweetened condensed milk for this recipe. Don’t swap for evaporated milk, or the filling won’t set.
- Butter – is used to bind the biscuit base. Salted or unsalted butter can be used and I recommend using real butter, rather than margarine or butter substitutes.
- Lemon – both the zest and juice are used, so fresh lemons are best. Lemon adds brightness to the condensed milk layer, as well as helping it to set. I recommend Meyer lemons for their sweet flavour and high juice content.
- Jelly crystals – I use raspberry or blackberry flavoured jelly crystals, but you can swap for your favourite flavour or use a colour or flavour to suit the occasion. Don’t follow the packet instructions on the jelly, 100ml less water is used in this recipe than what is stated on the packet instructions. This is so the jelly sets firmly and holds its shape when sliced.
- Powdered gelatine –to set the condensed milk layer. Find it in the baking aisle in supermarkets, or in health food stores. For a vegetarian slice, sub for your preferred setting agent like agar agar. However, the quantities will need to be adapted to suit.
Optional: fresh blackberries or raspberries can be added to the middle layer, before setting. They add lovely bursts of sweet-tart flavour to the creamy lemon filling. Use fresh berries, as frozen berries will bleed juice into the mixture.

Step by step guide
Full ingredient notes and quantities can be found in the detailed recipe card below. But here is a brief overview of what you can expect;
Make the jelly mixture;
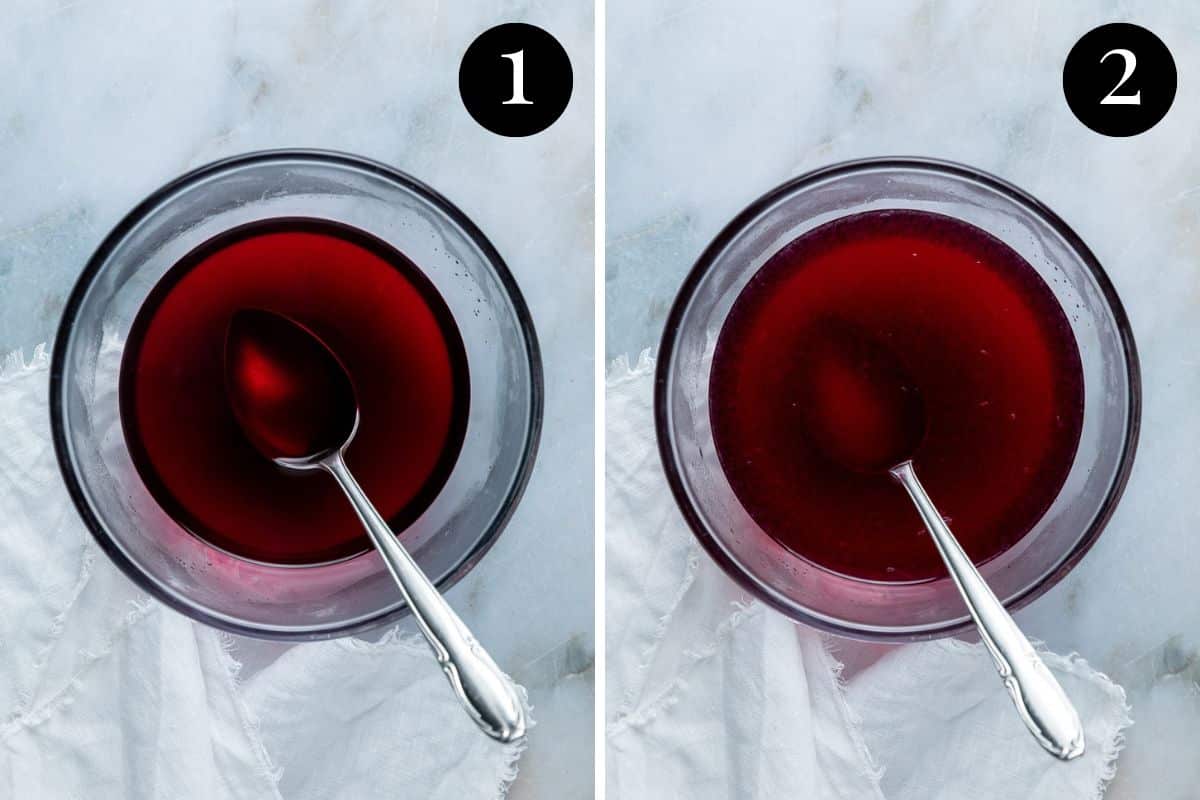
- Dissolve the jelly crystals in boiling water as per the instructions below.
- Add the cold water and lemon juice and stir.
- Set aside at room temperature. Don’t place into the fridge, or the jelly will set prematurely.
Make the biscuit base;
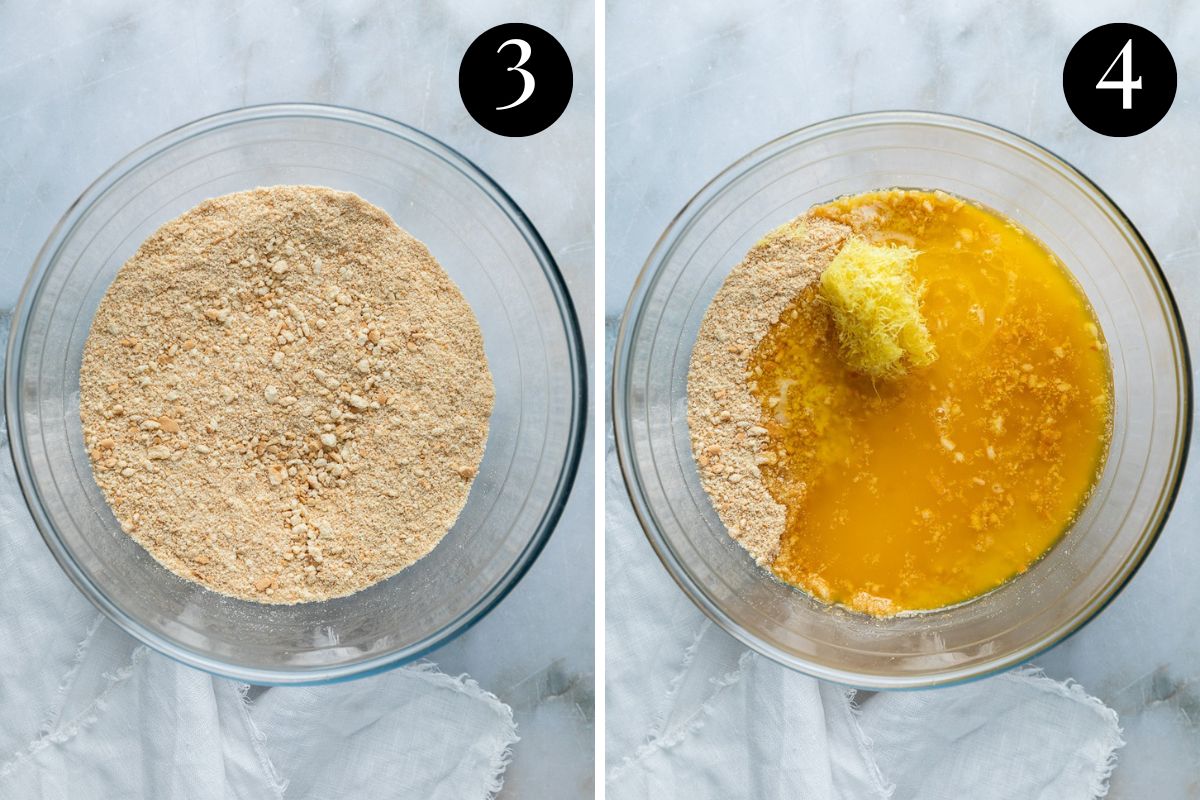
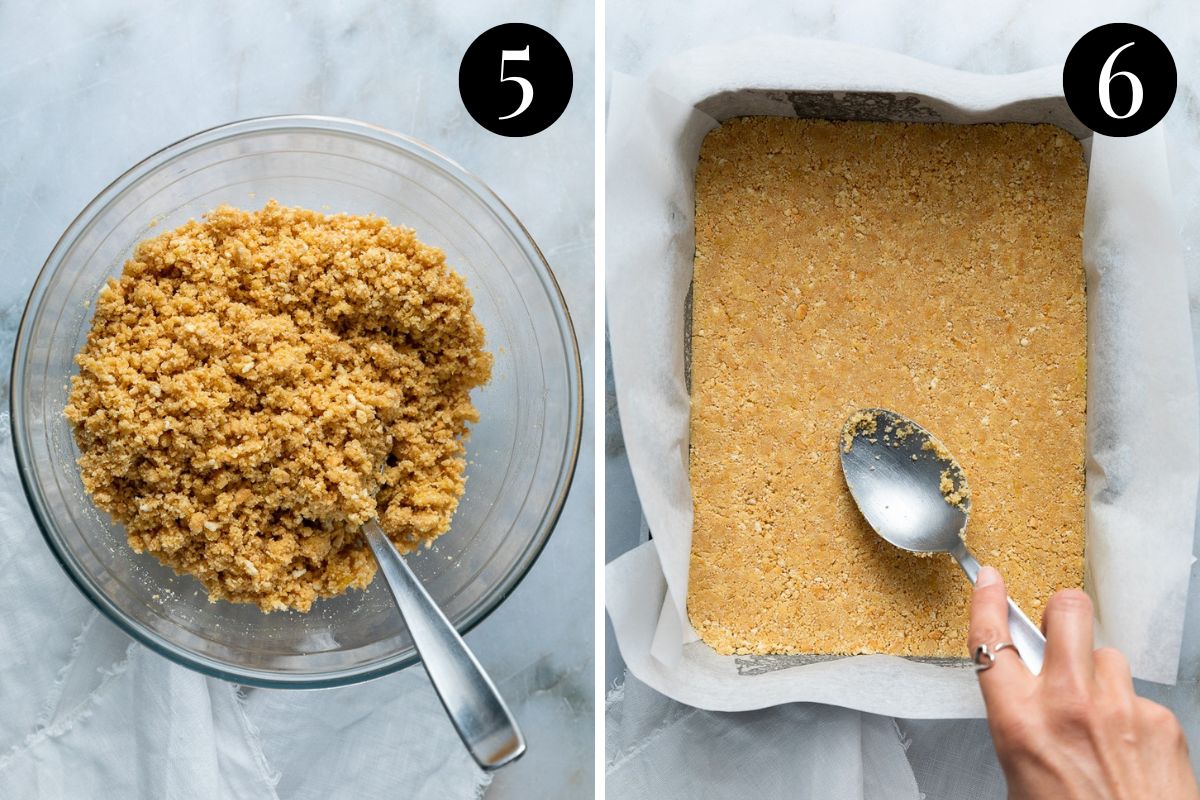
- Mix the crushed biscuits, lemon zest and melted butter and stir to combine.
- Use a metal spoon to press the mixture into a lined 25cm x 18cm (10 x 7 inch) slice tin. Place the base into the freezer to set while you prepare the condensed milk layer.
Make the lemon condensed milk layer;
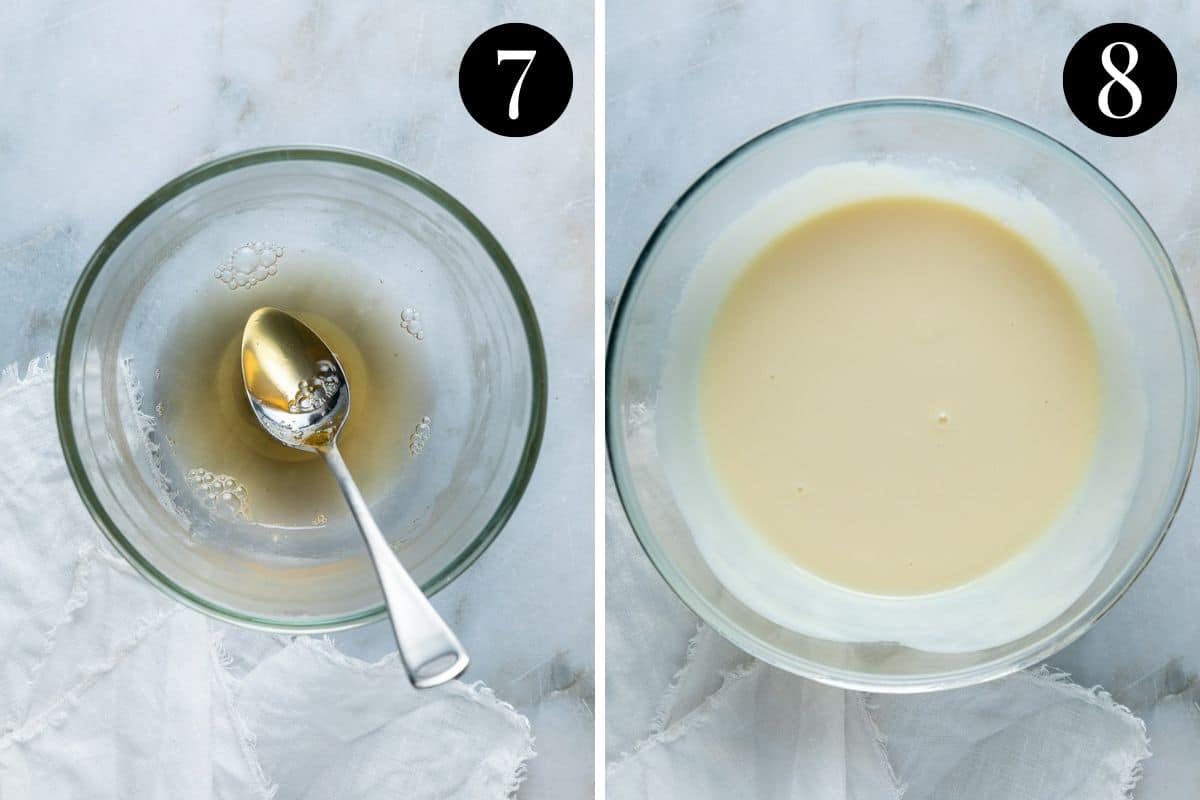
- Dissolve the gelatine in boiling water as per the recipe card below.
- Mix the gelatine with the condensed milk and lemon juice. Whisk until combined and smooth.
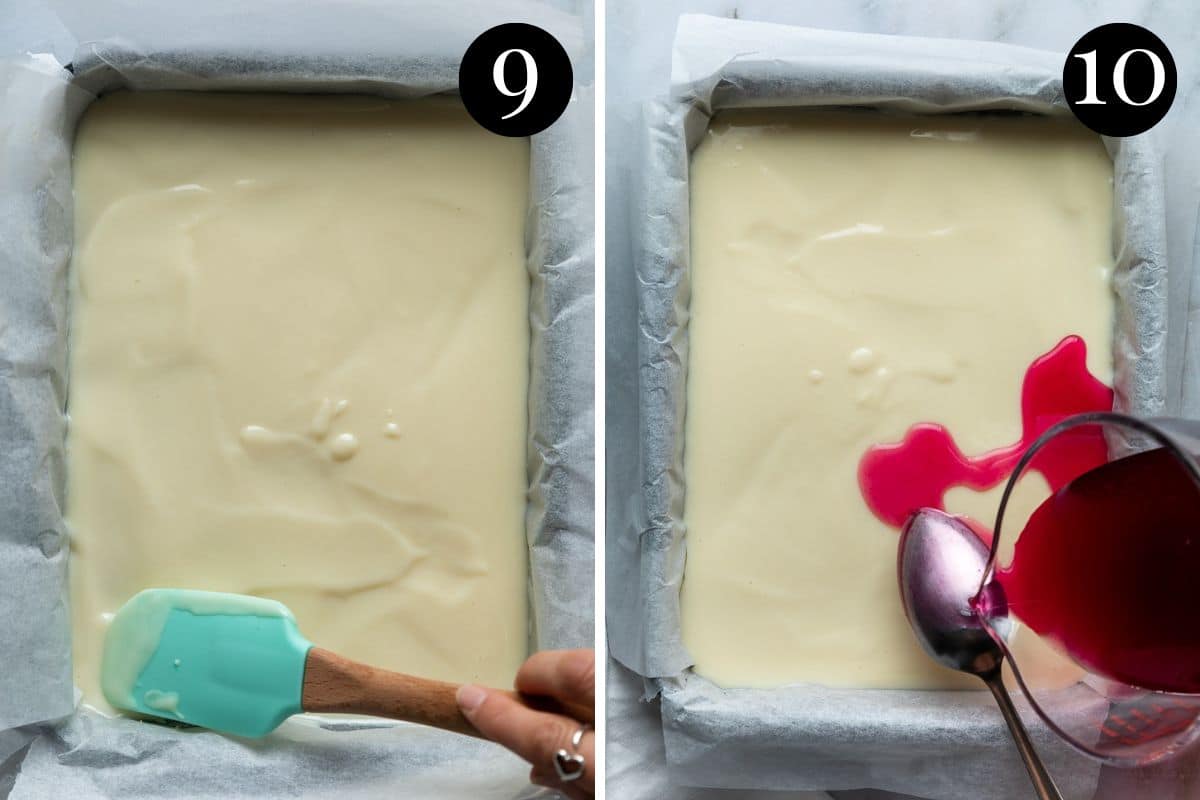
- Pour the condensed milk mixture onto the prepared biscuit base and use a spatula to gently smooth the top. If adding fresh berries, poke them into the filling.
- Set in the fridge for 1-2 hours, until firm.
Add the jelly layer;
- Once the condensed milk layer is firm to touch, slowly pour the prepared jelly mixture over the top, using a spoon to help the jelly spread over the slice without damaging the middle layer.
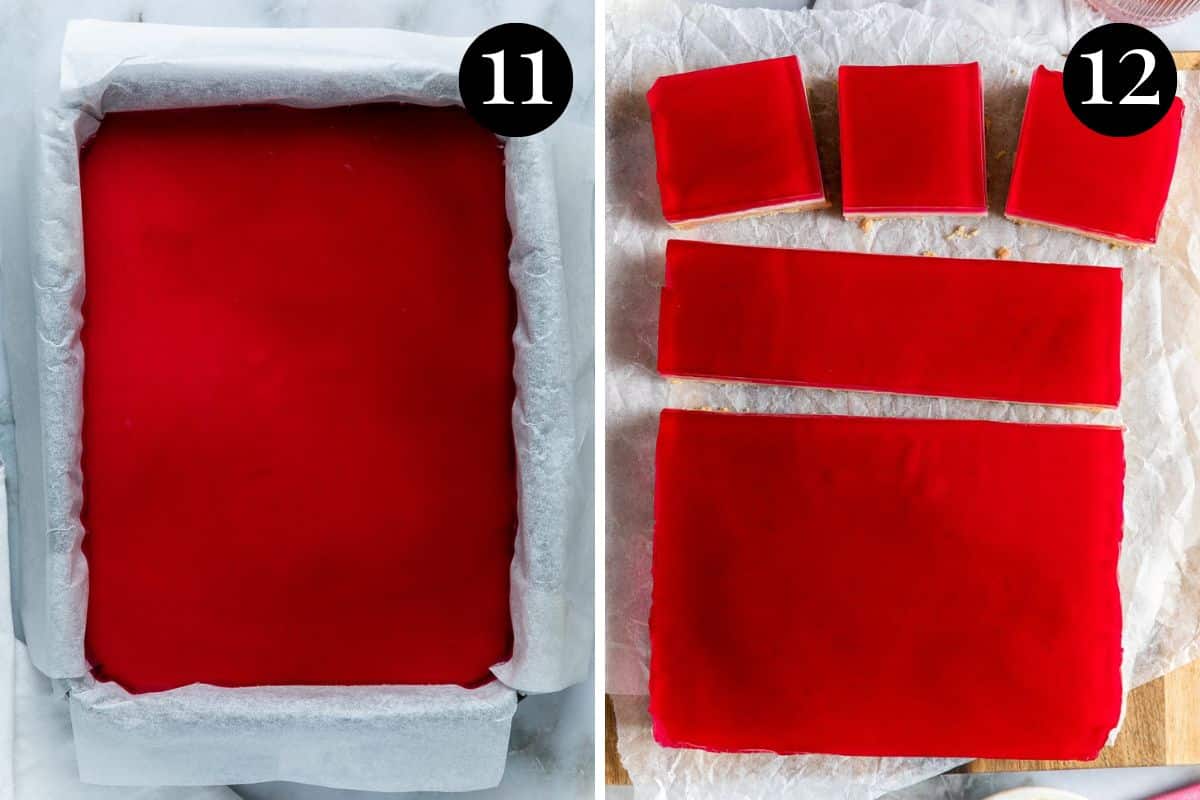
- Chill in the fridge until set (2 hours+).
*The jelly can leave indentations or damage the condensed milk layer if poured from height, without a spoon to break the flow. Hold a spoon close to the slice and pour the jelly onto the spoon, letting it flow over the sides and onto the slice (as per image #10).
Expert tips
- Be sure to line the slice tin with baking paper, so that you can easily remove the slice from the tin after chilling. Leaving the sides of the baking paper a little longer can help you to lift the slice. If it’s stuck, gently run a knife along the sides of the tin first, to loosen.
- Make sure the condensed milk layer is set before adding the jelly to the top. Otherwise, the layers can mix together and the slice won’t be as pretty. (But it’ll still be delicious!).
- Let the slice chill in the fridge for at least 2 hours before slicing and serving, or the layers won’t be completely set. Alternatively, you can make the slice the day before and chill (covered) overnight before slicing.
- For nice, clean slices, use a sharp or serrated knife and wipe the knife between cuts.
- Don’t follow the packet instructions to make the jelly. This recipe uses less water, so that the jelly layer sets firmly and holds its shape when sliced.
- I use a 25cm x 18cm slice tin that is 5cm tall. You can use a slightly smaller or larger tin, but the height of the layers and the setting times may vary.
- To stop the jelly layer from leaking down the sides of the tin and into the biscuit base, make sure that the condensed milk layer is pushed completely to the edges of the tin and fully set before adding the jelly.
FAQs
Jelly slice can be stored in the fridge in an airtight container for 4-5 days, but is best eaten in the first couple of days. It is not suitable for freezing.
Jelly setting times can vary, depending on the fridge temperature, the size of the container used, quantity of jelly and how much water is added. Most jellies will set in 2-4 hours. But in this case, less water is used to mix the jelly crystals and it is spread into a thin layer on the slice; so it should be set and ready to slice in around 2 hours. Make sure it is completely set before slicing.
The biscuit base is set in the fridge before the fillings are added, but if the jelly leaks down the sides of the base, it will work its way under the slice and cause a soggy base. To avoid this, make sure that both the base and the condensed milk layer are spread completely to the sides of the tin and fully set before adding the jelly.
Remove your slice successfully by following these steps. 1. Line your slice tin with baking paper that hangs over the sides of the tin. 2. Once the biscuit layer is fully set, gently loosen it from the bottom of the tin (and then put it back) before adding the condensed milk layer. 3. Once the slice has set, run a knife along the sides of the tin to loosen the edges and gently lift the slice using the sides of the baking paper.
This slice is not suitable for freezing, as the jelly layer will become damaged.
Related recipes


Tried this recipe? Please leave a star ⭐⭐⭐⭐⭐ rating or leave a review below and let you know how you went!
Hungry for more? Subscribe to my newsletter and follow along on Facebook, Instagram and Pinterest for the latest recipes and news.

Jelly Slice
Ingredients
For the jelly layer
- 85 grams raspberry jelly crystals 1 x 85 g packet. Or swap for your favourite flavour.
- 250 ml boiling water
- 125 ml cold water
- 4 tablespoons lemon juice juice from fresh lemon
For the biscuit base
- 250 grams Arnotts Marie biscuits or other plain, sweet biscuits, crushed.
- 200 grams butter
- zest of one lemon
For the middle layer
- 395 grams sweetened condensed milk 1 x 395g can
- ½ cup lemon juice freshly squeezed
- 3 teaspoons gelatine powder
- ⅓ cup boiling water
Optional
- ¾ cup fresh blackberries or raspberries optional, to add to the middle layer
Instructions
For the jelly
- Line a 25cm x 18cm (10 x 7 inch) slice tin with baking paper. Leave some baking paper hanging over the edges, to help remove the slice later.Slightly different sized tins can be used, but setting times and slice layers may vary.
- Place the jelly crystals into a bowl and add the boiling water. Stir until the crystals have dissolved (1-2 minutes).
- Add the cold water and lemon juice and stir. Set the jelly aside (don't refrigerate, we don't want it to set yet) to come to room temperature.
For the biscuit base
- Place the biscuits into a food processor (or place them into a ziploc bag and crush with a rolling pin) to fine crumbs. A few small lumps are ok.
- In a mixing bowl, add the crushed biscuits, melted butter and lemon zest and stir until completely combined.
- Using a metal spoon, firmly press the biscuit mixture into the prepared tin. Place the slice in the freezer for at least 15 minutes to set.
For the condensed milk/middle layer
- Mix the gelatine powder with ⅓ cup boiling water and stir until the gelatine has dissolved (no lumps).
- Combine the condensed milk, lemon juice and gelatine mixture in a bowl and whisk until completely smooth.
- Remove the biscuit base from the freezer and *gently* loosen the base from the bottom of the tin. This step will help you remove the slice from the tin once it has set. Keep the biscuit base in the bottom of the tin.
- Pour the condensed milk layer over the biscuit base and use a spatula to spread the mixture evenly, reaching right to the sides of the tin.
- If adding fresh blackberries or raspberries, spread evenly over the top of the mixture and gently press them down.
- Refrigerate for at least 2 hours, or until the condensed milk layer has firmly set.
Add the jelly
- Once the middle layer has completely set, gently pour the jelly over the top, using a metal spoon to break the flow and avoid indentations in the middle layer.
- Refrigerate for 2-3 hours, or until the layers are completely set.
- To remove the slice from the tin, run a knife along the edges to loosen and then gently lift the baking paper. Place the slice onto a cutting board.
- Cut the slice into pieces and serve cold. Enjoy!
Video
Notes
- Be sure to line the slice tin with baking paper so that you can easily remove the slice from the tin after chilling. Leaving the sides of the baking paper a little longer can help you to lift the slice. If it’s stuck, gently run a knife along the sides of the tin first, to loosen.
- Make sure the condensed milk layer is set before adding the jelly to the top. Otherwise, the layers can mix together and the slice won’t be as pretty. (It’ll still be delicious!).
- Let the slice chill in the fridge for at least 2 hours before slicing and serving, or the layers won’t be completely set. Alternatively, you can make the slice the day before and chill (covered) overnight before slicing.
- For nice, clean slices, use a sharp or serrated knife and wipe the knife between cuts.
- Don’t follow the packet instructions to make the jelly. This recipe uses less water, so that the jelly layer sets firmly and holds its shape when sliced.
- I use a 25cm x 18cm slice tin that is 5cm tall. You can use a slightly smaller or larger tin, but the height of the layers and the setting times may vary.
- To stop the jelly layer from leaking down the sides of the tin and into the biscuit base, make sure that the condensed milk layer is pushed completely to the edges of the tin and fully set before adding the jelly.
- Storage; jelly slice can be stored in the fridge in an airtight container for 4-5 days, but is best eaten in the first couple of days. It is not suitable for freezing.
- Please note that the nutrition information is based on the slice being divided into 12 pieces, with one piece being one serve. The nutritional information is an estimate only and does not take into account any additional toppings or sides served with the slice.
- This recipe is made using Australian metric cups and spoon measurements. Any reference to cups or spoons in this recipe is in Australian metric. Due to cup sizes varying from country to country, I advise adjusting if necessary.
Nutrition
Are you following us on Facebook, Instagram and Pinterest?
Update Notes: This recipe was originally published in November 2021, but was re-published with new information and photos in April 2024.


Sabrina Poon says
Fail proof recipe. Took it to an office morning tea and it loooks so sophisticated but it’s so easy to make! And the lemon juice balanced it perfectly, making it just the right amount of sweetness.
Andrea Geddes says
Hi Sabrina! I’m so happy to hear that you enjoyed this slice. It’s such a lovely one! I love the kick of the lemon juice too. Thanks for taking the time to leave a comment and let me know! Andrea 🙂