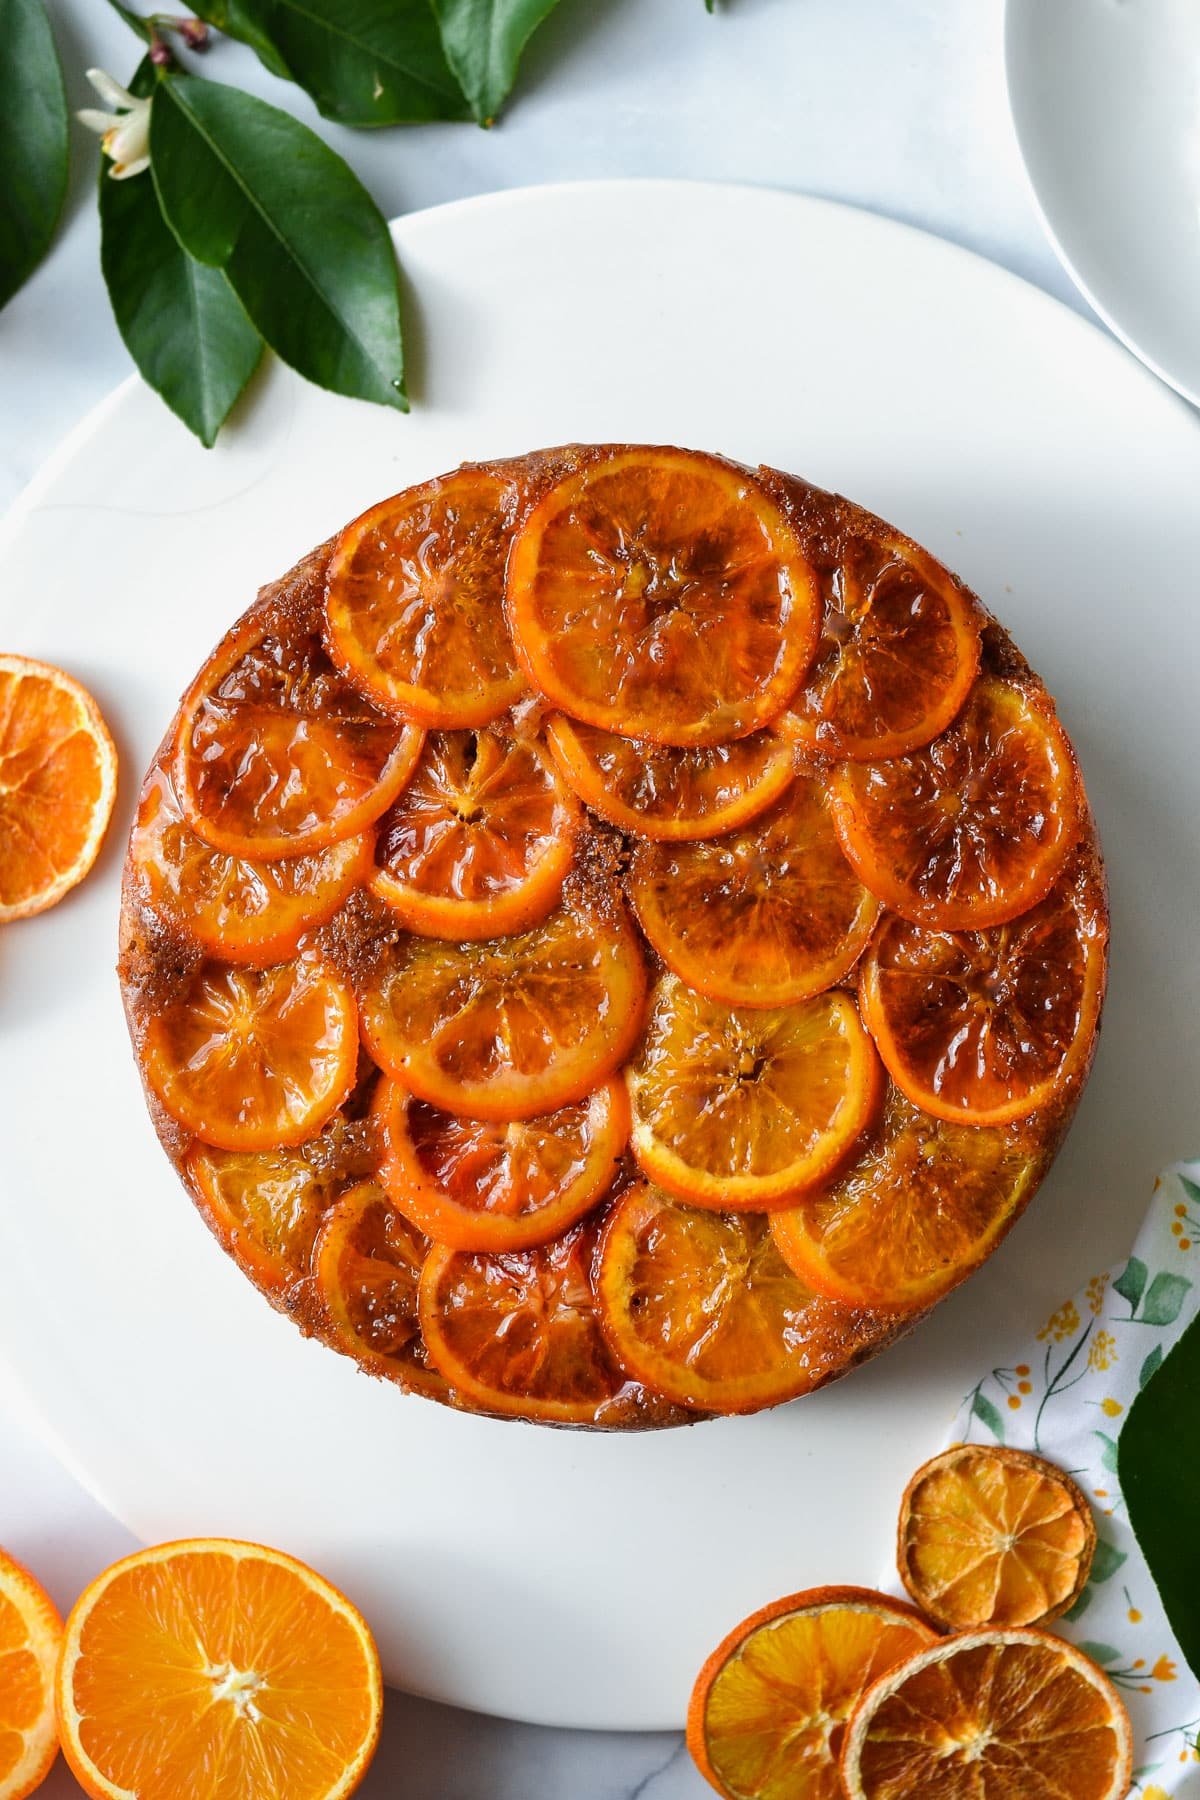
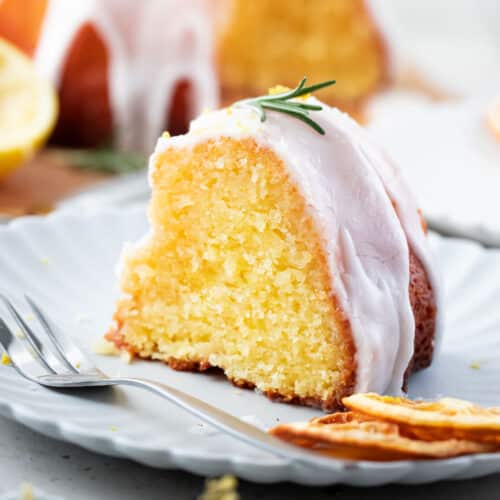
This is the best orange syrup cake you’ll ever try! Made with real orange zest and juice, it is packed full of citrus flavour with a buttery, tender crumb. It’s also ultra-moist and wonderfully zesty, thanks to a drizzle of simple orange syrup. Served warm with a dollop of cream, it will be love at first bite!
Why you’ll love this recipe
- Easy to make – with simple, everyday ingredients.
- Bursting with orange flavour.
- It’s garnished with vibrant, colourful orange slices, making it an impressive, show-stopping dessert with minimal effort.
- Stays moist for days.
- Perfect for any occasion – serve it for Easter, morning or afternoon tea, parties, Mothers’ Day or special occasions.
- Oranges are available year-round, so this cake can be enjoyed any time.
Incredibly moist and tender from the sweet orange syrup, this beautiful cake is lovely enjoyed warm with a dollop of cream.
Ingredients you will need
** This post contains tips and instructions to achieve the best possible results. This photo is a great guide for when you are in the supermarket, but for full ingredient quantities and methods, please scroll down to the detailed recipe card below!
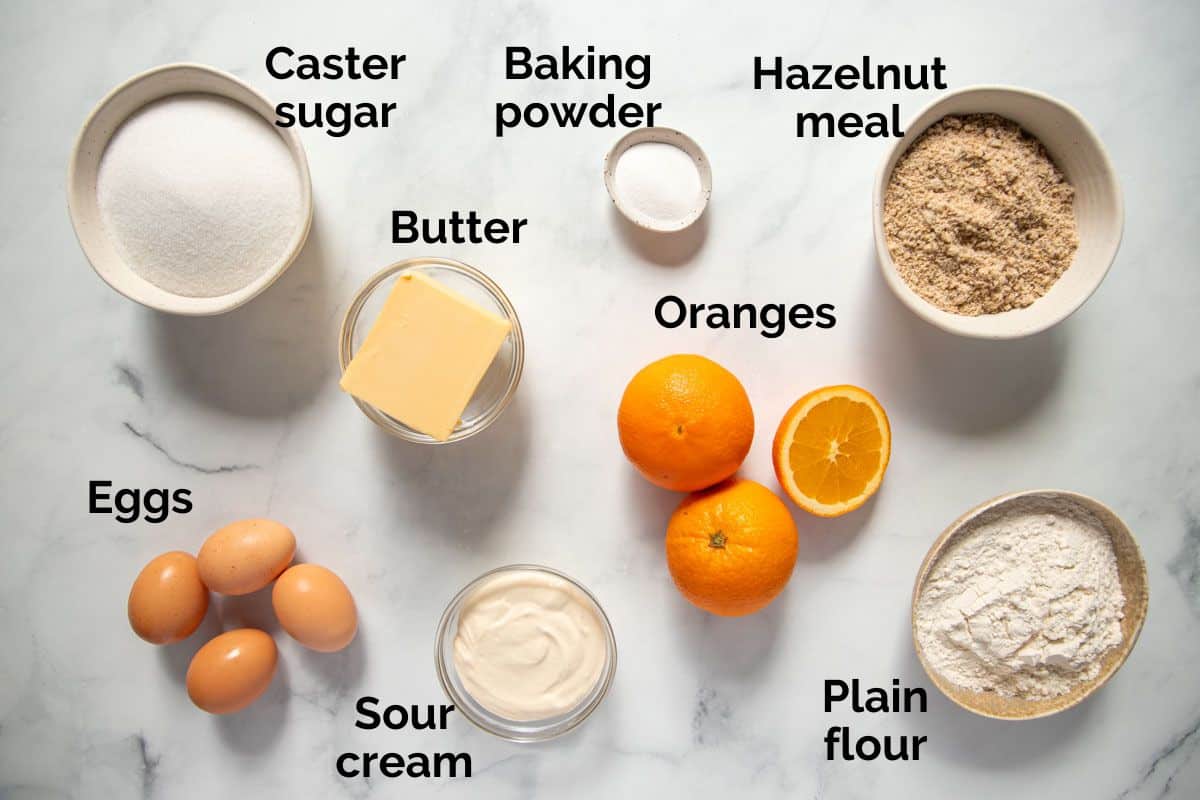
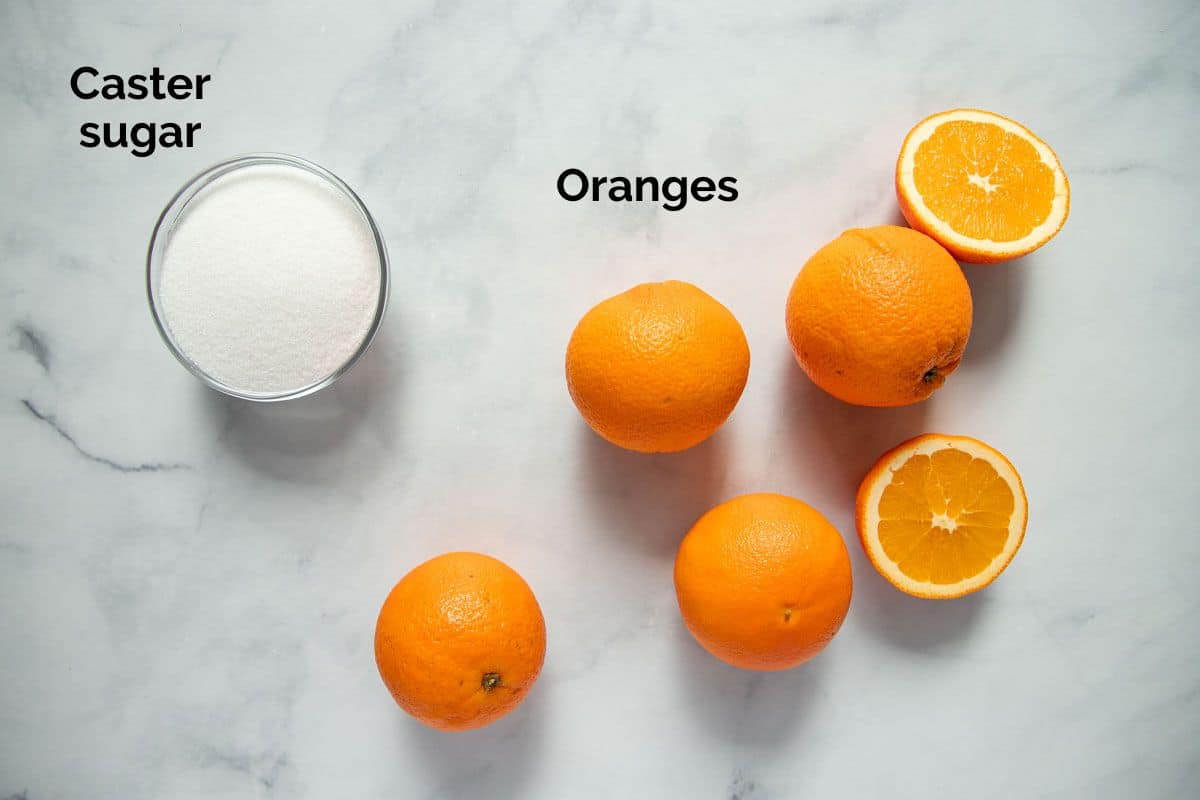
- Oranges – any type of fresh oranges can be used in this recipe, so choose your favourite or whatever is in season. Blood oranges, Navel oranges or Valencia are great options. Choose freshly picked oranges with firm, bright peel. Both the zest and juice of the oranges are used, as well as thin slices of orange for the topping. A seedless variety is recommended (but not essential), as nobody wants to bite into a seed!
- Hazelnut meal – also called hazelnut flour, hazelnut meal is made by grounding whole, raw hazelnuts. In this recipe, it gives the cake an incredibly tender, soft crumb and the sweet and earthy flavour pairs beautifully with the oranges. Hazelnut meal can be found in most supermarkets and specialty stores or you can make your own. It can be swapped for equal quantities of almond meal, if preferred.
- Caster sugar – also called superfine sugar, caster sugar sweetens and tenderises the cake and forms the base of the simple orange syrup.
- Eggs – 4 whole eggs provide structure, moisture and richness. They should be at room temperature before use, so they easily incorporate into the batter.
- Butter – unsalted butter, softened at room temperature. Use real butter rather than margarine or butter substitutes, for maximum richness and to enhance the flavours of the cake. You’ll need a little extra to grease the cake tin too.
- Sour cream – using sour cream ensures the cake is super-moist. Use regular, full-fat sour cream for best results.

Step by step guide
Full ingredient notes and quantities can be found in the detailed recipe card below. But here is a brief overview of what you can expect;
Grease a 20 cm (8 inch) cake tin and line the bottom and at least 1-2 cm of the sides with baking paper.
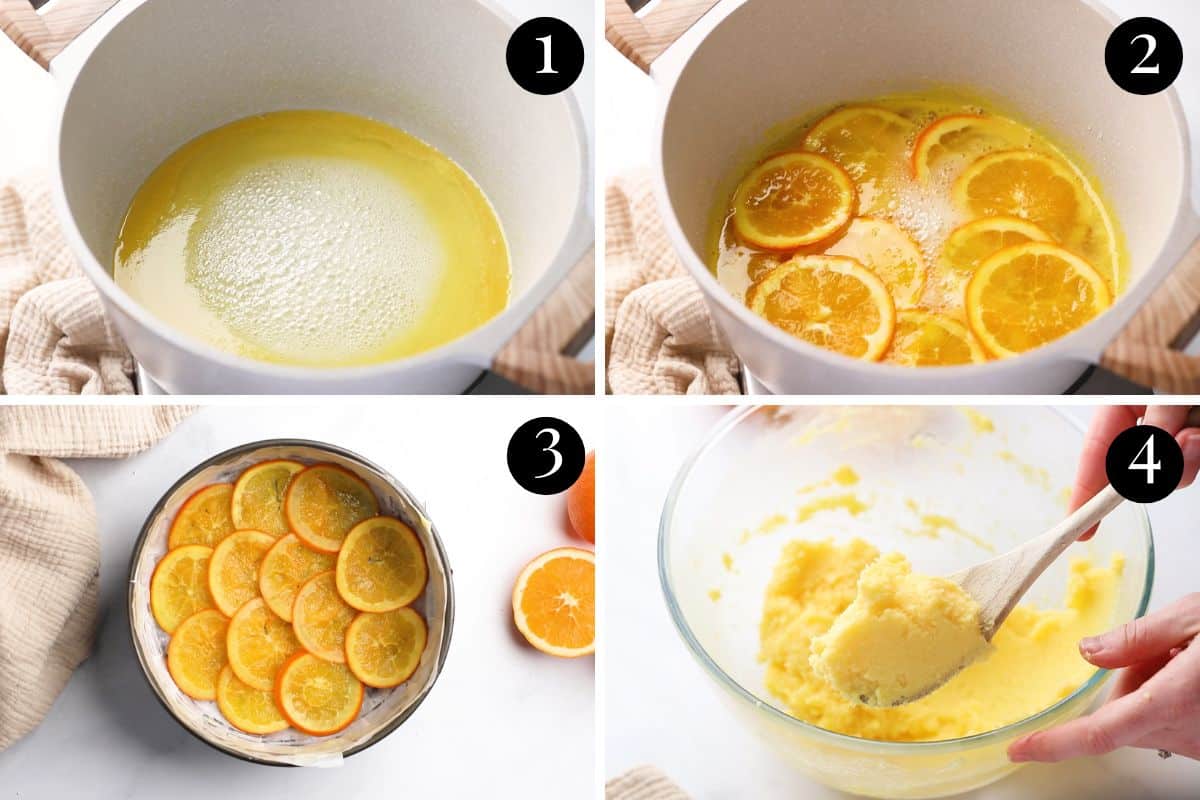
Step 1 – Make the orange syrup;
Add the orange juice and caster sugar to a large pot and bring to a low simmer until the sugar has dissolved.
Add the orange slices and simmer until soft (image 2).
Gently remove the orange slices from the syrup and lightly tap any excess syrup from the slices. Set aside the orange syrup to use later.
Arrange the orange slices in a single layer along the bottom of the cake tin, with the edges slightly overlapping (image 3).
Tip: shake as much syrup as possible from the orange slices before arranging them in the tin. Excess syrup can burn at the bottom of the tin.
Step 2 – Make the orange cake;
Use a wooden spoon to cream the butter, caster sugar and orange zest together in a bowl until pale and fluffy.
Alternatively, handheld electric beaters can be used.
Beat in the eggs, one at a time, until combined.
In a small bowl, whisk the flour, hazelnut meal and baking powder together until combined.
Fold in half of the flour mixture, reserving the other half, until just combined (image 8).
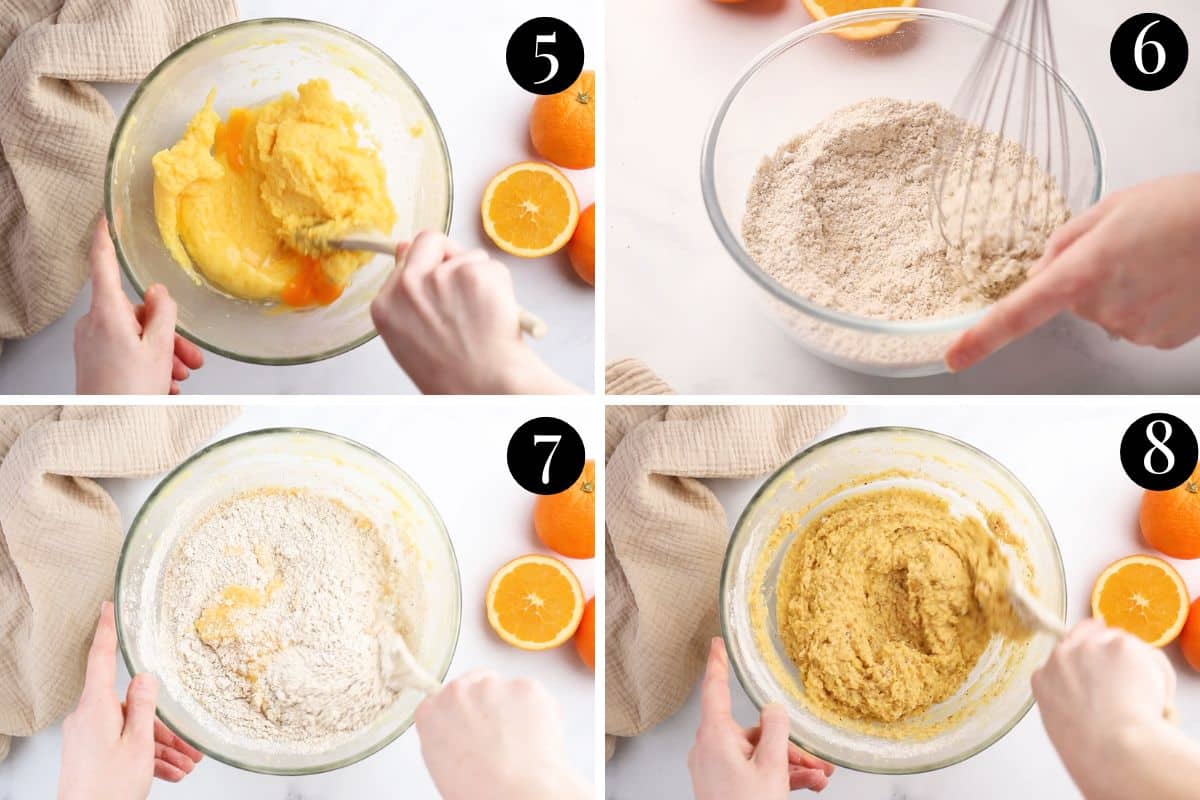
Stir in the orange juice and sour cream until combined (image 9).
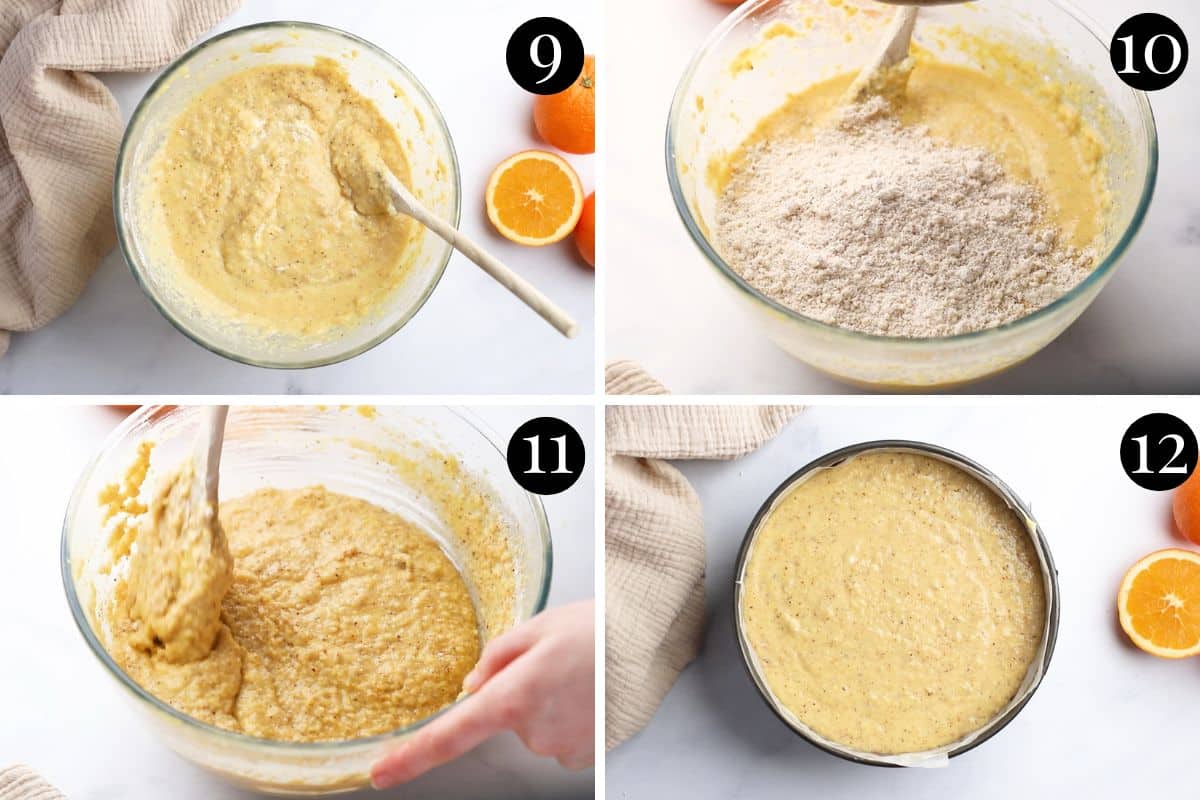
Add the remaining flour mixture and fold until just combined (image 11).
Gently pour the cake batter into the tin, on top of the arranged orange slices.
Step 3 – Bake;
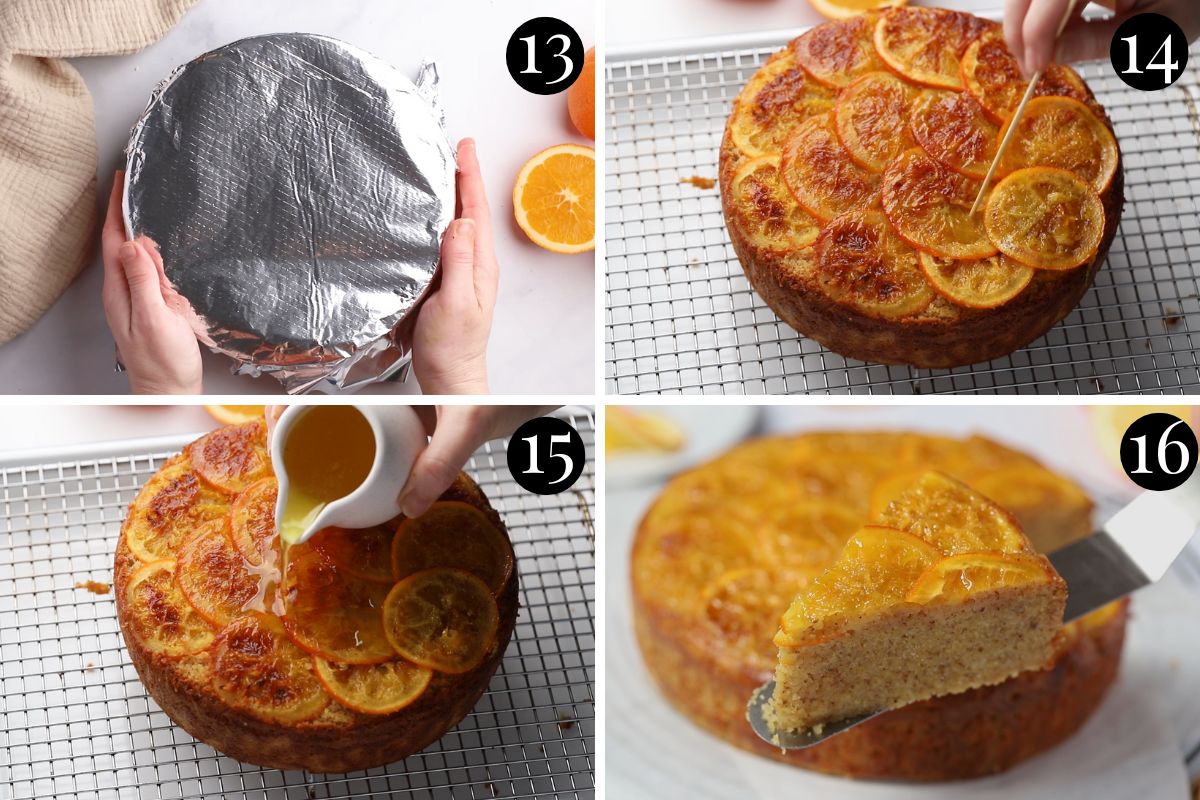
Cover the top of the cake tin with foil. Bake until the cake is fluffy and springs back in the middle when lightly pressed (full cooking times in recipe card below).
Step 4 – Drizzle with orange syrup;
Place a wire cooling rack above a large tray. The tray will catch the excess orange syrup so it doesn’t run all over your bench.
Gently turn the finished cake out onto the cooling rack (orange slices facing up).
Use a wooden skewer to poke holes into the top of the cake, being careful not to dislodge the orange slices (image 14).
Carefully pour the reserved orange syrup over the top of the cake while it is still warm.
The syrup soaks into the top of the cake through the little holes, making it even more moist and flavourful.
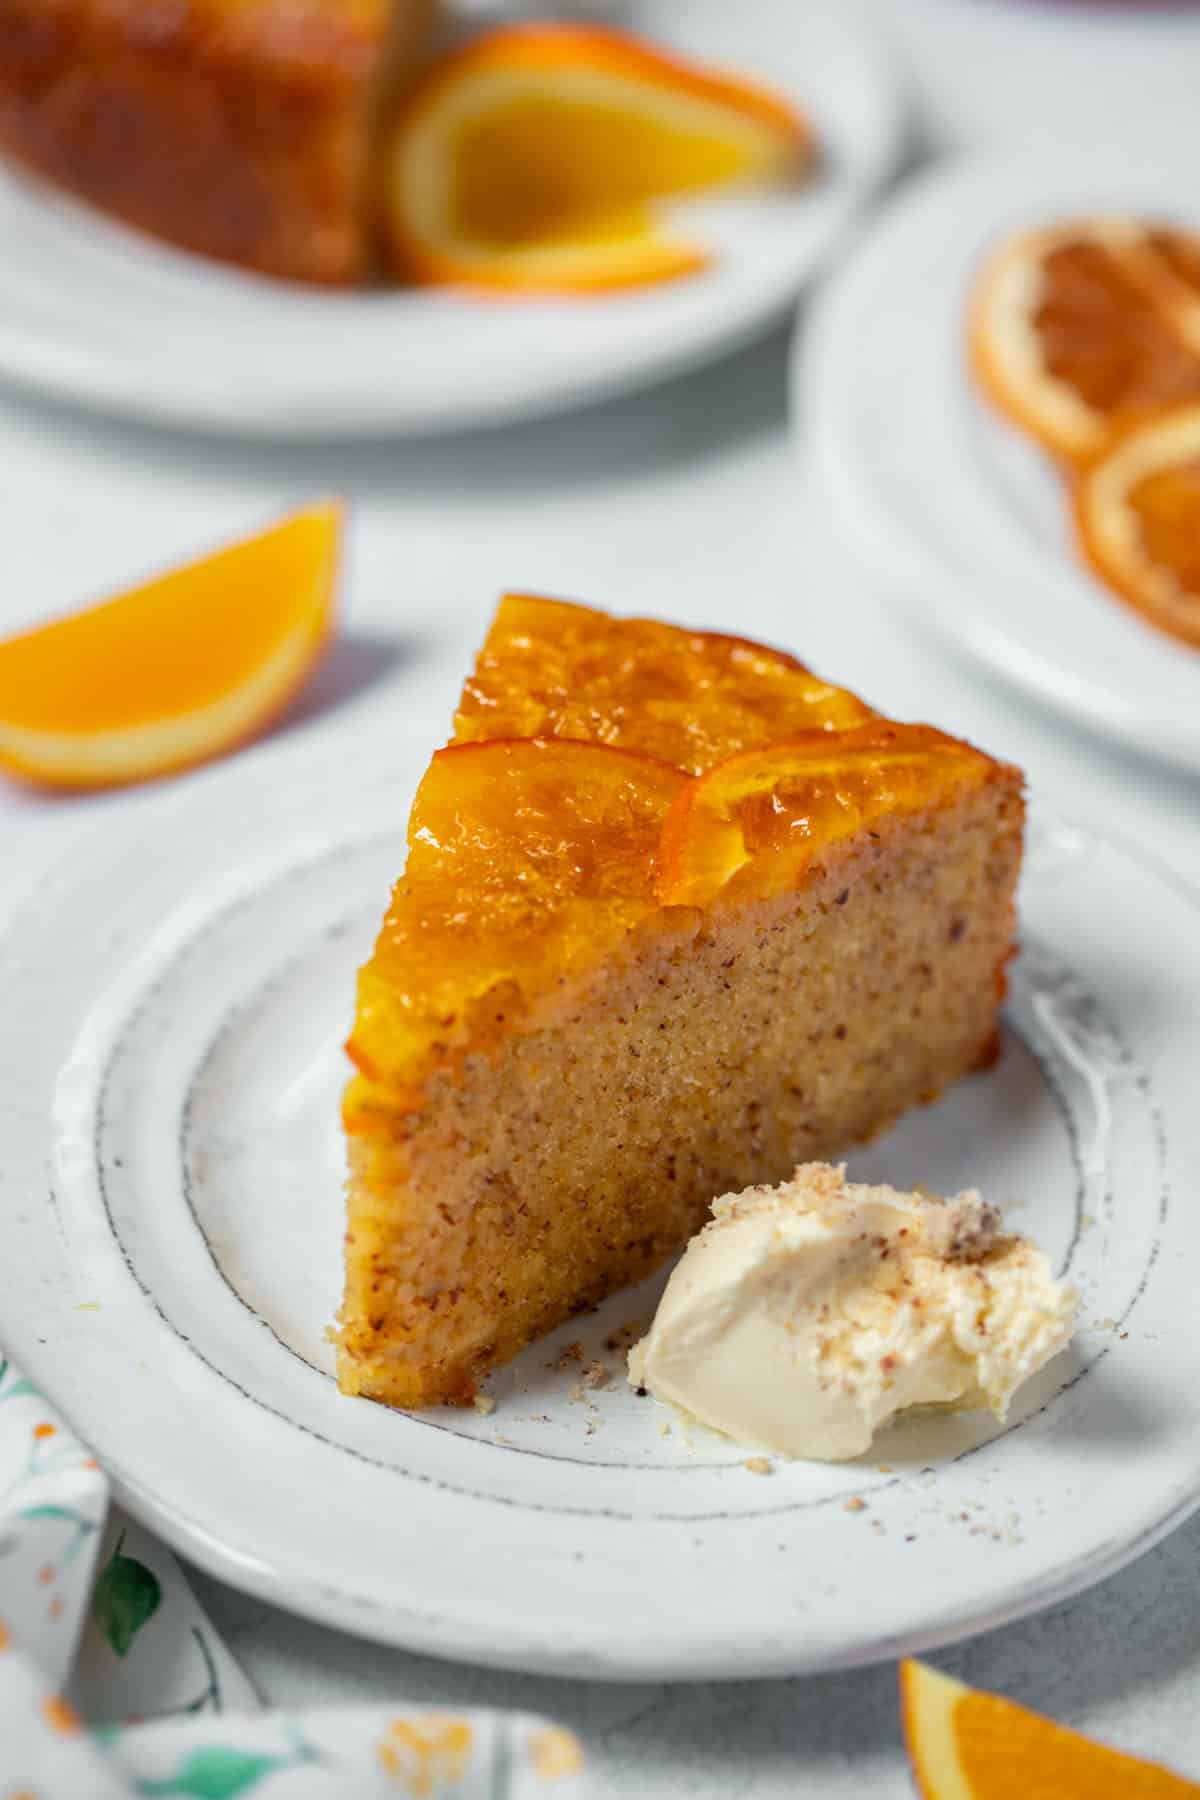
Slice and serve with a dollop of whipped cream, mascarpone or natural yoghurt.
Expert tips
- Make sure your ingredients are at room temperature. This will help them incorporate into the batter more easily and ensure the batter is smooth, with no lumps.
- For accuracy, weigh your ingredients using a baking or kitchen scale. The measurements need to be precise to ensure you end up with a perfectly tender and moist cake. Too much flour will result in a dry, dense cake.
- Don’t overmix the cake batter. Gently fold in the dry ingredients until just combined. Overmixing can result in a dry or rubbery cake.
- Line the cake tin with baking paper. Don’t skip this step. Baking paper must be used to line the tin, or the sliced oranges will stick to the bottom of the tin and become burnt and bitter. Use a single layer of baking paper, cut to fit the bottom of the tin and run slightly up the sides.
- I recommend leaving the peel on the orange slices used to decorate the cake. Leaving the peel on provides extra orange flavour and adds to the overall presentation, but you can remove the peel if you prefer.
- Gently tap the excess syrup from the orange slices, before adding them to the cake tin. Excess syrup can burn at the bottom of the tin as the cake bakes.
- This cake is best eaten when warm. It can be sliced and eaten straight after being soaked in the orange syrup. If the cake has cooled by the time you want to eat it, warm individual pieces in the microwave for 20-30 seconds.
- Serve it with a big dollop of double cream, mascarpone, crème fraiche or unsweetened natural yoghurt.
FAQs
This cake will freeze well for up to 3 months. Once the cake has cooled completely, wrap it in a double layer of clingfilm, or cut it and wrap the slices individually. Freeze in an airtight container for up to 3 months and thaw at room temperature when ready to eat. To serve, microwave individual slices until warm.
This cake is best eaten fresh, in the first day or two of being made. However, it will keep well in an airtight container in a cool place for 4-5 days. If your house is hot or humid, keep the cake in the fridge but re-warm the slices or allow them to return to room temperature before serving.
Although oranges work perfectly here, you can also swap oranges for whatever citrus fruits you have. Grapefruits, pomelos or oranges all work in this recipe. Adjust the sugar in the syrup for more sour fruit, if necessary.
Related recipes


Tried this recipe? Please leave a star ⭐⭐⭐⭐⭐ rating or leave a review below and let me know how you went!
Hungry for more? Subscribe to my newsletter and follow along on Facebook, Instagram and Pinterest for the latest recipes and news.

Orange Syrup Cake
Ingredients
Orange sugar syrup
- ¾ cups caster sugar 170 grams
- ⅓ cup orange juice (juice from 1-2 oranges)
- 2-3 medium oranges thinly sliced into circles (leave the peel on)
Orange cake
- 1 cup butter (250 grams), softened at room temperature
- 1 ½ cups caster sugar 325g
- zest of two oranges
- 4 whole eggs large, room temperature
- 1 cup hazelnut meal 125g (hazelnut flour).
- 1 cup plain flour 140g (all purpose flour)
- 1 ½ teaspoons baking powder
- ¾ cup orange juice approximately 3 oranges
- ½ cup sour cream
Instructions
- Pre-heat oven to 160 °C/320F (fan forced). Grease a 20cm (8") round cake tin with butter and line the bottom of the tin with baking/parchment paper, with the paper also folded at least 1-2cm up the sides.
For the orange sugar syrup
- Place the caster sugar and orange juice into a large saucepan and cook over low-medium heat. Bring to a slow simmer, stirring occasionally, until the sugar has dissolved (1-2 minutes).
- Carefully place the orange slices into the hot syrup and simmer gently for 3-4 minutes, until the orange slices have softened slightly.
- Remove the pan from the heat and carefully remove the orange slices using a fork, one at a time. Gently tap the slices on the edge of the pan to remove any excess syrup. Arrange the orange slices evenly along the bottom of the lined cake tin, on top of the baking paper. Reserve the orange syrup for later.
For the orange cake
- Place the softened butter, caster sugar and orange zest into a large mixing bowl and beat with a wooden spoon until pale and creamy (2-3 minutes). (Electric handheld beaters can also be used).
- Add the eggs, one at a time, beating between each addition until completely combined and fluffy.
- In a small bowl, whisk together the hazelnut meal, flour and baking powder until combined.
- Fold in half of the hazelnut mixture to the butter mixture, until just combined.
- Add the orange juice and sour cream and stir until combined.
- Fold in the remaining hazelnut mixture, until just combined.
- Pour the cake mixture into the cake tin, over the top of the sliced oranges.
- Cover the cake tin tightly with foil and bake for 1 hour and 30 minutes, or until the cake is completely cooked through and springs back when gently pressed in the middle. You can test by inserting a wooden skewer into the centre of the cake. If it comes out clean, with a few crumbs, the cake is ready.
- Remove the cake from the oven and carefully run a knife along the edge of the tin to gently loosen the cake. Carefully turn the cake upside down onto a wire rack (orange slices facing up).
- Place a tray underneath the wire rack, to catch any excess orange syrup.
- Using a wooden skewer, poke holes into the top of the cake, about halfway deep. Slowly pour the orange syrup over the top of the warm cake and allow it to soak in to the holes.
To serve
- Cut the cake into slices and serve warm with some sweet whipped cream or mascarpone. Enjoy!
Video
Notes
- Oranges – any type of fresh oranges can be used in this recipe, so choose your favourite or whatever is in season. Blood oranges, Navel oranges or Valencia are great options. Choose freshly picked oranges with firm, bright peel. Both the zest and juice of the oranges are used, as well as thin slices of orange for the topping. A seedless variety is recommended (but not essential), as nobody wants to bite into a seed!
- Hazelnut meal – also called hazelnut flour, hazelnut meal is made by grounding whole, raw hazelnuts. In this recipe, it gives the cake an incredibly tender, soft crumb. The sweet and earthy flavour of the hazelnut meal pairs beautifully with the oranges. Hazelnut meal can be found in most supermarkets and specialty stores or you can make your own. It can be swapped for almond meal, if preferred.
- Make sure your ingredients are at room temperature. This will help them incorporate into the batter more easily and ensure the batter is smooth, with no lumps.
- For accuracy, weigh your ingredients using a baking or kitchen scale. The measurements need to be precise to ensure you end up with a perfectly tender and moist cake. Too much flour will result in a dry, dense cake.
- Don’t overmix the cake batter. Gently fold in the dry ingredients until just Overmixing can result in a dry or rubbery cake.
- Line the cake tin with baking paper. Don’t skip this step. Baking paper must be used to line the tin, or the sliced oranges will stick to the bottom of the tin and become burnt and bitter. Use a single layer of baking paper, cut to fit the bottom of the tin and run slightly up the sides.
- I recommend leaving the peel on the orange slices used to decorate the cake. Leaving the peel on provides extra orange flavour and adds to the overall presentation, but you can remove the peel if you prefer.
- Gently tap the excess syrup from the orange slices, before adding them to the cake tin. Excess syrup can burn at the bottom of the tin as the cake bakes.
- This cake is best eaten when warm. It can be sliced and eaten after being soaked in the orange syrup. If the cake has cooled by the time you want to eat it, warm individual pieces in the microwave for 20-30 seconds.
- Serve it with a big dollop of double cream, mascarpone, crème fraiche or unsweetened natural yoghurt.
- Freezing; This cake will freeze well for up to 3 months. Once the cake has cooled completely, wrap it in a double layer of clingfilm, or cut it and wrap the slices individually. Freeze in an airtight container for up to 3 months and thaw at room temperature when ready to eat. To serve, microwave individual slices until warm.
- Storage; This cake is best eaten fresh, in the first day or two of being made. However, it will keep well in an airtight container in a cool place for 4-5 days. If your house is hot or humid, keep the cake in the fridge but re-warm the slices or allow them to return to room temperature before serving.
- The nutrition information is based on the cake being sliced into 10 pieces, with one piece being one serve. The nutritional information is an estimate only and does not take into account any additional toppings or sides served with the cake.
- This recipe is made using Australian cups and spoon measurements. Due to cup sizes varying from country to country, I advise adjusting if necessary.
Nutrition
Are you following us on Facebook, Instagram and Pinterest?
Update Notes: This recipe was originally published in November 2019, but was re-published with new information and photos in July 2023.


Robyn says
Can I use coconut yoghurt or cream instead of yoghurt
Can I warm the whole cake later
Andrea Geddes says
Hi Robyn,
I haven’t tested the recipe with coconut yoghurt or cream instead of sour cream. Coconut yoghurt should be fine in equal quantities. If you do try it, let me know how it turns out with your substitution! Andrea 🙂
Kimberly says
I made this cake and it was absolutely delicious. Like something from a French pastry shop. The perfect balance of flavours, not too sweet and just the right amount of zingy, fresh orange flavour. Not only did it taste amazing, it looked like something out of a boujie Cafe. Can’t wait to try some of Andrea’s other recipes
Andrea Geddes says
Hi Kimberly! I am SO happy to hear that you loved this cake as much as I do and I really appreciate you taking the time to leave a comment. Thanks so much! Andrea 🙂
Cherie Wallace says
This looks delicious! But if I wanted to make mini loaves, mini bundts, or muffin sized cakes, could I not put the orange slices on the bottom but reserve them to decorate with after the cake is cooked?
Andrea Geddes says
Hi Cherie! Thanks so much, it’s a super-moist and delicious cake. You can certainly make it into mini loaves, I’d still recommend lining the bottom with baking paper and adding the orange slices, they will cook further as the loaves bake and will help to keep everything moist. But you can certainly boil them in the syrup and use them at the end if you prefer. I haven’t tried it this way, so let me know how it goes! And however you make the cake, I hope you enjoy it! Andrea 🙂
Christine best says
I have just cooked cake for serving tomorrow lunchtime. I think I would leave putting the liquid through till tomorrow morning, as it might be too soggy, your thoughts please.
Andrea Geddes says
Hi Christine! I recommend still pouring the syrup over the cake while it’s hot so that it soaks into the top properly. I usually have leftovers for a day or two and the cake is still yummy and not soggy (just lovely and moist). You can still pour it over tomorrow if you prefer though (I recommend adding hot syrup). Either way, enjoy! Andrea 🙂
Jo says
Can I use 2 cups of almond meal instead of a mix with plain flour?
Andrea Geddes says
Hi Jo! I have only tested and made this recipe with the flour and almond meal combination, so I am not sure how it would turn out. However, I imagine it would still work- although the texture and lift will be different. If you do try it, please let me know how you go! Andrea 🙂
Shilpi & Etienne says
Hazelnut and Orange sounds like a lovely combo! Definitely a recipe we would like to try! Thanks for sharing step by step instructions with pictures, these are really helpful!
Andrea Geddes says
Hello! I’m so glad you found this post helpful and I hope you love the cake! It’s one of my favourites. Thanks for taking the time to comment. Andrea 🙂
Lexy says
Looks delicious. Can I use yoghurt instead of sour cream and is this recipe available in grams. Can’t wait to try this recipe in a few days time!
Andrea Geddes says
Hi Lexy! Yes, you could use Greek yoghurt instead of sour cream, if you prefer. I haven’t translated the recipe to grams, but I use Australian cups and spoon measurements which can be converted to grams if you prefer to cook that way. I hope you love it, thanks for trying! Andrea.
Sylvie says
What a stunning and delicious looking cake – I love the combination of orange and hazelnut! I must try it now that oranges are in season!
Andrea Geddes says
Hi Sylvie! Orange and hazelnut work so beautifully together. I hope you enjoy it! Thank you! Andrea 🙂